All posts by Don Matteo

lebt in Zürich, ist System Engineer MCP bei A-Enterprise GmbH. Mitglied des UNBLOG Network. Author und Blogger zu den Themen, Linux und Open Source. Tutorials für Windows, VMware, Synology, Fortinet.

Set-Clipboard, Get-Clipboard in PowerShell, How to use

How to use Set-Clipboard and Get-Clipboard in PowerShell

PowerShell provide a cmdlet for use the clipboard, advanced applications are allowed, from PowerShell save multible items to the clipboard to use later, it is possible to append content to already pasted items in the clipboard.

Use Set-Clipboard in PowerShell

Use the PowerShell cmdlet Set-Clipboard to copy a text to the clipboard.

Set-Clipboard "but this to clipboard.."

Use Get-Clipboard in PowerShell

Use the text you just copied can be retrieved with Get-Clipboard.

Get-Clipboard

Use Set-Clipboard with -Append copy a text to the existing one.

Write-Output "append something to" | Set-Clipboard -Append
Get-Clipboard

This the query again with Get-Clipboard.

Delete clipboard content

The following command deletes the contents on the clipboard.

Write-Host "delete items in clipboard.." $null | clip

Retrieve files and folders from Clipboard

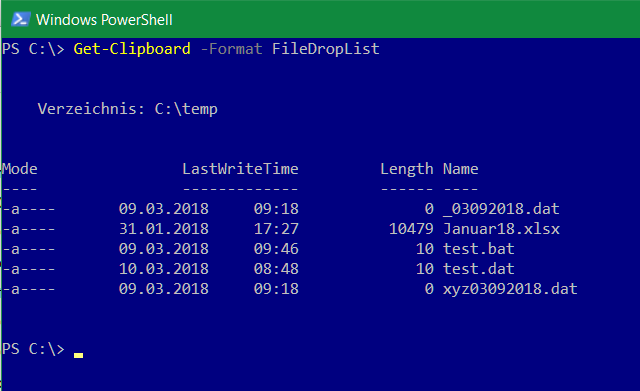
And there is even more to go, if you want to retrieve files and folders that are to be copied from the clipboard, the following command gives the output.

Get-Clipboard -Format FileDropList

It is also useful to copy the text content of files directly without opening the file to clipboard, such as scripts or source code.

Use Get-Content with clipboard

Get-Content copies the content of test.bat to the clipboard.

Get-Content test.bat | clip

Compare-Object compares the content and copies it to the clipboard.

Compare-Object $(Get-Content c:\temp\test.bat) $(Get-Content c:\temp\test1.bat) | clip

The default of Compare-Object is not case sensitive, use the parameter -CaseSensitive to distinguish small and capital letters.

Help with examples for use can be found with Get-Help.

Get-Help Set Clipboard -Detailed
Get-Help Get Clipboard -Detailed

Remarks

Commonly, in Windows the text or content is copied to the clipboard by pressing the “CTRL+C” shortcut key. However, in PowerShell, the text can also be copied to the clipboard using the “Set-Clipboard” cmdlet. This cmdlet sets the content to the clipboard. Moreover, the copied cmdlets can be pasted too in PowerShell using the “Get-Clipboard” cmdlet.

The following post will elaborate on the method to copy the content to the clipboard.
Using PowerShell Copy to Clipboard Function

As described earlier, the copy to clipboard function in PowerShell sets the text or content to the clipboard. The command used for that purpose is the “Set-Clipboard”. Examples explaining the procedure to copy the text to the clipboard are explained.

CWMP ACS TR-69 Provisioning DHCP Option

CWMP ACS TR-69 Provisioning

Technical Report 069 (TR-069) is a technical specification of the Broadband Forum that defines an application layer protocol for remote management of customer-premises equipment (CPE) connected to an Internet Protocol (IP) network. TR-069 uses the CPE WAN Management Protocol (CWMP) which provides support functions for auto-configuration, software or firmware image management, software module management, status and performance managements, and diagnostics..

The TR-069 protocol allows DHCP servers to send one or more vendor-specific parameters to the client router. A CWMP configuration requires the following parameters for the URL to the auto-configuration server (ACS) for provisioning via ISC-DHCPD:

subnet 192.168.0.0 netmask 255.255.255.0
        option routers 192.168.0.1;
        range 192.168.0.100 192.168.0.111;
        append dhcp-parameter-request-list 43;
        option vendor-encapsulated-options 01:12:68:74:74:70:3a:2f:2f:61:63:73:2e:69:73:70:2e:6f:72:67;
}

Example ACS URL https://acs.isp.org

The option vendor-encapsulated-options must be specified as an encoded sequence of identical syntax with code, length and value field to the DHCP option.

The code for this option is 43 and its minimum length is 1.
Code Len Vendor-specific information
+-----+-----+-----+-----+---
|  43 |  n |  i1 |  i2 | ...
+-----+-----+-----+-----+---

When encapsulated vendor-specific extensions are used, the
information bytes 1-n have the following format:

Code Len Data item Code Len Data item Code
+-----+-----+-----+-----+-----+-----+-----+-----+-----+-----+-----+
|  T1 |  n |  d1 |  d2 | ... |  T2 |  n |  D1 |  D2 | ... | ... |
+-----+-----+-----+-----+-----+-----+-----+-----+-----+-----+-----+

Section: IETF rfc2132 – DHCP Options and BOOTP Vendor Extensions

url2hex

For the conversion is the following bash script, which can run as follows ./url2hex https://acs.isp.org

#!/bin/bash
if [[ -z $1 ]]; then
  echo "Argument missing! Use: url2hex url"
  exit 1
fi
echo ""
echo -e "[[[ URL2HEX Converter ]]]\nTR-069 CWMP request ACS URL provisioning on ISC-DHCPD option vendor-encapsulated-options"
echo "URL:$1"
wcount=`echo $1 | wc -m`
tcount=`echo ${wcount}-1 | bc`
length=`printf '%x\n' ${tcount}`
hexurl=`echo -n $1 | xxd -ps | sed 's/[[:xdigit:]]\{2\}/\:&/g'`
echo -e "URL-length:${tcount} HEX:${length}\n\nvalues for CWMP provisioning in dhcpd.conf:\n"
echo "append dhcp-parameter-request-list 43;"
echo "option vendor-encapsulated-options 01:${length}${hexurl};"

Save the code lines to a file url2hex and make them executable.

$ chmod u+x url2hex

The string input is converted to HEX, after which the values are hung together, starting from 0x01 for the value of the CWMP option to ACS URL.

The output can then look like this:

[[[ URL2HEX Converter ]]]
TR-069 CWMP request ACS URL provisioning on ISC-DHCPD option vendor-encapsulated-options
URL:https://acs.isp.org
URL-length:19 HEX:13

values for CWMP provisioning in dhcpd.conf:

append dhcp-parameter-request-list 43;
option vendor-encapsulated-options 01:13:68:74:74:70:73:3a:2f:2f:61:63:73:2e:69:73:70:2e:6f:72:67;

The last two rows can be added in dhcpd.conf.

References

TR-069 Boadband Forum, art. “3.1 ACS Discovery”
RFC2132 – DHCP Options and BOOTP Vendor Extensions, art. “8.4. Vendor Specific Information”.