All posts by neutrinus

Beat Caveng, Developer bei A-Enterprise GmbH. Blog Author zu den Themen, Python und Open Source. Tutorials zu Python Problemlösungen und Shell Scripts.

Disable FortiGate SSL Inspection

FortiGate SSL inspection is the process of intercepting SSL/TLS encrypted Internet communication between the client and the server. Interception can be performed between the sender and the receiver and vice versa (receiver to sender). It is the same technique used in man-in-the-middle (MiTM) attacks without the consent of both entities.

FortiGate SSL Deep Inspection in Practice

When Deep FortiGate inspection is used, the FortiGate impersonates the recipient of the originating SSL session. Then decrypts and inspects the content to find threats and block them. It then re-encrypts the content and sends it to the real recipient.

In practice, this sometimes leads to unwanted blocking, especially when using self-signed SSL certificates, and the FortiGate behaves like a black box. It is also often found that the connection to the Exchange Server is denied for Outlook clients, with Outlook issuing the following error.

There is a problem with the proxy server’s security certificate.
The name on the security certificate is invalid or does not match the name mail.example.org.
Outlook cannot connect to the proxy server. (Error code 8000000).

To disable the FortiGate SSL inspection completely, you can create a clone for the Read-only Profile no-inspection under Security Profiles – SSL/SSH Inspection and configure it accordingly.

FortiGate SSL Inspection Profile Clone

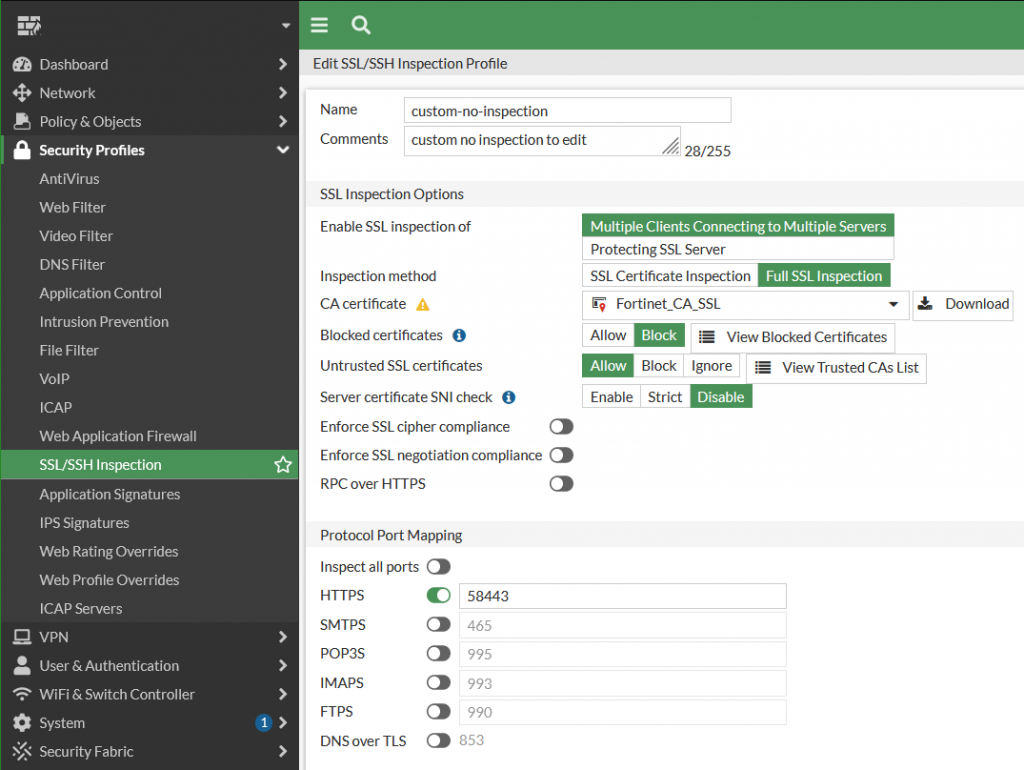
Under Protocol Port Mapping an unused port is entered for HTTPS. Which means that SSL Deep Inspection no longer takes place for port 443.

Enable the configured custom-no-inspection profile for the corresponding policy. For policies for internal and VPN connections, SSL/TLS deep inspection should not be required.

Start SSH from KeePass using Windows Terminal

This tutorial describes how to start an SSH terminal session under Windows, open the connection from the KeePass Manager, the known password Safe, with using OpenSSH and the Windows Terminal. Prerequisite is that OpenSSH is installed on Windows, from Apps & Features – Optional Features. The Windows Terminal can be found in the Microsoft Store.

The new Windows Terminal has evolved and achieves the parity to be measured with modern terminals of other operating systems such as the GNOME Terminal. Not only is it free, it can also be seen with the well-known terminal tools on Windows, such as PuTTY and KiTTY.

Windows Terminal is located under this path for batch processing.

%LOCALAPPDATA%\Microsoft\WindowsApps\wt.exe

Here from KeePass via the field URL with the “cmd://” argument.

For the entry in KeePass, add the following line into the URL field.

cmd://"%LOCALAPPDATA%\Microsoft\WindowsApps\wt.exe" ssh -v {USERNAME}@{TITLE}

  From the “Title” field, the hostname is passed in {TITLE}, from “User name” the user-ID is passed in {USERNAME}. If a different port is used for SSH add the port e.g. -p 60622

Click OK to close and save the entry. A double-click on the entry in the URL column opens the Windows Terminal.

The host entry is added in the Windows Terminal settings (Ctrl+,) with add new profile.

  Keys generated with ssh-keyen can be used SSH sessions without entering a password and even more securely.

SSH session using Windows KeePass and Windows Terminal

To do this, create the folder.ssh under the home path %USERPROFILE%, in which private and public keys are stored. Then creating the file config to assign hostname to the appropriate key.

Host vm126
    HostName 10.10.0.11
    User james
    IdentityFile ~/.ssh/id_rsa
    ServerAliveInterval 60

The public key (id_rsa.pub) is stored on the remote host at ~/.ssh/authorized_keys

the config file offers many options for configuring ssh targets so that they can be started easily in the Windows Terminal CLI.