
How to Run Your Own Firefox Sync Server
Firefox Sync Server running self-hosted, for bookmarks available synchronously on any device, including the timeline, tabs, add-ons, settings, and credentials, which can be matched on request.
The Mozilla-hosted Firefox account server can be easily used in combination with a self-hosted synchronization server and storage. Authentication and encryption protocols are designed so that the account server does not know the user’s plaintext password and therefore cannot access the stored synchronization data.
CONTENT
Firefox Sync Server Installation
Firefox Sync Basic Configuratin
Firefox Sync Apache Configuration
Firefox Sync HTTPS Let’s Encrypt
Firefox Browser Setting
Troubleshoting & Settings
This tutorial shows how to install Firefox Sync Server (Sync 1.5 server) on Apache and Ubuntu 16.04.4 LTS. The Ubuntu server, here sync.server.net as an example, is accessible via the Apache 2.4 web server on the Internet.
Firefox Sync Server Installation
Prerequisite for Sync 1.5 servers is Python 2.7 and Python Virtualenv, python-dev, make, git, as well as the C and C++ compiler. To ensure this, the following pacts will be made available:
$ sudo apt-get install apach2 libapache2-mod-wsgi python-dev python-virtualenv git-core g++ makeWe install the sync server under /opt, who prefers /usr/local, can choose this path, we will root and execute the following lines:
$ sudo su -
$ cd /opt
$ git clone https://github.com/mozilla-services/syncserver
$ cd syncserver
$ make build
To verify that the installation was successful, the following can provide the following:
$ make testFirefox Sync Basic Configuration
Create users and assign permission:
$ useradd -d /opt/syncserver/ -s /bin/false -l -r -U ffsync
$ chown -R ffsync:www-data /opt/syncserver/
The Firefox Sync Server is configured using the ini file to pass different runtime settings. The syncserver .ini file serves as a starting point.
Most settings can be applied before the sync server runs, the URL that can be reached for clients must be adapted to the sync server. For productive use, we open the syncserver .ini file and edit the public_url:
$ vi /opt/syncserver/syncserver.ini

[syncserver]
public_url = https://sync.server.net/
Change the public_url from localhost:5000 to our sync.server.net. In another section, the configuration is set up on the HTTPS protocol.
Then adjust the sqluri for our data beacon:
sqluri = sqlite:////opt/syncserver/syncserver.dbA secret key with the random generator is generated from a terminal, running the following line:
$ head -c 20 /dev/urandom | sha1sum
60bev0b7bd2f56dxea3794fb97f03c824e70e21d
Enter this key generated in the syncserver.ini file:
secret = 60bev0b7bd2f56dxea3794fb97f03c824e70e21dAssign enough rights to the database:
chmod 660 /opt/syncserver/syncserver.dbCreate automatic start in systemd for Firefox Sync:
$ vi /etc/systemd/system/firefox-sync.serviceand insert the following content:
$ [Unit]
Description=Firefox Sync Server
After=syslog.target network.target remote-fs.target nss-lookup.target

[Service]
Type=simple
User=ffsync
Group=ffsync
Umask=007
Restart=on-abort
ExecStart=/opt/syncserver/local/bin/gunicorn --paste /opt/syncserver/syncserver.ini

[Install]
WantedBy=multi-user.target
Start the Firefox Sync Server service:
$ systemctl start firefox-sync.serviceFirefox Sync Apache Configuration
Create an Apache Virtualhost as follows in this example:
$ vi /etc/apache2/sites-available/sync.server.net.conf

<virtualhost *:80="">
ServerName sync.server.net
DocumentRoot /opt/syncserver

CustomLog /var/log/apache2/access_sync.server.net.log combined
ErrorLog /var/log/apache2/error_sync.server.net.log
LogLevel warn

<directory opt="" syncserver="">
        Require all granted
        Options -Indexes
</directory>
</virtualhost>
Activate and restart the Apache Virtualhost:
$ a2ensite sync.server.net.conf
$ sudo systemctl restart apache2.service
Firefox Sync HTTPS Let’s Encrypt
Provide Let’s Encrypt for our Firefox Sync Server, adding the repository and installing the ACME packages:
$ add-apt-repository ppa:certbot/certbot
$ apt-get update
$ apt-get install python-certbot-apache
Now the Let’s Encrypt certificate can be created, certbot makes it easy for us, the SSL configuration required for our virtual host is created automatically.
$ certbot --apache -d sync.server.netUnder /etc/apache2/sites-enabled is now the symlink of this to file sync.server.net-le-ssl.conf shows, this is stored under/etc/apache2/sites-available.
$ ls /etc/apache2/sites-enabled/sync.server.net-le-ssl.conf
/etc/apache2/sites-enabled/sync.server.net-le-ssl.conf
In the file sync.server.net-le-ssl.conf, the WSGI configuration still needs to be added, we edit sync.server.net-le-ssl.conf, which then shows the following content:
<ifmodule mod_ssl.c="">
<virtualhost *:443="">
ServerName sync.server.net
DocumentRoot /opt/syncserver

        WSGIProcessGroup ffsync
        WSGIDaemonProcess ffsync user=ffsync group=ffsync processes=2 threads=25 python-path=/opt/syncserver/local/lib/python2.7/site-packages/
        WSGIPassAuthorization On
        WSGIScriptAlias / /opt/syncserver/syncserver.wsgi

        CustomLog /var/log/apache2/access_sync.server.net.log combined
        ErrorLog /var/log/apache2/error_sync.server.net.log
        LogLevel warn
<directory opt="" syncserver="">
        Require all granted
        Options -Indexes
</directory>
SSLCertificateFile /etc/letsencrypt/live/sync.server.net/fullchain.pem
SSLCertificateKeyFile /etc/letsencrypt/live/sync.server.net/privkey.pem
Include /etc/letsencrypt/options-ssl-apache.conf
</virtualhost>
</ifmodule>
Now the Apache web server needs to be restarted:
sudo systemctl restart apache2.serviceFirefox browser setting
In order for Firefox to be able to synchronize via its own sync server, the URL must be changed, for this purpose you enter about:config in the address bar and confirm with the enter key.
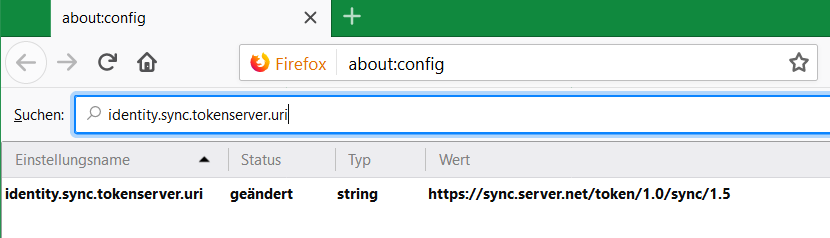
After confirming the warning, enter identity.sync.tokenserver.uri into the search box.
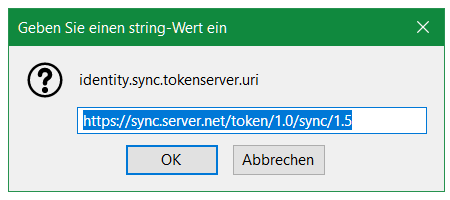
Double-clicking changes the value to your own sync server
https://sync.server.net/token/1.0/sync/1.5
Finally, the Mozilla account is created via the following URL:
https://accounts.firefox.comThe account itself is located on the Mozilla server, the data is stored on the own sync server.
It is important that the synchronization was made only after the entry to the own sync server in Firefox. If bookmarks and data are on the sync server with Mozilla, the data can be deleted, with the following command lines:
$ apt install python-pip
$ sudo pip install PyFxA
$ python ./bin/delete_user_data.py email.account@server.net
email.account@server.net with actual account email.
Troubleshoting & Settings
To check that The Firefox Sync Server is running correctly, open the log file /var/log/apache2/access_sync.server.net.log:
$ sudo tail -f /var/log/apache2/access_sync.server.net.logNote that the Let’s Encrypt certbot for validation, the Firefox Sync Server must be reachable via port 80, for the firewall included in Ubuntu in the default, the command is as follows:
$ sudo ufw allow httpWhen you call the Firefox Sync Server URL, or https://sync.server.net in the browser, the following output should appear:
$ curl -k https://sync.server.ent
it works!
If the Apache web server does not start, the syntax of the configuration can be validated:
$ apache2ctl configtest
Syntax OK
After all accounts have been created, access to other users can be blocked in the syncserver .ini file:
$ allow_new_users = falseThe Firefox Sync protocol contains the debug information in case of errors and can be queried with the following command in the browser line.
about:sync-log
Sources Link:
Run your own Sync-1.5 Server
Github mozilla-services/syncserver