WinSCP Sites storage is empty, the configuration are stored to registry or in INI file
WinSCP stores targets with the connection data under Sites, in using Windows ftp and scp connections, if all entries to the sites have disappeared after an update, there is no reason to panic. The sites can be restored easily and quickly, how to proceed is shown in this post.
WinSCP for ftp and scp connections in Windows
After a software update of WinSCP was performed, and the sites configuration were stored in the registry. Which was the default in the earlier versions. It may happen that after an update of WinSCP, the setting was changed to INI. So we just need to change the setting back to Registry.
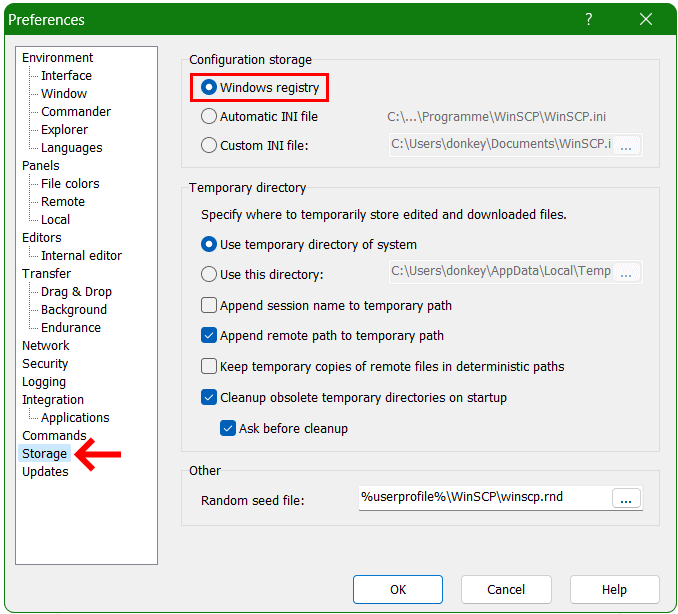
WinSCP Preferences
The setting from WinSCP.ini to Windows registry can be changed by clicking the Tools button, if the Login Session window is not open, press the keys Ctrl+N then the Tools button.
Choose Preferences Configuration storage
Under Preferences go to Storage and in the Configuration storage area, enable with click on Windows registry.
Tools – Preferences – Storage – Configuration storage: Windows registry.
After exiting WinsCP and running again, the targets reappear in the Site Manager Ctrl+N window.
WinSCP Configuration in Registry
If the registry is used as configuration store, the configuration is saved under the following key.
When loading configuration, WinSCP first looks for an INI file in the directory, where WinSCP executable is stored in. The INI file needs to have an .ini extension and the same name as the executable (i.e. WinSCP.ini). If INI file in not found there, WinSCP looks to application data directory of your user profile, i.e. to C:\Users\username\AppData\Roaming\WinSCP.ini.
When you use INI file for the first time, WinSCP tries to write it to directory, where WinSCP executable is stored. If the directory is not writable, INI file is stored to application data directory of your user profile.
WinSCP Transferring Configuration
The created destinations (sites) with the connection data are copied into the WinSCP.ini file with the change from Windows registry to Automatic INI file. If the sites were previously saved in the registry. To make the sites for WinSCP available on another computer, the sites with the connection data are transferred under Tools with Export/Backup Configuration and Import/Restore Configuration.
In this tutorial we will show you how to deploy FTP daemon vsFTPD on a Linux server, finally vsFTPD will be hardened by fail2ban.
Very Secure File Transfer Protocol Deamon (VSFTPD), as the service of the same name promises us, VSFTPD is a secure FTP daemon, which is used as the default FTP server by most Linux distributions, such as in Debian, Ubuntu, CentOS, Fedora, RHEL and more. VSFTPD provide a stable FTP server and is authorized under the GNU General Public License. VSFTPD is designed for secure and easy support for virtual clients with PAM (Pluggable Authentication Modules). This tutorial shows how to install VSFTPD and implement it with Fail2ban on Debian 10 (buster) or other Linux versions. Fail2ban is an intrusion prevention system written in Python that runs on any Linux operating system that includes a manipulable firewall.
How to Install vsFTPD and hardening FTP with Fail2ban
Installation
The provision of vsFTPD on Debian as well as under Ubuntu as usual by running the apt package manager from the default repository.
$ sudo apt-get install vsftpd -y
CentOS and RHEL install vsFTPD using DNF Dandified Yum.
$ sudo yum install vsftpd -y
After the installation we take steps to configuring vsFTPD.
$ sudo vi /etc/vsftpd.conf
For CentOS / RHEL / Fedora, vsftpd.conf find on path /etc/vsftpd.
$ sudo vi /etc/vsftpd/vsftpd.conf
If you don’t like VIM, you can edit using nano or ne. or whatever your favorite is,
We disable anonymous login and allow local users to write.
chroot stands for change root and is a feature for Unix systems to change the root directory. chroot only affects the current process and its child processes, it is a simple jail mechanism in which the FTP server prevents users from accessing files outside of its directory. chroot is also an easy way to sandbox untrusted data. The chroot settings for vsFTPD ftp users can be found in the file vsftpd.conf.
To configuring for chroot users, go to the line chroot_local_user and change to YES, as with chroot_list_enable
chroot_local_user=YES
chroot_list_enable=YES
All users are chrooted, except for a few who are exempt by creating the file /etc/vsftpd.chroot_list to containing those users who are excluded from chroot.
Create a file vsftpd.userlist and add users to it. Add user per line like the service accounts, for example: vsftpd.userlist
# for users that are denied.
root
bin
daemon
sys
sync
man
backup
admin
sshd
lp
sync
proxy
list
irc
shutdown
halt
mail
news
uucp
operator
games
nobody
postfix
www-data
ftp
mysql
SFTP encrypted authentication
So that passwords are not sent in clear text, add these options to the configuration file, some of which are already available, check them and change the options if necessary.
Note: The default is that SFTP is already enabled by the SSH daemon, so check the file /etc/ssh/sshd_config.
Subsystem sftp /usr/lib/openssh/sftp-server
Hint! more recommended VSFTPD settings
# chroot() jail at times vsftpd does not require filesystem.
secure_chroot_dir=/var/run/vsftpd/empty
# This string is the name of the PAM service vsftpd will use.
pam_service_name=ftp
# Uncomment this to indicate that vsftpd use a utf8 filesystem.
utf8_filesystem=YES
# passive mode FTP port range this allows by firewall.
pasv_min_port=40000
pasv_max_port=50000
Note: An FTP connection consists of the command channel and the data channel. Passive mode allows the FTP client to create both channels, so the firewall is allowed to let the FTP connection through, therefore the port range from pasv_min_port to pasv_max_port must be open on the firewall.
FTP server vsFTPD hardening trough Fail2ban
To protect the FTP server from brute force attacks, Fail2ban is enabled for vsFTPD. If there are a defined number of failed login attempts, the suspicious host is locked for a certain amount of time. For Fail2ban to work, the logs are important. To this end, Fail2ban is installed on the FTP server.
$ sudo apt install -y fail2ban
Fail2ban vsFTPD Configure FTP services
For fail2ban and vsFTPD, create the file jail.local, if not already exist.
$ sudo vi /etc/fail2ban/jail.local
The file jail.conf can also be copied, or individual blocks of the services can be added to jail.local.
[vsftpd]
enabled = true
# or overwrite it in jails.local to be
# logpath = %(syslog_authpriv)s
# if you want to rely on PAM failed login attempts
# vsftpd's failregex should match both of those formats
port = ftp,ftp-data,ftps,ftps-data
logpath = %(vsftpd_log)s
findtime=1800
bantime = 7200
maxretry = 4
Logs are important for the functionality of fail2ban. The FTP server (VSFTPD) logs in to log file /var/log/vsftpd.log. Fail2ban is flexible and can be adapted to most requirements. If an additional service is used, which requires xferlog, it can be logged in both log files with dual_log_enable=YES.
In the standard, /var/log/vsftpd.log is read out, which is predefined with the variable %(vsftpd_log)s.
The Fail2ban daemon must restart to apply changes.
$ sudo systemctl restart fail2ban
Now check vsftpd blocked IP addresses by fail2ban, you can be here as root run this fail2ban-client command.
$ fail2ban-client status vsftpd
Status for the jail: vsftpd
| Filter
|  |- Currently failed: 0
|  |- Total failed: 3
|  '- File list: /var/log/vsftpd.log
'- Actions
   |- Currently Banned: 17
   |- Total banned: 126
   '- Banned IP list:
UNBLOG verwendet Cookies, um Dein Online-Erlebnis zu verbessern. Mit "ACCEPT" gibst Du Deine Zustimmung zur Nutzung dieser Website und unseren Datenschutzbestimmungen, oder wähle Cookie settings.
Diese Website verwendet Cookies, um Ihre Erfahrung zu verbessern, während Sie durch die Website navigieren. Von diesen werden die Cookies, die nach Bedarf kategorisiert werden, in Ihrem Browser gespeichert, da sie für das Funktionieren der grundlegenden Funktionen der Website wesentlich sind. Wir verwenden auch Cookies von Drittanbietern, mit denen wir analysieren und verstehen können, wie Sie diese Website nutzen. Diese Cookies werden nur mit Ihrer Zustimmung in Ihrem Browser gespeichert. Sie haben auch die Möglichkeit, diese Cookies zu deaktivieren. Das Deaktivieren einiger dieser Cookies kann sich jedoch auf Ihre Browser-Erfahrung auswirken.
Notwendige Cookies sind unbedingt erforderlich, damit die Website ordnungsgemäß funktioniert. Diese Kategorie enthält nur Cookies, die grundlegende Funktionen und Sicherheitsmerkmale der Website gewährleisten. Diese Cookies speichern keine persönlichen Informationen.
Alle Cookies, die für die Funktion der Website möglicherweise nicht besonders erforderlich sind und speziell zur Erfassung personenbezogener Daten des Benutzers über Analysen, Anzeigen und andere eingebettete Inhalte verwendet werden, werden als nicht erforderliche Cookies bezeichnet. Es ist obligatorisch, die Zustimmung des Benutzers einzuholen, bevor diese Cookies auf Ihrer Website ausgeführt werden.