Category Archives: Howto Tutorials (EN)

Knowledge Network for Tutorials, Howto’s, Workaround, DevOps Code for Professionals.

How to Enable KeePass URL App Launcher

Launch connections from KeePass use variable title, user name and password

KeePass allows to open a program directly from the entry, the interaction performs the connection to a host with user and password transfer from KeePass, the external program must be executable with command line parameters, such as PuTTY or KiTTY it allows.

The interaction is enabled in the field URL. The KeePass URL starts with the prefix cmd:// followed by the external program, enclosed in quotation marks.

KeePass URL starts with the prefix cmd:
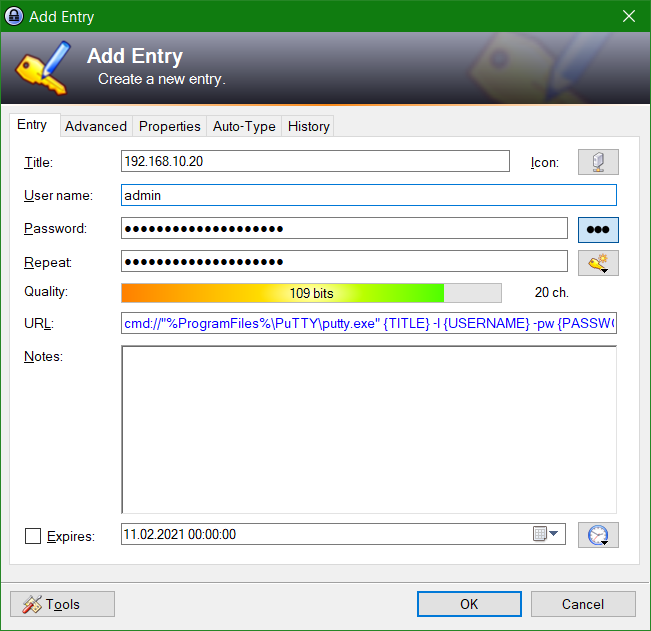
cmd://"%ProgramFiles%\PuTTY\putty.exe" {TITLE} -l {USERNAME} -pw {PASSWORD}

The field Title of the KeePass entry contains the host name or IP address. The URL is composed of the Title, User name, and Password field, which is used as the KeePass variable TITLE, USERNAME, and PASSWORD, they passed to PuTTY, with -l for username and -pw for the password, for which host is suitable the field TITLE.

The URL field can execute any valid URL for which a protocol handler is defined. On most systems at least the http://, https://, ftp://, ssh:// and mailto: protocols are defined. KeePass supports all protocols that Windows supports.

If you have registered PuTTY globally (i.e. with Windows Explorer) for ssh:// URLs, KeePass automatically uses PuTTY for ssh:// URLs as well. Starting with Windows 10 version 1909, the OpenSSH Client can also be installed under Apps & Features – Optional Features.

Instead of a URL, you can also execute command lines using the URL field. To tell KeePass that the line you entered is a command line, prefix it using cmd://. For example if you would like to execute Notepad, your URL could look like this:

cmd://"%ProgramFiles%\WinSCP\winscp.exe" /script=%USERPROFILE%\host.cfg

Source link: KeePass URL Field Capabilities

how to save sent items to Delegated Mailbox on Outlook

Outlook does not save sent email in the sent items of the delegate mailbox, DelegateSentItemsStyle.

Outlook offers several people access to a shared Exchange mailbox in order to send e-mails from there; the e-mails that are sent are always in the mailbox of their own user “Sent Items”. This standard behavior of Outlook makes it difficult for employees to understand what was replied to which email by whom.

There is no way to change this state in the Outlook settings. However, adding a registry key enables Outlook to always move such e-mails to the mailbox that sent the e-mail. The following instructions are valid for Microsoft Outlook 2007 to 2019.

Outlook Sendt Items. How to do it.

Open the registry editor with the key Win+R

Win + R Key

then entering regedit and click OK, now navigate to the following registry key:

HKEY_CURRENT_USER\Software\Microsoft\Office\15.0\Outlook\Preferences

The number 15.0 stands for the Office version, the following values apply to the versions:

12.0 = 2007
14.0 = 2010
15.0 = 2013
16.0 = 2016
16.0 = 2019
16.0 = Office 365

Create a new DWORT key with the name DelegateSentItemsStyle and assign the value 1 to this newly created key.

As you can see, the version number has remained at 16.0 since Outlook 2016 and Office 2019 will not become version 17.0. This is because Office 2016 and Office 2019 are now the same code base as Office 365.

Alternatively, you can run the following command in a command prompt opened as an administrator.

REG ADD "HKCU\Software\Microsoft\Office\15.0\Outlook\Preferences" /v "DelegateSentItemsStyle" /t REG_DWORD /d "1" /f

Outlook is now able to save the sent e-mail in sent items in the shared mailbox.

Note! Outlook must be configured to run in cached mode for this option to work properly.

Cumulative Update 9 for Exchange Server 2013 introduced a new feature that allows administrators to set the option to copy messages to the Sent Items folder.

Unfortunately, there is no easy solution for public folders. To do this, a transport role must be configured on the Exchange server.

If you are still using Exchange 2010, you have to go to the OWA options for the shared mailbox, and under Settings, select Sent Items, Sender and “From” mailboxes.

Outlook under Settings, select Sent Items, Sender and "From" mailboxes.

Microsoft also provide an PowerShell cmdlet, from Exchange 2010 SP2 RU4 run the Set-MailboxSentItemsConfiguration command.

Set-MailboxSentItemsConfiguration "SharedMailbox" -SendAsItemsCopiedTo SenderAndFrom