Easily turn off Windows Firewall with netsh or in the PowerShell
There are still situations where it is necessary to disable the Windows Firewall. Windows Powershell supports Firewall disable command, where the service does not need to be stopped or disabled. On Windows Server, you can disable the firewall from the console using netsh commands. Windows Server 2012 or later also allows the Set-NetFirewallProfile PowerShell cmdlet to run.
Turn off the Firewall with Windows PowerShell
To do this, open Windows PowerShell as an administrator and run the following line:
Reactivating the Windows Defender Firewall requires -Enable True instead of False at the end.
Disable Firewall with the netsh command
Open a command prompt with administrative privileges and insert the following command:
netsh advfirewall set allprofiles state off
This example retrieves all of the firewall rules in the active store, which is a collection of all of the policy stores that apply to the computer. Running this cmdlet without specifying the policy store retrieves the persistent store.
Example in Powershell to retrieves all of the Windows Firewall if it’s disable or not. The rules scoped to the public profile.
PS C:\>Get-NetFirewallProfile -Name Public | Get-NetFirewallRule
Description
The Get-NetFirewallRule cmdlet returns the instances of firewall rules that match the search parameters from the user. See the New-NetFirewallRule cmdlet for Windows Powershell Firewall disable for more information.
This cmdlet returns one or more Powershell Firewall rules by specifying the Name parameter (default), the DisplayName parameter, rule properties, or by associated filters or objects. The queried rules can be placed into variables and piped to other cmdlets for further modifications or monitoring.
Linux in Windows 10 and 11 with Kali Linux Desktop – Win-KeX (“Windows Kali Desktop EXperience”), starting with feature update 2004 there is an XFCE GUI on the Windows desktop.
Win-KeX provides a Kali Desktop Experience for Windows Subsystem for Linux (WSL 2) with the features that support two dedicated modes.
Win-KeX window mode kex –win is the classic appearance in a window for the Kali Linux desktop.
Win-KeX SL mode kex –slprovides the seamless integration of Kali Linux into the Windows desktop with the Windows Start menu below and the Kali panel at the top of the screen. All applications start in their own windows that use the same desktop as Windows applications.
Win-KeX Features
Win-KeX SL Seamless Sound support Support multiple sessions Run Win-KeX as root Shared clipboard cut and paste content between Kali and Windows Apps
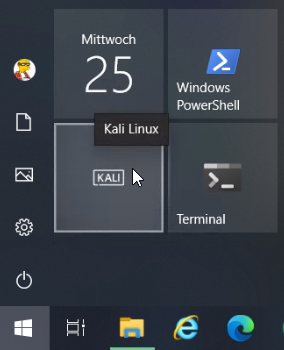
Install Kali Linux on Windows
To install Kali Linux on Windows, Open PowerShell as administrator and run the command bellow.
Back after reboot run the commands from PowerShell as administrator.
dism.exe /online /enable-feature /featurename:VirtualMachinePlatform /all /norestart
dism.exe /online /enable-feature /featurename:Microsoft Windows subsystem Linux /all /norestart
Restart the computer again.
Then download Windows Subsystem for Linux 2 (WSL 2) and run the Update Setup Wizard. Download the latest package here and choose WSL2 Linux kernel update package for x64 machine.
Run the next command from the PowerShell as administrator.
wsl --set-default-version 2
Install Kali Linux from the Microsoft Store.
Kali Linux is a Debian-based Linux distribution that mainly includes penetration testing and digital forensics. Kali Linux is primarily aimed at professional and advanced users.
Now complete the initial setup and launch Kali Linux.
Win-KeX can be run in window mode or Seamless mode. Win-KeX in window mode as follows.
kex --win
Start Win-KeX in Seamless – Sameless mode.
kex --sl
Win-KeX Start Examples
kex - Desktop full screen
kex --win - Desktop Window
kex --sl - Desktop Seamless Mode
kex --sl -s - Desktop Seamless Mode with Sound
kex --sl --wtstart - KeX server and win-kex client in terminal
kex --esm - KeX desktop in native RDP windows
Prerequisite for Win-KeX
The Visual C++ Redistributable packages are required to run Win-KeX, if not already installed, the packages can be downloaded here. Install the Universal C Runtime x86 (vc_redist.x86.exe) and x64 (vc_redist.x64.exe). Kali Linux requires Windows 10 version 2004 or later, and the Windows subsystem for Linux – WSL 2.
To use Win-KeX, a computer with Intel virtualization function VT-x is required. The BIOS provides the operating system with the virtualization function, for which you activate the Intel (R) Virtualization Technology in the UEFI BIOS settings.
Linux Shell in Windows Terminal
Also now is a good time to mention the Windows Terminal, if not already installed, it is worth doing it now.
Windows Terminal can be installed from the Windows Store.
Windows Terminal is a multi-tabbed command-line frontend for Windows 10. The shell of Kali Linux – ZSH can be used with Windows Terminal.
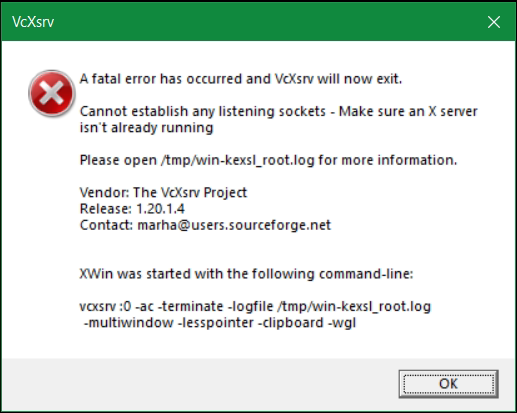
If VcXsrv is trying to start Win-KeX in Seamless Mode, an error is issued by VcXsrv:
A fatal error has occurred and VcXsrv will now exit.
A fatal error has occurred and VcXsrv will now exit.
In the log, it’s the last lines in /tmp/win kexsl_user.log:
winMultiWindowXMsgProc - Fatal error 1 on xcb connection
winClipboardIOErrorHandler!
winClipboardProc - setjmp returned for IO Error Handler.
(II) Server terminated successfully (0). Closing log file.
here you can try to start Win-KeX with sudo:
sudo kex --sl --wtstart -s
A solution also brought the deletion of the logs under /tmp.
sudo rm -f /tmp/*.log
And stop the KeX server with the –stop and –kill option.
sudo kex --stop
sudo kex --kill
After that, the start of kex as a normal user became possible.
kex --help

        Win-Kex 2.10 provides a GUI desktop experience for Kali Linux
        in Windows Subsystem for Linux 2 (WSL 2)

        Usage:
                kex <mode> <command> <parameters>

                Mode:
                --esm            : Launch KeX desktop in a dedicated window using Windows native RDP
                --sl             : Seemlessly integrate KeX into the Windows desktop
                --win            : Launch KeX desktop in a dedicated window

                Command:
                [none]           : start KeX server and launch KeX client
                --start          : start kex server
                --start-client   : start kex client
                --stop           : stop kex server
                --status         : show kex server status
                --kill           : stop kex server and kill all related processes
                --passwd         : set kex server password
                --wtstart        : start kex server and launch win-kex client
                                   in Windows Terminal session
                --start-sound    : start Windows sound server
                --stop-sound     : stop Windows sound server
                --help           : display help
                --version        : display version

                Parameters:
                -i               : Use container IP address instead of "localhost"
                -m               : Optimized for Multiscreen (Win mode only)
                -s               : Sound support


        Examples:
                kex -s           : Start KeX server in window mode and launch KeX client with sound support
                kex --sl -s      : Start KeX in seemless mode and launch KeX client with sound support
                kex --esm -i -s  : Start KeX in ESM mode with arm workaround and launch KeX client with sound support
                sudo kex         : Start KeX server as root in window mode and launch KeX client
UNBLOG verwendet Cookies, um Dein Online-Erlebnis zu verbessern. Mit "ACCEPT" gibst Du Deine Zustimmung zur Nutzung dieser Website und unseren Datenschutzbestimmungen, oder wähle Cookie settings.
Diese Website verwendet Cookies, um Ihre Erfahrung zu verbessern, während Sie durch die Website navigieren. Von diesen werden die Cookies, die nach Bedarf kategorisiert werden, in Ihrem Browser gespeichert, da sie für das Funktionieren der grundlegenden Funktionen der Website wesentlich sind. Wir verwenden auch Cookies von Drittanbietern, mit denen wir analysieren und verstehen können, wie Sie diese Website nutzen. Diese Cookies werden nur mit Ihrer Zustimmung in Ihrem Browser gespeichert. Sie haben auch die Möglichkeit, diese Cookies zu deaktivieren. Das Deaktivieren einiger dieser Cookies kann sich jedoch auf Ihre Browser-Erfahrung auswirken.
Notwendige Cookies sind unbedingt erforderlich, damit die Website ordnungsgemäß funktioniert. Diese Kategorie enthält nur Cookies, die grundlegende Funktionen und Sicherheitsmerkmale der Website gewährleisten. Diese Cookies speichern keine persönlichen Informationen.
Alle Cookies, die für die Funktion der Website möglicherweise nicht besonders erforderlich sind und speziell zur Erfassung personenbezogener Daten des Benutzers über Analysen, Anzeigen und andere eingebettete Inhalte verwendet werden, werden als nicht erforderliche Cookies bezeichnet. Es ist obligatorisch, die Zustimmung des Benutzers einzuholen, bevor diese Cookies auf Ihrer Website ausgeführt werden.