
Install Lets Encrypt Certbot on CentOS Linux with Apache.
Let’s Encrypt is a certification authority that offers free X.509 certificates for Transport Layer Security (TLS). This tutorial explains how to perform Let’s Encrypt SSL install the ACME process with certbot and how to implement Lets Encrypt on a CentOS Linux host with Apache web server.
Assuming that the Apache web server is already installed, the domain is configured as Apache VirtualHost, and the domain is dissolvable in DNS, with an A-record in the forward zone of that domain, or a quad-A record for the server is entered for IPv6. Furthermore, the server must be accessible via port 80 for the ACME Challenge.
For installation we want to become root.
$ su -
Password:
Last login: Tue Jan 15 06:25:52 CET 2019 on pts/0
Install the EPEL repository followed by the certbot package.
$ yum -y install epel-release
$ yum -y install mod_ssl python-certbot-apache
Now restart the Apache web server.
$ systemctl restart httpdRelease the firewall for SSL with the service port 443.
$ firewall-cmd --add-service=https
$ firewall-cmd --runtime-to-permanent
Now let the certbot generate the SSL certificate.
$ certbot --apache -d mydomain.com -d www.mydomain.comThe first domain should be the base domain. In this example, it is called mydomain.com to replace it with the actual domain name.
The output of the certbot looks something like this.
certbot --apache -d mydomain.com -d www.mydomain.com
Saving debug log to /var/log/letsencrypt/letsencrypt.log
Plugins selected: Authenticator apache, Installer apache
Starting new HTTPS connection (1): acme-v02.api.letsencrypt.org
Obtaining a new certificate
Performing the following challenges:
http-01 challenge for mydomain.com
Waiting for verification...
Cleaning up challenges
Resetting dropped connection: acme-v02.api.letsencrypt.org
Created to SSL vhost at /etc/httpd/conf.d/mydomain-ssl.conf
Deploying Certificate to VirtualHost /etc/httpd/conf.d/mydomain-le-ssl.conf

Please choose whether or not to redirect HTTP traffic to HTTPS, removing HTTP access.
- - - - - - - - - - - - - - - - - - - - - - - - - - - - - - - - - - - - - - - -
1: No redirect - Make no further changes to the webserver configuration.
2: Redirect - Make all requests redirect to secure HTTPS access. Choose this for
new sites, or if you're confident your site works on HTTPS. You can undo this
change by editing your web server's configuration.
- - - - - - - - - - - - - - - - - - - - - - - - - - - - - - - - - - - - - - - -
Select the appropriate number[1-2] then [enter](press 'c' to cancel): 2
Redirecting vhost in /etc/httpd/conf.d/mydomain.conf to ssl vhost in /etc/httpd/conf.d/mydomain-ssl.conf

- - - - - - - - - - - - - - - - - - - - - - - - - - - - - - - - - - - - - - - -
Congratulations! You have successfully enabled https://mydomain.com

You should test your configuration at:
https://www.ssllabs.com/ssltest/analyze.html?d=mydomain.com
- - - - - - - - - - - - - - - - - - - - - - - - - - - - - - - - - - - - - - - -

IMPORTANT NOTES:
 - Congratulations! Your certificate and chain have been saved at:
   /etc/letsencrypt/live/mydomain.com/fullchain.pem
   Your key file has been saved at:
   /etc/letsencrypt/live/mydomain.com/privkey.pem
   Your cert will expire on 2019-04-14. To obtain a new or tweaked
   version of this certificate in the future, simply run certbot again
   with the "certonly" option. To non-interactively renew *all* of
   your certificates, run "certbot renew"
 - If you like Certbot, please consider supporting our work by:

Donating to ISRG / Let's Encrypt: https://letsencrypt.org/donate
   Donating to EFF: https://eff.org/donate-le
Finally, the Installed Lets Encrypt certificate on Linux can be tested.
$ curl -k https://mydomain.comGet the URL in the browser and verify it with SSL Labs.
https://www.ssllabs.com/ssltest/analyze.html?d=mydomain.com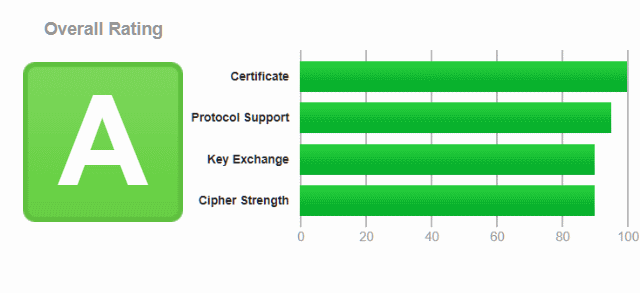
The installed Lets Encrypt certificate is valid for 90 days on the Linux. For the automatic renewal of the certificate, we create a new cron job.
$ crontab -e

0 0 * * 0 /usr/bin/certbot renew >> /var/log/certbot.log
The certificate is checked once a week at midnight for renewal.
Lets Encrypt Shell Access
We recommend that most people with shell access use the Certbot ACME client. It can automate certificate issuance and installation with no downtime. It also has expert modes for people who don’t want autoconfiguration. It’s easy to use, works on many operating systems, and has great documentation. Visit the Certbot site to get customized instructions for your operating system and web server.
If Certbot does not meet your needs, or you’d like to try something else, there are many more ACME clients to choose from. Once you’ve chosen ACME client software, see the documentation for that client to proceed.

