Check SHA256 hash with Windows 10

How to Check File Integrity

SHA256 hash values provide information about the integrity of a file, for example, they can protect against manipulated programs. Unixoid operating systems already have the checksum tools like sha256sum on-board. Windows 10 includes a cmdlet in PowerShell with which the checksums can be quickly checked.

What are checksums

To ensure the integrity of a file, checksums (MD5, SHA256, SHA512, …) are created. A checksum is formed over all bytes of a file (the byte values are multiplied by different numbers according to certain rules.) The value calculated in this way uniquely identifies the file content. If you re-generate the checksum at a later time (or on another computer) and compare it with the first one, you can see whether the file has been modified. This principle is also often used to check whether a file transfer has taken place without errors.

Check SHA256 hash checksum

Checking the hash signature is particularly suitable for downloads. An ISO image or archive file can be checked for integrity and authenticity after downloading. The manufacturers and developers publish signatures with which an image of integrity and authenticity can be compared by means of the SHA256 hash or MD5 hash value. So that the unchanged origin and originality can be ensured without this being the case with a man-in-the-middle attack.

PowerShell Get-FileApply Hash

This example checks the Linux Mint 20 ISO image that was previously downloaded. To verify the integrity of an ISO image, the SHA256 sum is generated and compared, with the SHA256 hash in the sha256sum file.txt,which is also downloaded.

The files linuxmint-20-cinnamon-64bit.iso and sha256sum.txt are copied to a folder, then you open PowerShell and switch to the folder where the cmdlet Get-FileHash is now executed.

Get-FileHash linuxmint-20-cinnamon-64bit.iso -Algorithm SHA256

Algorithm       Hash                                                                   Path
---------       ----                                                                   ----
SHA256          2F6AE466EC9B7C6255E997B82F162AE88BFE640A8DF16D3E2F495B6281120AF9       C:\linuxmint-20-cinnamon-64bit

The SHA256 hash of the ISO image is generated.

Then open the previously downloaded file sha256sum.txt which contains the hash. Checksum hash are often referred to as checksum or file fingerprint.

Get-Content sha256sum.txt
2f6ae466ec9b7c6255e997b82f162ae88bfe640a8df16d3e2f495b6281120af9 *linuxmint-20-cinnamon-64bit.iso

As you can see, sha256sum.txt contains the hash string in lowercase, but the hash is calculated by Get-FileHash in uppercase, so that we can then use the hash for the comparison, we convert it from sha256sum.txt to an uppercase string with ToUpper().

$text="2f6ae466ec9b7c6255e997b82f162ae88bfe640a8df16d3e2f495b6281120af9".ToUpper()

Write-Host $text
2F6AE466EC9B7C6255E997B82F162AE88BFE640A8DF16D3E2F495B6281120AF9

The hash string of Get-Content sha256sum.txt is inserted between the quotation marks in $text.

Get-FileHash Parameter -Algorithm

algorithm specifies the cryptographic hash function to use to calculate the hash value from the contents of the specified file or stream. The acceptable values for this parameter are:

  • SHA1
  • SHA256
  • SHA384
  • SHA512
  • MD5

If no value is specified or the parameter is omitted, the default value is SHA256.

For security reasons, MD5 and SHA1, which are no longer considered secure, and they should only be used for simple change verification, but not to generate hash values for files that need to be protected from attack or tampering.

The procedure can then look like the following in a PowerShell script for this example.

$text="2f6ae466ec9b7c6255e997b82f162ae88bfe640a8df16d3e2f495b6281120af9".ToUpper()
$hash=(Get-FileHash linuxmint-20-cinnamon-64bit.iso -Algorithm SHA256 | Select-Object -Property Hash | ft -HideTableHeaders)
Write-Host $text
Write-Host $hash

The comparison of both hash values with the following line in PowerShell.

[string]$text -eq [string]$hash

Hash Calculate and Compare

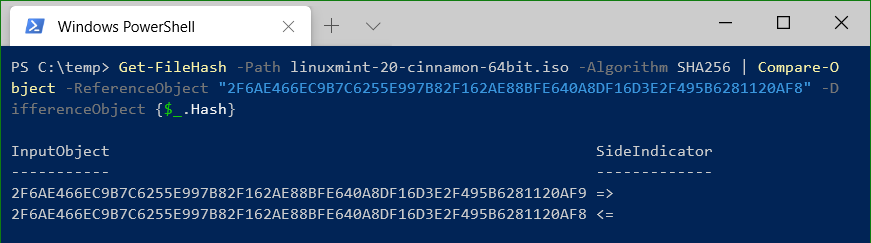
The following script calculates the hash value and compares it with Compare-Object and the fingerprint from the signature.

Get-FileHash -Path linuxmint-20-cinnamon-64bit.iso -Algorithm SHA256 | Compare-Object -ReferenceObject "2F6AE466EC9B7C6255E997B82F162AE88BFE640A8DF16D3E2F495B6281120AF9" -DifferenceObject {$_.Hash}

If the checksums match, no output appears.

Use Windows PowerShell Get-FileHash

If the hash values does not match, then both objects are displayed.

PowerShell Get FileHash Compare Object, If the hash values do not match, both objects are output.

email SPF record in postfix

How to set up Postfix to check email SPF record

email SPF record in postfix

In addition to an A Record, MX and PTR record, mail servers (MTA) also require an SPF record in DNS.

What are SPF Records

Sender Policy Framework (SPF) is a method of sender authentication. Like DKIM, SPF is a TXT data set of DNS that is designed to help prevent email spoofing and identify it as legitimate when delivering your own emails. Also, the e-mail is not to be prevented from ending up in the junk e-mail folder at the recipient. If a domain is abused by e-mail spoofing, the emails are likely to end up in the recipient’s spam folder.

The SPF record specifies which hosts or IP addresses are allowed to send e-mail on behalf of a domain. You should only allow your own mail server or your ISP server to send e-mail for this domain.

Create SPF record in DNS

An SPF record is a DNS record that is added to a domain’s DNS zone. The SPF record in a DNS zone can look like this:

IN  TXT  "v=spf1 a mx "all"

When managing the domain of an Internet web hosting provider, this may look something like this.

email SPF record in postfix
  • TXT indicates that this is a TXT record.
  • v=spf1 indicates that this is an SPF record and the SPF record version is SPF1.
  • mx means that all hosts listed in the MX records are allowed to send emails for the domain, all other hosts are not allowed.
  • -all Fail – servers that aren’t listed in the SPF record are not authorized to send email (not compliant emails will be rejected).
  • ~all Softfail – If the email is received from a server that isn’t listed, the email will be marked as a soft fail (emails will be accepted but marked).
  • +all It is strongly recommend not to use this option, this tag allows any server to send email from this domain.
  • include – An additional SPF request for the domain specified in the include statement that contains the IP address of the sender.

To verify that the SPF record is resolved on the public Internet, the dig utility on the Linux host should be used for querying as follows:

dig domain.com TXT +short
"v=spf1 a mx "all"

On a Windows computer, nslookup can be run in a command prompt (cmd), the change may be delayed depending on the TTL:

C:\> nslookup -type=txt domain.com

In the PowerShell, Resolve-DnsName is used with the following command:

PS C:\> Resolve DnsName Name domain.com -type TXT | ft -a

Name Type TTL Section Strings
----       ---- ---  ------- -------
domain.com TXT 3485 Answer sv=spf1 a mx

Online SPF validators such as mxtoolbox can also be used to check which hosts are allowed to send the emails of their own domain.

Postfix SPF Policy Agent pypolicyd-spf

For our Postfix SMTP server, we still need an instruction to check the SPF record of incoming emails to detect fake emails. To do this, install the pypolicyd-spf package from the EPEL repository as root:

yum install epel-release
yum install policyd-spf

Then add a user for Policyd SPF:

adduser -U -M -s /bin/false policyd-spf

Postfix Master Configuration

Now edit the postfix master configuration file master.cf:

vi /etc/postfix/master.cf

policyd-spf unix - n n - 0 spawn
    user=policyd-spf argv=/usr/libexec/postfix/policyd-spf

Add the lines at the end of the file master.cf, instructing Postfix to start the SPF policy demon. Policyd-SPF runs as a user policyd-spf.

  Policyd SPF should not run in a chroot environment.

Save and close the file.

Postfix Main Configuration

Next, edit the postfix main configuration file main.cf:

vi /etc/postfix/main.cf

policyd spf_time_limit = 3600
smtpd_recipient_restrictions =
   permit_mynetworks,
   permit_sasl_authenticated,
   reject_unauth_destination,
   check_policy_service unix:private/policyd-spf,
   Permit

The line with policyd-spf should come to reject_unauth_destination to stand. Save the file and then restart Postfix:

systemctl restart postfix

Check SPF record of received email

The next time an email is received from your domain with an SPF record, the SPF check results are displayed in the raw email header. The following header indicates that the sender of the email was sent by an authorized host.

Received-SPF: Pass (mailfrom) identity=mailfrom;

Postfix logs the SPF check results in maillog with syslog as follows.

Jul 19 07:10:38 mailhub policyd-spf[24382]: Pass; identity=helo; client-ip=12.34.56.78; helo=mail77-192.srv2.com; envelope-from=return@news.domain.com; receiver=max.muster@domain.com