SMTP servers must decide whether an SMTP client is authorized to send e-mail that the server is responsible for.
Simple Authentication and Security Layer (SASL) Integration Postfix
This guide describes how to extend an MTA (Mail Transport Agent) Postfix on CentOS 7 with CyrusSASL for SMTP authentication (SMTP-Auth). After that, clients can send e-mail using SMTP-Auth. This manual is checked under CentOS Linux release 7.7.1908 (Core), with Postfix v2.10.1 and Cyrus-SASL 2.1.26. It is assumed that the postfix is already configured and Transport Layer Security (TLS) is implemented.
Postfix does not implement the SASL Library itself, but uses existing implementations as building blocks. This means that some SASL-related configuration files belong to Postfix, while other configuration files belong to the specific SASL implementation that Postfix will use.
How to Install Cyrus-SASL
When root install the packages with the following command:
yum install cyrus-sasl cyrus-sasl-plain -yThe individual SASL mechanisms are installed as RPMs.
The following is the integration for Postfix, for this purpose make the modification in the file /etc/postfix/master.cf:
===================================================================
 service type private unpriv chroot wakeup maxproc command + args
 (yes)   (yes)   (yes)   ( never) (100)
===================================================================
 smtps inet n - n - - smtpd
   -o syslog_name=postfix/smtps
   -o smtpd_tls_wrappermode=yes
   -o smtpd_sasl_auth_enable=yes
   -o smtpd_recipient_restrictions=permit_sasl_authenticated,reject
For Postfix to work with SASL, Postfix must not run in the chroot directory, line smtps at position 5 (n).
Configure SMTP-Auth for local users, we edit the Postfix file /etc/postfix/main.cf:
smtpd_tls_auth_only = no
smtp_use_tls = yes
smtpd_use_tls = yes
smtpd_sasl_auth_enable = yes
smtp_sasl_mechanism_filter = !gssapi, !login, static:all
smtpd_sasl_security_options = noanonymous
smtpd_sasl_tls_security_options = noanonymous
smtpd_sasl_type = cyrus
smtpd_sasl_path = smtpd
Cyrus-SASL is configured by two files. The first file /etc/sysconfig/saslauthd can be transferred:
# Directory in which to place saslauthd's listening socket, pid file, and so
# on.  This directory must already exist.
SOCKETDIR=/run/saslauthd

# Mechanism to use when checking passwords.  Run "saslauthd -v" to get a list
# of which mechanism your installation was compiled with the ablity to use.
MECH=pam

# Additional flags to pass to saslauthd on the command line.  See saslauthd(8)
# for the list of accepted flags.
FLAGS=
The SASL mechanisms PLAIN and LOGIN, CRAM-MD5 and DIGEST-MD5 are often used, for which the configuration file /etc/sasl2/smtpd.conf is responsible, the deployment was also performed during installation:
pwcheck_method: saslauthd
mech_list: plain login CRAM-MD5 DIGEST-MD5
Now start Cyrus-SASL Library Daemon and activate the systemd autostart, then re-start Postfix:
systemctl start saslauthd
systemctl enable saslauthd
systemctl restart postfix
SMTP Submission Support on port 587 is now enabled, and this can be verified with the following command:
ss -tuln4 | grep 587
tcp   LISTEN      0      100         *:587         *:*
To authenticate to the SMTP gateway, a user is now created to send e-mail through the MTA:
adduser -M -s /sbin/nologin User24
passwd User24
A local UserID is sufficient for our request here, Cyrus-SASL support LDAP and SQL to interact, for example, Kopano or an AD directory service.
Testing Cyrus-SASL SMTP-Auth
The mechanisms for authentication within STARTTLS can be verified with OpenSSL:
openssl s_client -connect mail.relayhost.net:587 -starttls smtpIn the output of openssl pass an EHLO:
EHLO Hans
 250-mail.relayhost.net
 250-PIPELINING
 250-SIZE 27262976
 250-ETRN
 250-AUTH PLAIN LOGIN CRAM-MD5 DIGEST-MD5
 250-ENHANCED STATUS CODES
 250-8BITMIME
 250 DSN
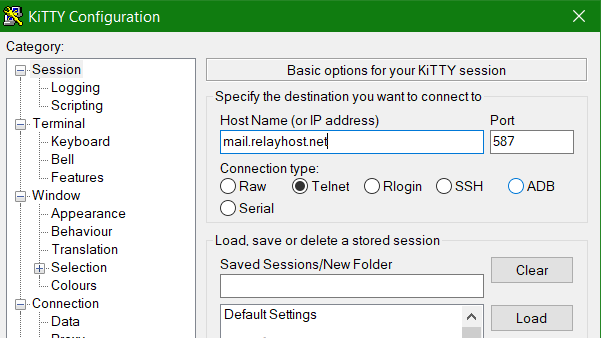
If OpenSSL is not available, telnet can also be used for this purpose, it is connected to the gateway mail.relayhost.net via port 587, PuTTY or KiTTY can also be used for this purpose.

Now we want to authenticate to the gateway (MTA). The user name and password must be transferred to the SMTP gateway in base64 encoded format, and enter the following command lines to obtain the base64 encoding for the user name and password.
echo -en "userxy" | base64
dXNlcnh5
echo -en "password" | base64
cGFzc3dvcmQ=
The SASL SMTP-Auth configuration and authentication is checked as follows by running the following lines in the terminal, after entering AUTH LOGIN to insert the user name encoded with Base64 and the password.
AUTH LOGIN
dXNlcnh5
cGFzc3dvcmQ=
telnet mail.relayhost.net 25
Trying mail.relayhost.net...
Connected to mail.relayhost.net
Escape character is 'A]'.
220 mail.relayhost.net ESMTP MAIL Service ready at Sat, 12 Mar 2019 09:26:12
EHLO smtp.example.com
250-smtp.example.com Hello
250-AUTH=LOGIN
250-AUTH LOGIN
250-TURN
250-SIZE 2097152
250-ETRN
250-PIPELINING
250-DSN
250-ENHANCED STATUS CODES
250-8bitmime
250-BINARYMIME
250-CHUNKING
250-VRFY
250 OK
AUTH LOGIN
334 VXClcm5hbWU6
dXNlcnh5
334 UGFzc4dvcmQ8
cGFzc3dvcmQ=
235 2.7.0 Authentication successfulThe SMTP-Auth edition of Postfix with Cyrus-SASL.
Insert the above encoded credentials at the 334 prompts, here at line 24 as userxy and at line 26 our password.
A 250 STARTTLS in the output shows the prerequisites that the plaintext username with password is transmitted to the SMTP gateway protected by STARTTLS.
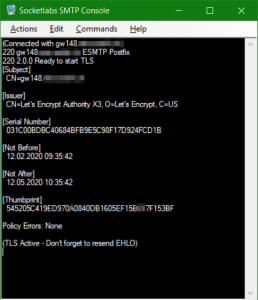
Another easy way to test an SMTP gateway is SMTPConsole.


