Tag Archives: Outlook Workaround

Outlook is primarily the client to the Exchange server, but it can also be used without Exchange. It first appeared in 1997 in connection with the Microsoft server.

how to save sent items to Delegated Mailbox on Outlook

Outlook does not save sent email in the sent items of the delegate mailbox, DelegateSentItemsStyle.

Outlook offers several people access to a shared Exchange mailbox in order to send e-mails from there; the e-mails that are sent are always in the mailbox of their own user “Sent Items”. This standard behavior of Outlook makes it difficult for employees to understand what was replied to which email by whom.

There is no way to change this state in the Outlook settings. However, adding a registry key enables Outlook to always move such e-mails to the mailbox that sent the e-mail. The following instructions are valid for Microsoft Outlook 2007 to 2019.

Outlook Sendt Items. How to do it.

Open the registry editor with the key Win+R

then entering regedit and click OK, now navigate to the following registry key:

HKEY_CURRENT_USER\Software\Microsoft\Office\15.0\Outlook\Preferences

The number 15.0 stands for the Office version, the following values apply to the versions:

12.0 = 2007
14.0 = 2010
15.0 = 2013
16.0 = 2016
16.0 = 2019
16.0 = Office 365

Create a new DWORT key with the name DelegateSentItemsStyle and assign the value 1 to this newly created key.

As you can see, the version number has remained at 16.0 since Outlook 2016 and Office 2019 will not become version 17.0. This is because Office 2016 and Office 2019 are now the same code base as Office 365.

Alternatively, you can run the following command in a command prompt opened as an administrator.

REG ADD "HKCU\Software\Microsoft\Office\15.0\Outlook\Preferences" /v "DelegateSentItemsStyle" /t REG_DWORD /d "1" /f

Outlook is now able to save the sent e-mail in sent items in the shared mailbox.

Note! Outlook must be configured to run in cached mode for this option to work properly.

Cumulative Update 9 for Exchange Server 2013 introduced a new feature that allows administrators to set the option to copy messages to the Sent Items folder.

Unfortunately, there is no easy solution for public folders. To do this, a transport role must be configured on the Exchange server.

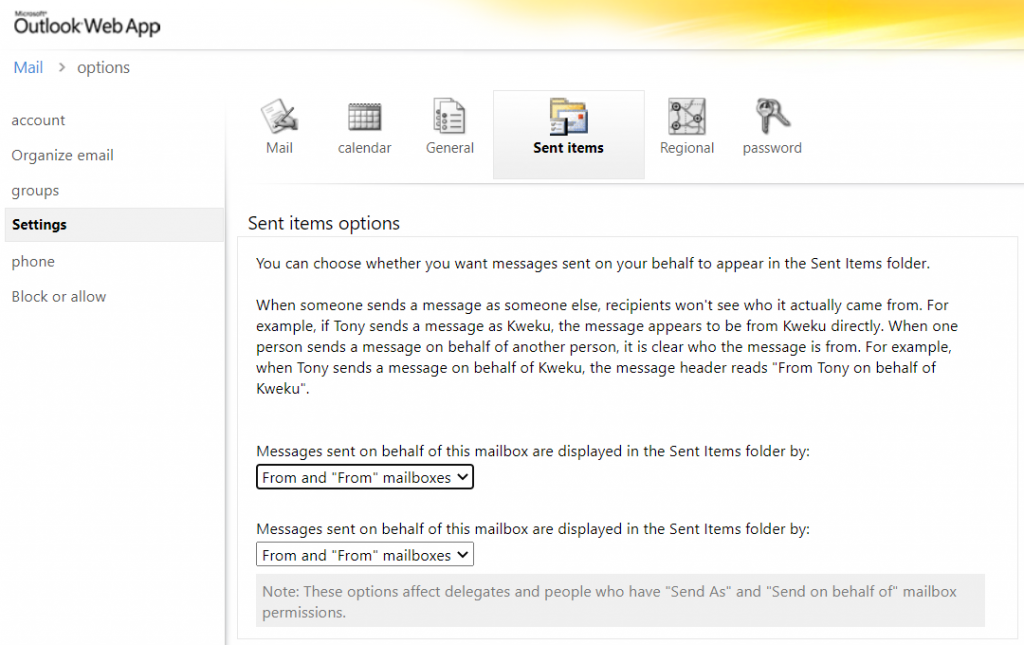
If you are still using Exchange 2010, you have to go to the OWA options for the shared mailbox, and under Settings, select Sent Items, Sender and “From” mailboxes.

Outlook under Settings, select Sent Items, Sender and "From" mailboxes.

Microsoft also provide an PowerShell cmdlet, from Exchange 2010 SP2 RU4 run the Set-MailboxSentItemsConfiguration command.

Set-MailboxSentItemsConfiguration "SharedMailbox" -SendAsItemsCopiedTo SenderAndFrom

Outlook signature template distribution

How to automatically create Outlook signature with attributes from Active Directory

Within a company it is one of the tasks of system administrators to manage the signatures for the corporate identity. Most companies want to design the entire look and feel of the signature.

Outlook does not offer any direct options for this, as the email signature in Outlook is a client-side application and users can therefore create and change their own signature. However, there is the possibility of preventing access to the signature options using group policies. However, this does not correct the problem that a default signature is first created and generated and made available to the users.

Where a centralized solution at Outlook client level is preferred and you want to do without the Exchange Transport Rules, or no Exchange Server is used to generate the signatures and distribute them via login script or GPOs, this article can be a Provide an approach for centralized solutions.

VBScript Outlook Signature deployment

The following VBScript creates an Outlook signature on the client, while user data (attributes) are read from Active Directory, dsa.msc (Active Directory users and computers) and then inserted into the signature, after which the script inserts the signature in new e- Mails and replies to.

On Error Resume Next

Set objSysInfo = CreateObject("ADSystemInfo")

GetUser = objSysInfo.UserName
Set objUser = GetObject("LDAP://" & GetUser)

GetName = objUser.FullName
GetTitle = objUser.Title
GetDepartment = objUser.Department
GetCompany = objUser.Company
GetPhone = objUser.TelephoneNumber
GetOtherPhone = objUser.otherTelephone
GetMobile = objUser.Mobile
GetEmail = objUser.EmailAddress
GetFax = objUser.FaxNumber
GetStreet = objUser.StreetAddress
GetZip = objUser.PostalCode
GetCity = objUser.l
GetState = objUser.State
GetHomepage = objUser.Homepage
GetNotes = objUser.Info
Appendix = "Feel free to contact us if you have any questions."
Regards = "Best Regards,"

Set objWord = CreateObject("Word.Application")

Set objDoc = objWord.Documents.Add()
Set objSelection = objWord.Selection

Set objEmailOptions = objWord.EmailOptions
Set objSignatureObject = objEmailOptions.EmailSignature

Set objSignatureEntries = objSignatureObject.EmailSignatureEntries

' BOF signature

objSelection.Font.Name = "Calibri"
objSelection.Font.Size = 11
objSelection.TypeText Appendix
objSelection.TypeParagraph()
objSelection.TypeText Regards & Chr(11)
objSelection.TypeText GetName
objSelection.TypeParagraph()
objSelection.TypeText GetTitle & " " & GetDepartment & Chr(11)
objSelection.TypeText "Mobile " & GetMobile
objSelection.TypeParagraph()
objSelection.Font.Name = "Arial Black"
objSelection.Font.Size = 13
objSelection.Font.Bold = True
objSelection.Font.Color = RGB(22,46,106)
objSelection.TypeText GetCompany
objSelection.Font.Name = "Calibri"
objSelection.Font.Size = 11
objSelection.Font.Bold = False
objSelection.Font.Color = RGB(0,0,0)
objSelection.TypeParagraph()
objSelection.TypeText GetStreet & "  " & GetZip & " " & GetCity & "  " & GetNotes & Chr(11)
objSelection.TypeText "Telefon " & GetPhone & "  Fax " & GetFax & "  " & GetEmail & "  " & GetHomepage

' EOF signature

Set objSelection = objDoc.Range()

objSignatureEntries.Add "MySignature", objSelection
objSignatureObject.NewMessageSignature = "MySignature"
objSignatureObject.ReplyMessageSignature = "MySignature"

objDoc.Saved = True
objWord.Quit

The lines of code are copied into an editor, probably Notepad, and saved with the file extension-.vbs.

Adjustments to the signature can be made in the script between BOF signature and EOF signature.

Now execute the script on a workstation with Outlook, there is no output on the screen, then open Outlook will a new e-mail can be created, the signature now appears in the message, which looks similar to the figure below.

Outlook Signatur

Outlook Signaturen Client distribution

You can configure scripts for login via GPOs. The settings for login and logout scripts can be found under User Configuration => Policies => Windows Settings => Scripts. The storage location for scripts that are assigned via GPOs is under the path \\FQDN\SYSVOL\FQDN\policies\user\scripts\logon and logoff.

Suggestions and adjustments

Suggestions for this post are desired and welcome; there is a repository referenced for this post on Github. If you like this post, you can also give us a rating there. If you want to contribute to this project, you can fork your own repository, do not hesitate to create your own repository or project with a pull request, it is open source and it is licensed under the MIT license.