Tag Archives: PowerShell Programming language

PowerShell is a task automation and configuration management program from Microsoft, consisting of a command-line shell and the associated scripting language. Platforms are Windows PowerShell .NET Framework, Implementation language on C#.

How to check .NET version with PowerShell

To check the .NET Framework version with PowerShell on Windows 10 and Windows 11, follow these steps.

In this tutorial you show how to check the installed .NET Framework version by using PowerShell. Here we go, hit the key on your keyboard and typing “powershell”, right-click the top result and choose Run as administrator.

Check .NET Framework version in PowerShell

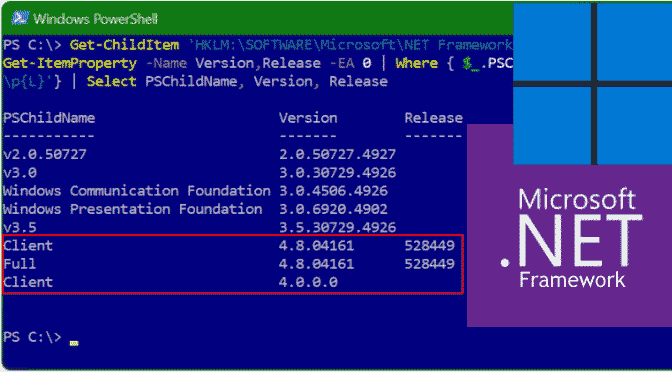
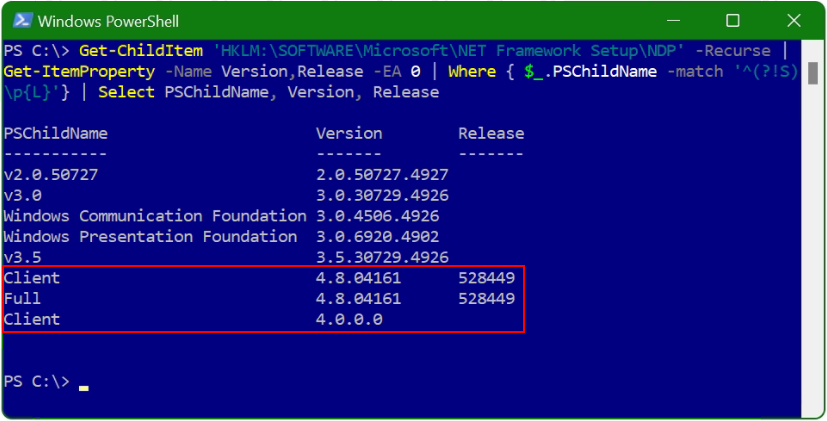
Paste the following line into PowerShell and hit the Enter key.

Get-ChildItem 'HKLM:\SOFTWARE\Microsoft\NET Framework Setup\NDP' -Recurse | Get-ItemProperty -Name Version,Release -EA 0 | Where { $_.PSChildName -match '^(?!S)\p{L}'} | Select PSChildName, Version, Release

If you ran the command above, PowerShell will return the information for both the client and the full version of .NET Framework installed on Windows 10 or if you are already using Windows 11.

How to check .NET version with PowerShell

Enable .NET Framework 3.5 by using PowerShell

For a Windows Server 2012 or later installation that isn’t connected to the Internet, you can use PowerShell to add .NET Framework 3.5 and provide access to the \sources\sxs folder on the installation media. The \sources\sxs folder can be copied to network share (for example, \network\share\sxs) to make it easily accessible to multiple computers. The target computer account DOMAIN\SERVERNAME$ must have at least read access to the network share.

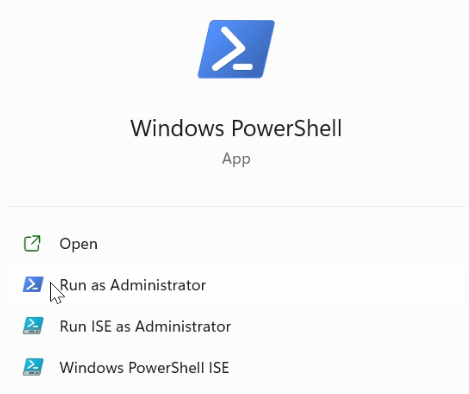
Start Windows PowerShell in the Administrator Command Prompt by typing.

powershell

To install .NET Framework 3.5 from installation media located on a network share, use the following command.

Install-WindowsFeature Net-Framework-Core -source \network\share\sxs

To verify installation, run the following command.

Get-WindowsFeature

Use .NET classes with PowerShell

The PowerShell itself was developed on the basis of the .NET Framework 2.0. In addition, all objects within PowerShell are based on the .NET object model and the classes from the .NET framework can also be used with basic functions, i.e. without the help of other tools.

This means that PowerShell users have access to an enormous function library that can be used to cover many use cases. However, in-depth knowledge of the .NET framework is absolutely necessary. This article shows basic access.

Static properties and methods can thus be called directly. There is no need to instantiate the class, i.e. to create an object.

Issue Self-Signed SSL Certificate for internal Website

This privacy error may be seen in your browser when an website is visited by using SSL Self-Signed Certificates. These often are internal web-sites of devices in your network.

Privacy error your connection isn’t private

This error page can be seen in the browser when an https page is visited, often these are internal web-sites of devices in your own network, or because you have your own web server in your network, in order to develop web-sites or web-apps in the lab, certificates are required for SSL-encrypted web-sites. However, you may do not want to have the certificate created by a trusted Certificate Authority (CA) issuer, which brings unnecessary costs, except for a Let’s Encrypt certificate, which is free, but the web server for the Automatic Certificate Management Environment (ACME) check must be reachable from the internet, here it is sufficient to issue a self-signed certificate.

How to creating Self-Signed SSL Certificates

Creating a self-signed ssl certificate automated with import them to the Windows Certificate Store of the local computer. It prompts for a Common Name to create the self-signed certificate according to the URL.

$CommonName=Read-Host -Prompt 'Enter a Common Name (CN)'
if ($CommonName) {
	Write-Output "Self-Signed Certificate [$CommonName] processing.."
} else {
	Write-Warning -Message "Missing Common Name (CN)!"
	Break;
}
New-SelfSignedCertificate -DnsName "$CommonName" -CertStoreLocation "cert:\LocalMachine\My"
$pass=ConvertTo-SecureString "pass123" -AsPlainText -force
$file="$env:temp\$CommonName.pfx"
$thumbprint=Get-ChildItem -Path Cert:\LocalMachine\MY | Where-Object {$_.Subject -Match "$CommonName"} | Select-Object Thumbprint -ExpandProperty "Thumbprint"
Export-PFXCertificate -cert cert:\LocalMachine\My\"$thumbprint" -file $file -Password $pass
Import-PfxCertificate -FilePath $file cert:\LocalMachine\root -Password $pass

Run this commands in a PowerShell opened as administrator. The certificate you just issued can now be found in the Certificate Manager (CERTLM.MSC) Microsoft Management Console (mmc) under Trusted Root Certification Authorities and in Personal certificates.

Note. Set the PowerShell Execution Policy from Restricted to RemoteSigned or Unrestricted to allow local PowerShell scripts to run.

PS C:\> Set-ExecutionPolicy RemoteSigned

Configuring SSL with the IIS PowerShell Snap-in

The acquisition of certificates is not a simple matter and cannot be made without an issuer. The users of your web-site have to trust the certificate and that’s why you have to get it from a trusted Certificate Authority. For testing purposes you can deploy your own certificate however. For this walkthrough we will use a so-called self-signed certificate.

Now lets use the IIS PowerShell Snap-in to create an SSL binding and associate it with the certificate we just created.

Creating an Self-Signed SSL Certificates Binding

We are adding the SSL binding to the Default Web Site using one of the task-based cmdlets called New-WebBinding. First you need to import the WebAdministration module gained when installing the Web-Server Windows feature.

PS C:\> Import-Module WebAdministration
PS IIS:\> New-WebBinding -Name "Default Web Site" -IP "*" -Port 443 -Protocol https

You can check the binding collection using the following command.

PS IIS:\> Get-WebBinding 'Default Web Site'

Assign the Certificate to IP:Port of the IIS Binding

You can CD into the IIS:\SslBindings directory and query the existing SSL bindings. The directory will be empty on an IIS default install.

PS IIS:\> cd IIS:\SslBindings
PS IIS:\SslBindings> gci

Now you can use the certificate thumbprint we got in the previous step to associate it with all IP addresses (0.0.0.0) and the SSL port 443.

PS IIS:\SslBindings> get-item cert:\LocalMachine\MY\"$thumbprint" | new-item 0.0.0.0!443

The previous command displaying the following SSL Binding.

IP Address       Port Store            Sites
----------       ---- -----            -----
0.0.0.0          443  My               Default Web Site

SSL is ready to go now and you can browse to your site by entering.

https://localhost