Use Ping to determine MTU Packet size
Use ping to determine MTU packet size. The Maximum Transmission Unit that a router allows without packet fragmentation. The Maximum Transmission Unit describes the maximum packet size of a protocol in the network layer of the OSI model, which can be transmitted in networks without fragmenting the frames in the data link layer. This packet size fits into the payload of the data link layer protocol.
How to check optimal MTU size for Routers
To check the MTU of a path, you have to pass the parameter -f to ping to set the “don’t fragment bit (DF-Bit-Set)” for the ICMP test packet in the IPv4 header, only then you will receive a message if the MTU is exceeded.
The ICMP Packet and MTU size
MTU check using ICMP ping packet
Run ICMP Ping in the Windows command prompt to determine the MTU size of a desired path.
The parameter -f specifies that the packages are not fragmented.
The size of the send buffer is specified with -l.
C:\> ping -4 -f 1.1.1.1 -l 1473

Pinging 1.1.1.1 with 1473 bytes of data:
Packet needs to be fragmented but DF set.
Packet needs to be fragmented but DF set.
Packet needs to be fragmented but DF set.
Packet needs to be fragmented but DF set.

Ping statistics for 1.1.1.1:
    Packets: Sent = 4, Received = 0, Lost = 4 (100% loss),
As the above results show, the packets should be fragmented. If the -f parameter were omitted, the ping would respond with fragmentation, which we don’t want.
If you don’t get an reply but see “Packet needs to be fragmented but DF set.” you’ve not found the maximum ping size.
Hint. It is best to gradually reduce the ping with the MTU value, in steps of 10+/-10 (e.g. 1472, 1462, 1440, 1400) until a packet size has been reached that is no longer fragmented and a response is received.
C:\> ping -4 -f 1.1.1.1 -l 1472

Pinging 1.1.1.1 with 1472 bytes of data:
Reply from 1.1.1.1: bytes=1472 time=7ms TTL=56
Reply from 1.1.1.1: bytes=1472 time=7ms TTL=56
Reply from 1.1.1.1: bytes=1472 time=7ms TTL=56
Reply from 1.1.1.1: bytes=1472 time=7ms TTL=56

Ping statistics for 1.1.1.1:
    Packets: Sent = 4, Received = 4, Lost = 0 (0% loss),
Approximate round trip times in milli-seconds:
    Minimum = 7ms, Maximum = 7ms, Average = 7ms
The above results indicate that the packets will not be fragmented.
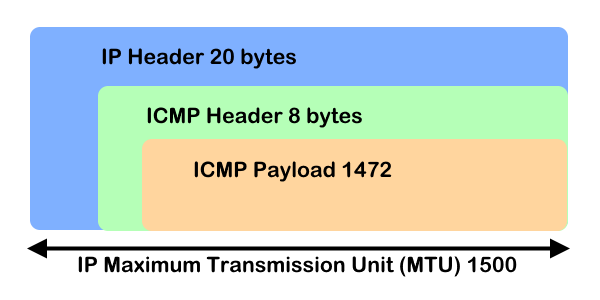
To get the right MTU size, take 1472 and add 28 to it. In the example above, 1472 is the correct value, and the size is 1500 for the network in which you work.
Calculation: 8 bytes for the ICMP-header + 20 bytes for the IP-header + 1472 bytes for the ICMP-payload: 8 + 20 + 1472 = 1500
The Control Message Protocol Protocol (ICMP) in layer 3 of the network layer, which is used by ping to send a message via the ICMP payload, which is encapsulated with the IP header. The MTU cannot exceed the size of the ICMP packet of 1500 bytes.
ICMP packet at Network layer
| IP header | ICMP header | ICMP payload size | MTU (1500) |
| 20 bytes | 8 bytes | 1472 bytes (maximum) | 20 + 8 + 1472 = 1500 |
ICMP packet at Data Link layer
| Ethernet header | IP header | ICMP header | ICMP payload size | MTU (1514) |
| 14 | 20 bytes | 8 bytes | 1472 bytes (maximum) | 14 + 20 + 8 + 1472 = 1514 |
Note. default size of ICMP payload is 32 bytes and the maximum is 1472, if the size of the payload packet is greater than 1472 then packet gets fragmented into small packets.
ICMP Message Packet decoding in Wireshark

The ICMP packet sent by the source machine is an echo request. The figure shows that ICMP query code 8 responds to the ping request.
Using Linux Ping set don’t fragment bit (DF-Bit-Set) in the Linux Shell and macOS Terminal
| Linux | ping -M do -s 1472 1.1.1.1 |
| macOS | ping -D -s 1472 1.1.1.1 |
Use Linux ping in a terminal will using DF-bit-set do not fragment message.
$ ping -M do -s 1473 1.1.1.1
PING 1.1.1.1 (1.1.1.1) 1473(1501) bytes of data.
ping: local error: Message too long, mtu=1500
ping: local error: Message too long, mtu=1500
ping: local error: Message too long, mtu=1500
^C
--- 1.1.1.1 ping statistics ---
3 packets transmitted, 0 received, +3 errors, 100% packet loss, time 31ms
Typical MTU sizes
| Medium | MTU in Bytes |
| Ethernet | 1500 |
| PPPoE | 1492 |
| VPN encapsulated | 1420 |
| ATM | 4500 |