Windows Terminal is a multi-tabbed terminal emulator available from Microsoft for Windows 10 and 11. Command line applications are executable in a separate tab as PowerShell, WSL, SSH, and Azure Cloud Shell Connector are preconfigured.
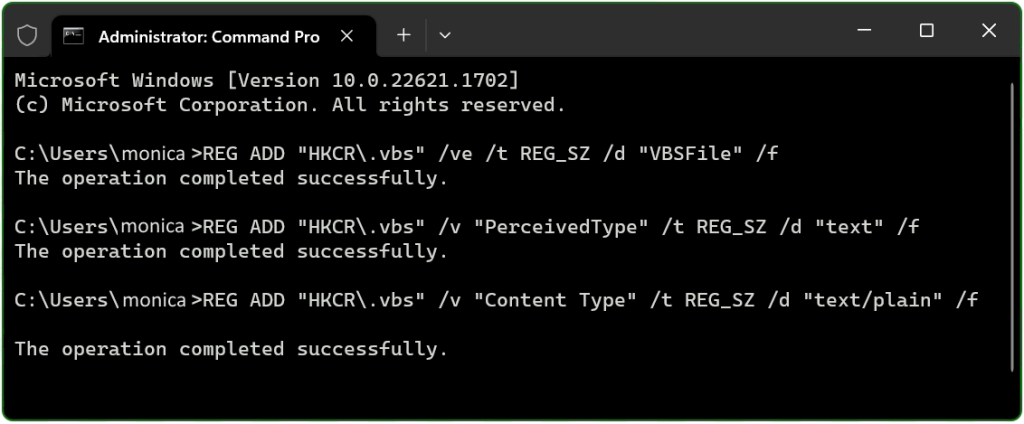
By registering with REG ADD key vbs scripts become executable
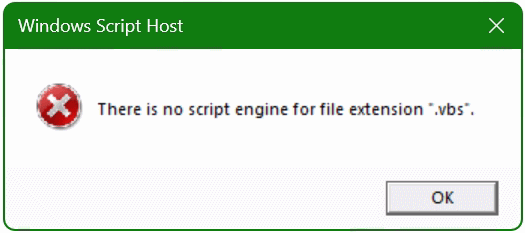
For reasons that are not known, Windows occasionally fails to run files of type .vbs (Visual Basic Script). Double-clicking does not execute the VB script file, instead the Windows Script Host error occurs.
Cause
This is a Windows issue. The proper association for .vbs file type is not set properly. There are different recommendations on how to fix this error message. The problem is caused by associating .vbs files with a program other than Microsoft Windows Based Script Host (the default).
Solution
The following registration using REG add the keys by opening a command prompt as an administrator.
By inserting the REG lines, the shortcut for VB Script files (.vbs) is added to the registry.
Visual Basic – VBS Script files can now be run in a Windows 10 and Windows 11 command line environment.
Another alternative possibility by re-associating the .vbs script files with the following command:
assoc .vbs=VBSFile
In this particular situation, the customer had .vbs script files already associated with Microsoft Windows Based Script Host already.
If that is the same case for you, check the following reference under HKEY_CLASSES_ROOT.vbs and make sure the vbs script files is assigned to “VBSFile”.
VBScript (“Microsoft Visual Basic Scripting Edition”) is an Active Scripting language developed by Microsoft that is modeled on Visual Basic. It allows Microsoft Windows system administrators to generate powerful tools for managing computers without error handling and with subroutines and other advanced programming constructs. It can give the user complete control over many aspects of their computing environment.
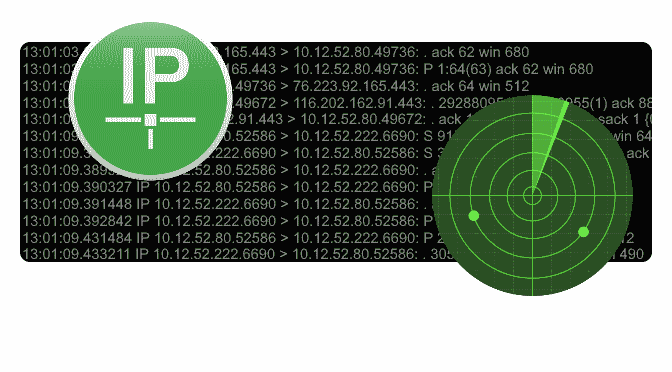
WinDump is a free command-line utility for network packet dump and traffic monitoring in Windows. It is often used in the analysis of network issues and help for troubleshooting as well as a security tool.
TcpDump is a powerful and versatile tool that contains many options and filters and is used in a variety of cases. Since it is a command-line tool, it is ideal to run it on virtual servers or devices that operate without a graphical user interface (GUI), or even to collect data that can be analyzed later.
TcpDump as WinDump on Windows
TcpDump for network packet monitoring is available as a BSD license and is pre-installed in the base system on most Unix operating systems such as FreeBSD and Linux. For Windows there is the port WinDump for network packet monitoring which is also freely available.
This tutorial shows how to install and use WinDump on Windows 11.
Network WinDump Windows Installation
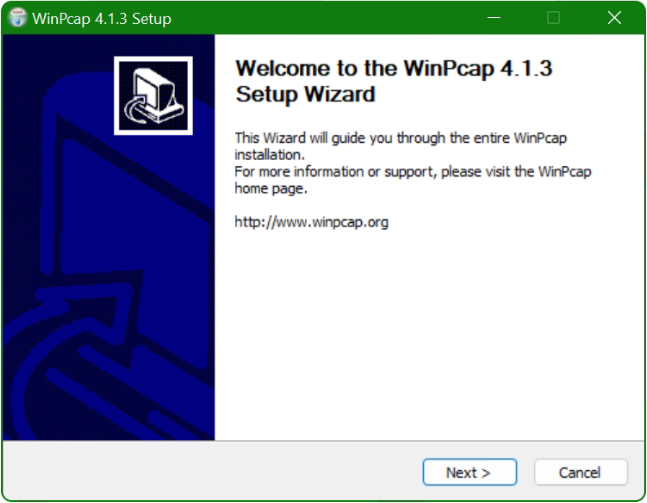
WinPcap is required as a system requirement, the program library available as freeware consists of a driver that allows access to the network card. The WinPcap program library is based on the “libpcap” library known from Unix/Linux, in which the pcap interface was implemented. The network packets are intercepted and forwarded by the WinPcap modules bypassing the protocol stack.
Install WinPcap
First, the WinPcap driver is downloaded and installed here.
The WinPcap Setup Wizard guides you through the installation with three clicks, and you can accept the suggested settings. After installing WinPcap, the computer does not have to be restarted. The network interface is put into promiscuous mode by WinPcap, whereby all packets on this interface are “listened” and forwarded to the network stack, which enables evaluation as well decoding with WinDump.
Installing WinDump
After WinPcap is installed, then you are ready for WinDump they can be downloaded here. WinDump is a command-line tool that does not have to be installed. The file WinDump.exe can be copied for example under Program Files to a newly created folder WinDump. You can also copy WinDump.exe directly into the SystemRoot (C:\Windows), whereby the search path entry can be omitted.
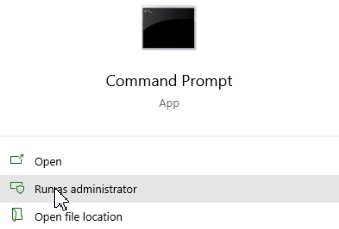
WinDump can now be run by pressing the key and type in “command prompt” to open a command prompt as administrator with clicking on Run as administrator.
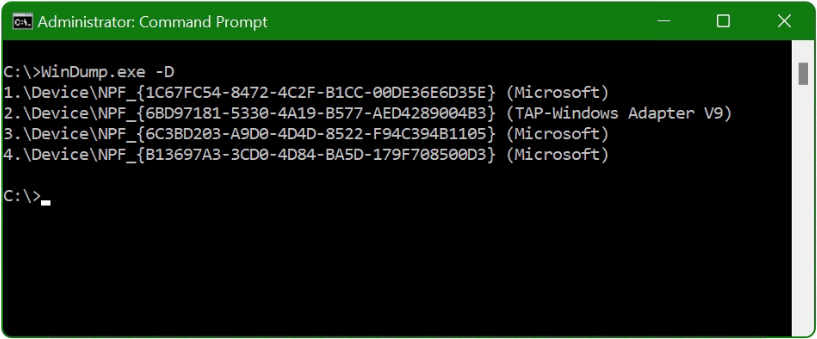
Find network interfaces
With the -D option, WinDump displays a list of the network interfaces available on the system on which WinDump can listen to packets. Windows assigns a GUID to each of these network interfaces.
Which GUID has which network interface? for my laptop I want to capture the packets from the WLAN adapter with WinDump.
This is where the command-line tool netsh helps to provide the information.
If you want to capture packets from the LAN Ethernet port (cable), the DOT3SVC service must be run, if it is not started, you can run the following command.
net start DOT3SVC
For Wi-Fi, the WLAN service must be started.
net start WLANSVC
Thus, the prerequisite is created for netsh to provide us with the desired information, with the following command for the LAN Ethernet port run in the command prompt.
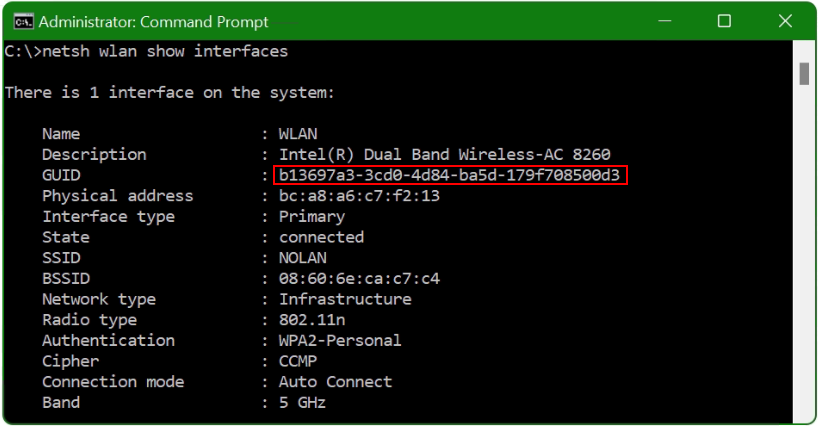
netsh lan show interfaces
Here on my laptop I use the WLAN network interface.
netsh wlan show interfaces
The command shows us the GUID of the WLAN network interface.
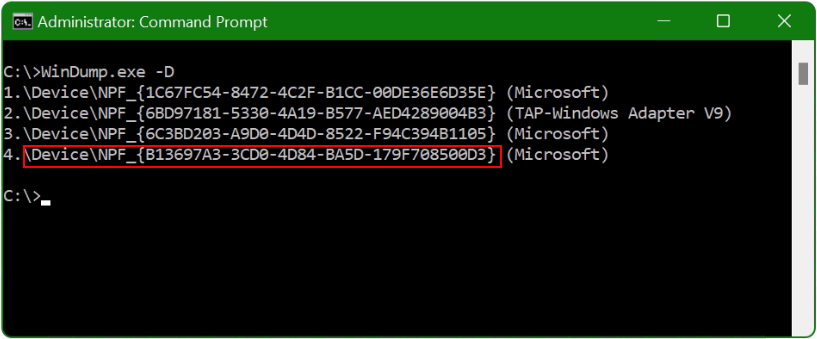
The GUID of my WLAN interface is marked in red here. As a reminder, with the command WinDump -D the interface appears here, i.e. in line 4.
WinDump should listen to my laptop on Interface 4 (WinDump -D). With apply the -i option followed by \Device\NPF_{GUID}.
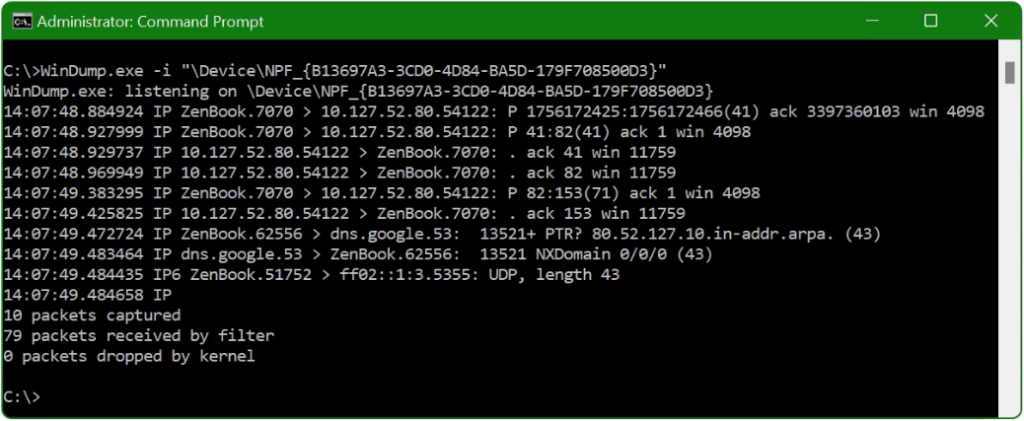
So far so good, the packets are displayed, then now comes the moment when flags and filters are used, so the chances increase that an issue can be found at all.
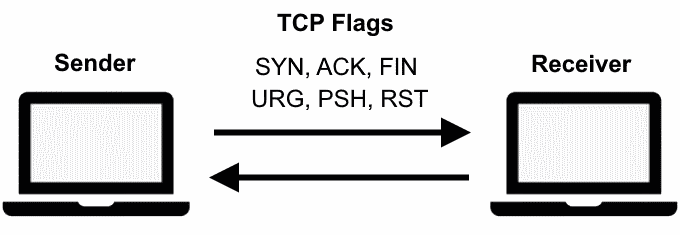
TCP flags are used within TCP packet transfer to announce a connection status or provide additional information in the context of the three-way handshake. They can be used to troubleshoot or control the connection. The TCP flags that are most commonly used are SYN, ACK, and FIN.
Analyze and display packets that contain one of the TCP flags, such as the TCP ACK flag here.
In the following example, only outbound connections are to be captured. In order to capture TCP packets that are initiated on our computer, we instruct WinDump to capture only those packets for which the SYN flag is set. However, we also have to exclude packages where the ACK flag is set, otherwise we will also receive the responses of the external host.
The -c 4 option limits the output to 4 packets (4 lines). The -v option for verbose dump, -vv increased verbose dump.
By default, WinDump resolves IP addresses to host names and also uses service names instead of port numbers. If no DNS is available, or you simply want to see the port number, the -n option can be applied.
WinDump Filter Expressions
Use filter to select which packet headers capture. If no filters are applied, all packet headers are getting. Commonly used filters are port, host, src, dst, tcp, udp, icmp.
windump -i "\Device\NPF_{B13697A3-3CD0-4D84-BA5D-179F708500D3}" -n "udp port 53 or tcp port 53"
The filter is applied to udp port 53 and tcp port 53, so only DNS packets are shown.
Filter expressions can be combined with the AND, OR, and NOT operators. In this way, packets can be isolated more precisely.
windump -i "\Device\NPF_{B13697A3-3CD0-4D84-BA5D-179F708500D3}" "src 10.10.10.11 and dst port 22"
In the next example, capturing all packets except tcp packets.
The output of WinDump can scroll very quickly across the screen, but the package headers can be saved to a file with the -w option. The files are saved in pcap format and have a .pcap extension. pcap files stored in this way can e.g. in Wireshark to decoding again later.
This command saves 20 output lines to the icmp.pcap file.
Help and version information is available with run -help.
C:\>windump -help
windump version 3.9.5, based on tcpdump version 3.9.5
WinPcap version 4.1.3 (packet.dll version 4.1.0.2980), based on libpcap version 1.0 branch 1_0_rel0b (20091008)
Usage: windump [-aAdDeflLnNOpqRStuUvxX] [ -B size ] [-c count] [ -C file_size ]
                [ -E algo:secret ] [ -F file ] [ -i interface ] [ -M secret ]
                [ -r file ] [ -s snaplen ] [ -T type ] [ -w file ]
                [ -W filecount ] [ -y datalinktype ] [ -Z user ]
                [ expression ]
Conclusion
WinDump for network packet monitoring is easy to set up, once you are familiar with the various flags and filters after a few attempts, network issues can be solved quickly, as well the security in the network can be checked and optimized, that in the same effective way as is possible with a linux system.
UNBLOG verwendet Cookies, um Dein Online-Erlebnis zu verbessern. Mit "ACCEPT" gibst Du Deine Zustimmung zur Nutzung dieser Website und unseren Datenschutzbestimmungen, oder wähle Cookie settings.
Diese Website verwendet Cookies, um Ihre Erfahrung zu verbessern, während Sie durch die Website navigieren. Von diesen werden die Cookies, die nach Bedarf kategorisiert werden, in Ihrem Browser gespeichert, da sie für das Funktionieren der grundlegenden Funktionen der Website wesentlich sind. Wir verwenden auch Cookies von Drittanbietern, mit denen wir analysieren und verstehen können, wie Sie diese Website nutzen. Diese Cookies werden nur mit Ihrer Zustimmung in Ihrem Browser gespeichert. Sie haben auch die Möglichkeit, diese Cookies zu deaktivieren. Das Deaktivieren einiger dieser Cookies kann sich jedoch auf Ihre Browser-Erfahrung auswirken.
Notwendige Cookies sind unbedingt erforderlich, damit die Website ordnungsgemäß funktioniert. Diese Kategorie enthält nur Cookies, die grundlegende Funktionen und Sicherheitsmerkmale der Website gewährleisten. Diese Cookies speichern keine persönlichen Informationen.
Alle Cookies, die für die Funktion der Website möglicherweise nicht besonders erforderlich sind und speziell zur Erfassung personenbezogener Daten des Benutzers über Analysen, Anzeigen und andere eingebettete Inhalte verwendet werden, werden als nicht erforderliche Cookies bezeichnet. Es ist obligatorisch, die Zustimmung des Benutzers einzuholen, bevor diese Cookies auf Ihrer Website ausgeführt werden.