All posts by Don Matteo

lebt in Zürich, ist System Engineer MCP bei A-Enterprise GmbH. Mitglied des UNBLOG Network. Author und Blogger zu den Themen, Linux und Open Source. Tutorials für Windows, VMware, Synology, Fortinet.

KVM Hypervisor on CentOS7

Installing KVM on CentOS


KVM is an open source hardware virtualization software that allows Linux-based and Windows-based virtual machines to run simultaneously. Called a Kernel-based Virtual Machine, KVM is an alternative to VMware ESXi and Xen, where by installing the KVM package, loading the KVM module into the current kernel and forming a hypervisor from a Linux machine.
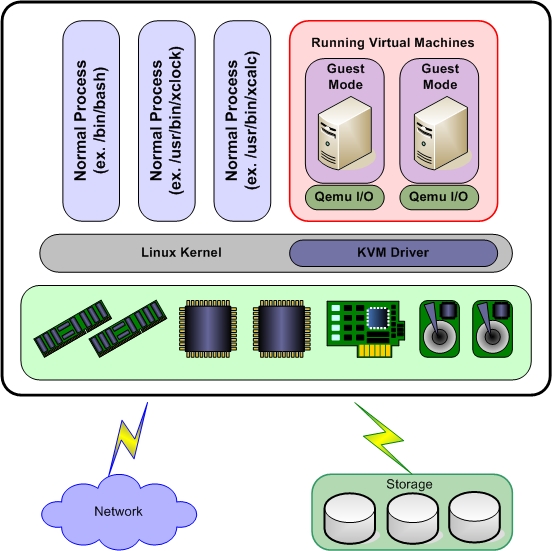
KVM Hypervisor on CentOS7

This article shows how to install a KVM hypervisor on CentOS 7.x and RHEL 7.x to install virtual machines afterwards.

KVM Hypervisor Installation

Before proceeding with the KVM installation, check whether the CPU of the system supports hardware virtualization. To do this, perform the following command in the root shell

grep -E '(vmx|svm)' /proc/cpuinfo

The word vmx or svm should appear in the output, otherwise the CPU does not support virtualization. It may be worth going into the BIOS system to activate the VT-x boot setting.

The KVM packages and their modules are installed.

yum install -y qemu-kvm qemu-img virt-manager libvirt libvirt-python libvirt-client virt-install virt-viewer bridge-utils

The KVM service can now be activated and started.

systemctl enable libvirtd
systemctl start libvirtd

We check if the KVM modules have actually been started.

lsmod | grep kvm
kvm_intel 162153 0
kvm 525409 1 kvm_intel

If there is a Minimal CentOS 7 or RHEL 7 installation, the virt-manager does not start, so we still have to install X-Window.

yum install -y "@X Window System" xorg-x11-xauth xorg-x11-fonts-* xorg-x11-utils

Restart the server and then try to start the virtual manager.

virt-manager

Before we start deploying VMs, let’s first create a bridge interface. The bridge interface is required if you want to access virtual machines from outside the network to the hypervisor. In our example, the Ethernet interface is called ifcfg-eth0.

cd /etc/sysconfig/network-scripts/
cp ifcfg-eth0 ifcfg-br0

Now edit the interface file ifcfg-eth0 and enter the following:

vi ifcfg-eth0

TYPE=Ethernet
NM_CONTROLLED="no"
BOOTPROTO=static
DEVICE=eth0
ONBOOT=yes
BRIDGE=br0

Edit the ifcfg-br0 bridge file and specify the following:

vi ifcfg-br0

TYPE=Bridge
NM_CONTROLLED="no"
BOOTPROTO=static
DEVICE=br0
ONBOOT=yes
IPADDR=192.168.91.40
NETMASK=255.255.255.0
GATEWAY=192.168.91.1
DNS1=192.168.91.50

Restart the network service to activate the bridge.

systemctl restart network

Check the bridge interface with the following command:

ip addr show br0

If you prefer to make the Network Manager, you can create the bridge interface as follows:

nmcli c add type bridge autoconnect yes con-name br0 ifname br0
nmcli c modify br0 ipv4.addresses 192.168.91.40/24 ipv4.method manual
nmcli c modify br0 ipv4.gateway 192.168.91.1
nmcli c modify br0 ipv4.dns 192.168.91.50
nmcli c delete eth0
nmcli c add type bridge-slave autoconnect yes con-name eth0 ifname eth0 master br0
reboot
ip a

Virtual machines can now be created either from the command line with the virt-install command or from the GUI virt-manager.

In the GUI, go to the File option and click New virtual Machine.

The virtual machine is now created with the help of the wizard.

Create virtual machine

Create virtual machines from the command line:

virt-install --name=Ubuntu-16-04 --file=/var/lib/libvirt/images/ubuntu16-04.dsk --file-size=20 --nonsparse --graphics spice --vcpus=2 --ram=2048 --cdrom=ubuntu-16.04-server-amd64.iso --network bridge=br0 --os-type=linux --os-variant=generic
Starting install...
Allocating 'ubuntu16-04.dsk' | 20 GB 00:00:00
Creating domain...

From the virtual manager, the VMs are booted up and managed, the status and system load is displayed, similar to what you know from vSphere.

Illustration: KVM virtual Manager

Furthermore, virt-manager from Cygwin is executable in Windows 10, for this Cygwin64 must be installed with the Xorg server and virt-manager, with the virt-manager one connects to the KVM hypervisor.

Illustration: Cygwin virt-manager Inindung
Illustration: Cygwin virt-manager

Master Browser Lookup

Windows Master Browser Lookup for NetBIOS Name and Elected Master Browser

The folders and printers shared by Windows clients appear in the client network environment. If the network environment remains empty, it is often the computer browser service. Windows attempts to view all PCs on a Windows network in the network environment.

Windows Workstation Service

First, you need to make sure that a Windows network is working properly at all. The Windows Workstation Service and Server services must be running, and the network connection properties must have file and printer sharing and the Microsoft Network Client active, and TCP/IP over NetBIOS must be enabled.

Note that clients that are not in a domain are in the same workgroup, the WORKGROUP and WORKING GROUP are different groups. If all this does not yet lead to success, one should search for the computer on the network, which has been delegated to the master browser.

NetBIOS Name Information

The NBTscan is a program for scanning IP networks for NetBIOS name information. It sends a NetBIOS status query to any address in the specified range and lists received information in a human-readable form. For each responding host, the IP address, NetBIOS computer name, user name, and MAC address of the computer are displayed.

C:\> nbtscan -s: -h -v 192.168.10.0/24

To discover the master browser on a local network, the following content can be created in a batch file.

@Echo Off
Title Master Browser Lookup & Color 1A
call :IsAdmin

if not [%1]==[] goto lookup
echo use: nbt [ip address range]
echo example: nbt 192.168.10.0/24
goto:eof

:lookup
nbtscan -s: -h -v %1 | find "Master Browser"
for /f "delims=" %%A in ('nbtscan -s"   " -h -v %1 ^| find "Master Browser"') do set "var=%%A"
echo .
echo Elected Master Browser on %var:~0,15%
echo .
nbtstat -A %var:~0,15%
pause

:IsAdmin
Reg.exe query "HKU\S-1-5-19\Environment"
If Not %ERRORLEVEL% EQU 0 (
 cls & echo You must have administrator rights to continue ... 
 pause & exit
)
cls
goto:eof

Using Copy Paste to the batch file .bat save and, when the IP network is committed, run as an administrator in the command prompt, the program nbtscan.exe and cygwin1.dll must be in the same directory, or the path to the program must be in the search path environment.

Download NBTScan

Master Browser Delegation

Often it helps when the PC of this is the master browser on its network to restart, so the choice to delegate another computer is triggered. Microsoft sets priorities here, by regulating the assignment (election) to the master browser is granted. Administrators don’t just want to leave it to random rules about who master browser should be, to do so, you open Regedit and go to the following key.

HKEY_LOCAL_MACHINE-SYSTEM\CurrentControlSet\Services\Browser\Parameters

Edit the REG_SZ MaintainServerList key and set it to FALSE or TRUE, for disable or enable. For Windows XP and Server 2003, the REG_SZ key is IsDomainMaster with value FALSE / TRUE, and MaintainServerList with the value AUTO / NO / YES. The change does not take effect immediately and may take up to 48 minutes.

Linux Samba Master Browser

For Linux, the Samba configuration file smb.conf is responsible, in the following example, a Samba server with the highest priority is chosen as the master browser, suitable on a network without Windows PDC. In networks in these there is a Windows PDC it is not recommended.

[global]
    domain master = yes
    preferred master = yes
    local master = yes
    os level = 255
Illustration: Computer Browser Service Architecture

NBTStat is a command-line tool for troubleshooting NetBIOS name over TCP/IP (NetBT) resolution issues, it is part of the Windows standard. It shows protocol statistics and current TCP/IP connections with NetBT.

C:\> nbtstat -A 192.168.10.73
LAN connection 1:
Node IP[192.168.10.73] address: Rang[]e ID: 

NetBIOS name table of the remote computer

    Name          Type  Status
    ---------------------------------------------
    AMX3000       <00>  CLEAR  Registered
    WORKGROUP     <00>  GROUP  Registered
    WORKGROUP     <1C>  GROUP  Registered
    AMX3000       <20>  CLEAR  Registered
    WORKGROUP     <1B>  CLEAR  Registered
    WORKGROUP     <1E>  GROUP  Registered
    ADMINISTRATOR <03>  CLEAR  Registered

    MAC Adresse = 00-0B-AB-0B-11-8E

NetBIOS name tables type <00> is output in hex.</00>

<00> specifies the domain to which this computer belongs
<03> Computer name assigned to the messenger service
<20> Computer name assigned to the server service
<1C> Internet group name registered with domain controller
<1B> Identifying a domain master browser name
<1E> Computer can be used as a backup browser in the domain
<03> Username currently logged on to this computer
<1D> Identify segment master browsers without a domain