In this Tutorial we show you how to deploy and use GeoIP with the kernel firewall of Debian 10 buster and Debian 11 bullseye or Ubuntu 20.04 LTS.
More Security with GeoIP Lockout
In addition, further considerations should be made whether the accessibility of websites and services from countries far away from local languages is at all appropriate. Furthermore, it could be considered that relations with distant regions, such as the South Pacific, might not be maintained. When tracking the sources of brute force and DDoS attacks, the sources are often found in the Far East and Russia.
A geolocation system is used to determine the location of systems. On the Internet, an IP address can be assigned to a country, a city or an organization in order to then determine the location.
Install the GeoIP Firewall
The installation of the required services and libraries for GeoIP firewall on Debian and Ubuntu is done as root with “su -” or “sudo su -“.
$ apt update && apt upgrade
$ apt -y install curl unzip perl iptables-dev xtables-addons-common libtext-csv-xs-perl libmoosex-types-netaddr-ip-perl pkg-config
If you get abortE: Package iptables-dev has no installation candidatethen skip next MaxMind GeoLite2 and go to update.
The GeoIP database must be downloaded from the MaxMind website, with the following URL: https://www.maxmind.com. MaxMind is a Massachusetts-based digital mapping company that provides location data for IP addresses.
MaxMind requires you to register for the Free Account with a valid email. After signing in, go to My Account and Download Databases.

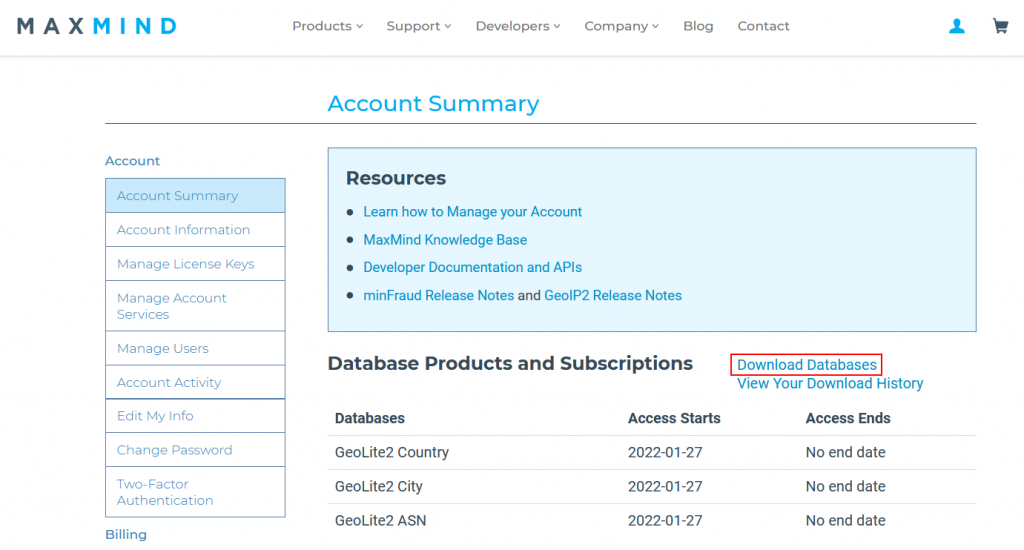
Under GeoIP2 and GeoIP Legacy Databases – GeoLite2-Country-CSV Format with Download ZIP download the file.

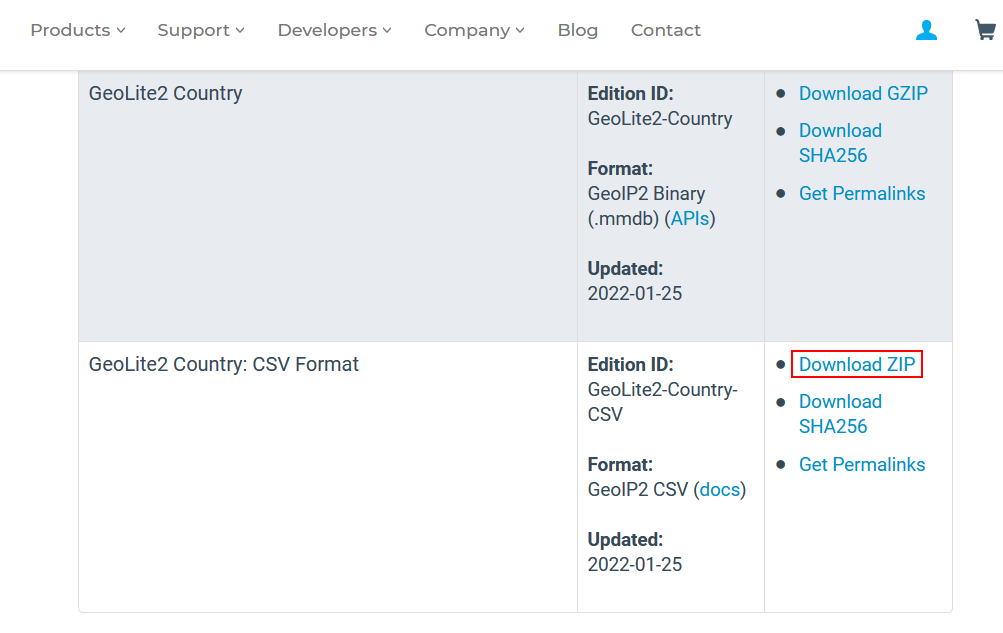
If you want to perform the download using Permalink, you need a license key, which you can generate under “My Account – Manage License Keys”, the download did not work here at this time (401 Unauthorized).
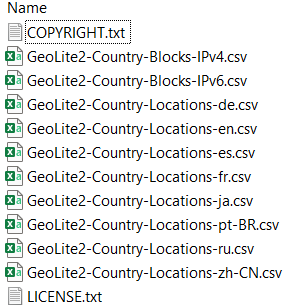
The contents of the GeoLite2-Country-CSV_20220125.zip ZIP file

Create a new directory on the host and change to it.
$ mkdir -p /usr/share/xt_geoip/
$ cd /usr/share/xt_geoip
Upload theCountry-CSV_20220125.zip/usr/share/xt_geoip
$ unzip GeoLite2-Country-CSV_20220125.zip
$ cd GeoLite2-Country-CSV_20220125
$ /usr/lib/xtables-addons/xt_geoip_build -D /usr/share/xt_geoip *.csv
The CSV data is converted using the MaxMind CSV database converter to binary for xt_geoip. The output appears similar to the following, here in abbreviated form.
729578 entries total
    0 IPv6 ranges for
   16 IPv4 ranges for
362309 IPv6 ranges for 0 0
365215 IPv4 ranges for 0 0
    0 IPv6 ranges for 1 0
   28 IPv4 ranges for 1 0
    0 IPv6 ranges for AD Andorra
    8 IPv4 ranges for AD Andorra
...
Now load the GeoIP firewall module xt_geoip into memory with subsequent testing.
$ modprobe xt_geoip
$ lsmod | grep ^xt_geoip
The output should be similar to this.
xt_geoip 16384 34Using GeoIP firewall on Debian and Ubuntu
The GeoIP firewall integration on Debian and Ubuntu for iptable is now complete, commands can now be executed with the following syntax.
iptables -m geoip –src-cc country[,country] -dst-cc country[,country]
For example, traffic from Russia and China should be blocked.
$ iptables -A INPUT -m geoip --src-cc RU,CN -j DROPDrop accesses that do NOT come from Germany.
$ iptables -A INPUT -m geoip ! --src-cc EN -j DROPIt can also block the outgoing traffic, here to India.
$ iptables -A OUTPUT -m geoip -dst-cc IN -j DROPHelpful iptables commands.
$ iptables -vnL
$ iptables -L INPUT --line-numbers -vn
The output might look something like the following.
Chain INPUT (policy DROP 259 packets, 13704 bytes)
num   pkts bytes target     prot opt in     out     source               destination
1    68011   14M f2b-apache-auth  tcp  --  *      *       0.0.0.0/0            0.0.0.0/0            multiport dports 80,443
2     155K   41M f2b-sshd   tcp  --  *      *       0.0.0.0/0            0.0.0.0/0            multiport dports 22
3     272K   12M ufw-reject-input  all  --  *      *       0.0.0.0/0            0.0.0.0/0
4       0     0 DROP       all  --  *      *       0.0.0.0/0            0.0.0.0/0            -m geoip --source-country RU,CN
5       0     0 DROP       all  --  *      *       0.0.0.0/0            0.0.0.0/0            -m geoip --source-country BY,CY
This example swipe row 5.
$ iptables -D INPUT 5Query ISO Country Code of an IP address, first install geoip-bin package.
$ apt install geoip-binExample GeoIP query with geoiplookup.
$ geoiplookup 61.219.11.151
GeoIP Country Edition: TW, Taiwan
Example. iptables GeoIP firewall on Debian
An example with ISO codes for countries that are classified as obscure or as known suspicious havens and are explicitly blocked, the ISO codes of the DACH countries should be approved.
$ iptables -P INPUT DROP
$ iptables -A INPUT -m geoip --src-cc AT,CH,DE -j ACCEPT
$ iptables -N DROP_GEOIP
$ iptables -A DROP_GEOIP -m geoip --src-cc ID -j DROP
$ iptables -A DROP_GEOIP -m geoip --src-cc KP -j DROP
$ iptables -A DROP_GEOIP -m geoip --src-cc TJ -j DROP
$ iptables -A DROP_GEOIP -m geoip --src-cc TM -j DROP
$ iptables -A DROP_GEOIP -m geoip --src-cc TR -j DROP
$ iptables -A DROP_GEOIP -m geoip --src-cc UA -j DROP
$ iptables -A DROP_GEOIP -m geoip ! --src-cc AT,CH,DE -j DROP
$ iptables -A INPUT -j DROP_GEOIP
The (!) argument inverts the passed values, which excludes ISO (AT,CH,DE) from jump to DROP.
Check the iptables INPUT chain with line-numbers, the output as follows for this example.
$ iptables -L INPUT --line-numbers -vn
Chain INPUT (policy DROP 0 packets, 0 bytes)
num   pkts bytes target     prot opt in     out     source               destination
1     273K   12M ufw-after-logging-input  all  --  *      *       0.0.0.0/0            0.0.0.0/0
2     273K   12M ufw-reject-input  all  --  *      *       0.0.0.0/0            0.0.0.0/0
3     273K   12M ufw-track-input  all  --  *      *       0.0.0.0/0            0.0.0.0/0
4       0     0 DROP       all  --  *      *       0.0.0.0/0            0.0.0.0/0            -m geoip --source-country RU,CN
5       0     0 DROP       all  --  *      *       0.0.0.0/0            0.0.0.0/0            -m geoip --source-country BY,CY
6       0     0 DROP       all  --  *      *       0.0.0.0/0            0.0.0.0/0            -m geoip --source-country HK,KP
7       0     0 DROP       all  --  *      *       0.0.0.0/0            0.0.0.0/0            -m geoip --source-country KG,KZ
8       0     0 DROP       all  --  *      *       0.0.0.0/0            0.0.0.0/0            -m geoip --source-country UA,VN
9       0     0 DROP       all  --  *      *       0.0.0.0/0            0.0.0.0/0            -m geoip --source-country MD,GE
10      0     0 DROP       all  --  *      *       0.0.0.0/0            0.0.0.0/0            -m geoip --source-country TW,TM
11    102  5329 DROP_GEOIP all  --  *      *       0.0.0.0/0            0.0.0.0/0
12     90  4827 DROP       all  --  *      *       0.0.0.0/0            0.0.0.0/0            -m geoip ! --source-country AT,CH,DE
iptables-persistent
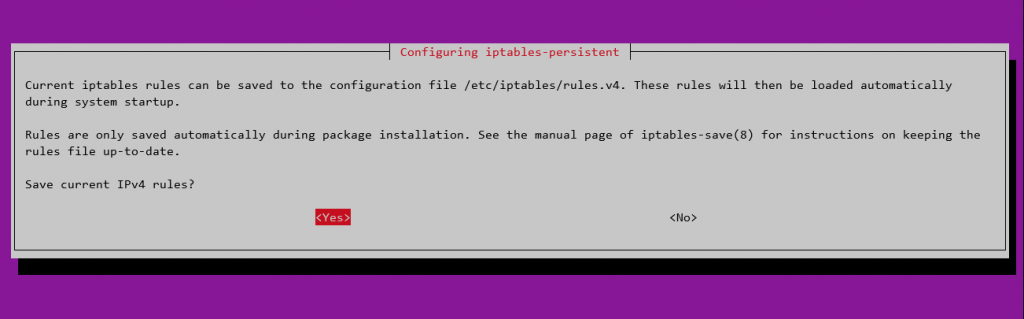
Reactivate the iptables chains after a restart, to do this iptables-persistent is installed.
$ apt install iptables-persistentConfirm with yes to back up the iptables during installation.

The iptables chains can be backed up with iptables-save to restore them at a later time.
$ iptables-save > /etc/iptables/rules.v4
$ ip6tables-save > /etc/iptables/rules.v6
Recovery with iptables-restore
$ iptables-restore < /etc/iptables/rules.v4
$ ip6tables-restore < /etc/iptables/rules.v6
The next related post might also be helpful, see in How to use iptables and configuring.
Update
later it was discovered that the iptables-dev library is no longer available on debian 11 and has been replaced by libxtables-dev.
Expect from xt_geoip_build is now the DBIP format as input, Maxmind is thrown out. Probably because the new “build script” xt_geoip_build requires the CSV file download from db-ip.com, instead from MaxMind.
Run the commands bellow to install libxtables-dev, continous with download the Country Lite Database in the DBIP format from db-ip.com, then unzip the GZ and convert the CSV using the xt_geoip_build script.
$ apt install libxtables-dev
$ mkdir -p /usr/share/xt_geoip/
$ cd /tmp
$ wget -O dbip-country-lite.csv.gz "https://download.db-ip.com/free/dbip-country-lite-$(date +'%Y-%m').csv.gz"
$ gunzip dbip-country-lite.csv.gz
$ chmod 755 /usr/lib/xtables-addons/xt_geoip_build
$ /usr/lib/xtables-addons/xt_geoip_build -D /usr/share/xt_geoip *.csv
Conclusion
This tutorial will show you how to deploy and configure GeoIP with Debian and Ubuntu kernel firewall. Using GeoIP Lockout brings more security. It is shown how you will install and apply the necessary services and libraries. For GeoIP firewall on Debian and Ubuntu based operating systems.