Category Archives: Howto Tutorials (EN)

Knowledge Network for Tutorials, Howto’s, Workaround, DevOps Code for Professionals.

Use the PrtScn button to open screen snipping

How to use the Windows 10 Print Screen button to open the screen snipping feature

Windows 10 version 1903 allows you to use the screen snipping feature to quickly snip and share a screenshot. You can use the Print Screen key to launch screen snipping. Until now, you had to be satisfied to use additional tools, such as the free Greenshot tool. Here is come now the Windows 10 Print Screen shortcut.

How the Print Screen Button works

Windows Print Screen Button Snipping Button Key

Using the new print screen button, you can capture a rectangle, snip a freeform area, or take a full screen capture, and copy it directly to the clipboard.

Enable Print Screen Key to Launch Screen Snipping in Windows 10

  1. Open the Settings
  2. Go to Ease of access -> Keyboard
  3. On the right, scroll down to the Print Screen shortcut section
  4. Activate with the slider – Use the PrtScn button to open screen snipping

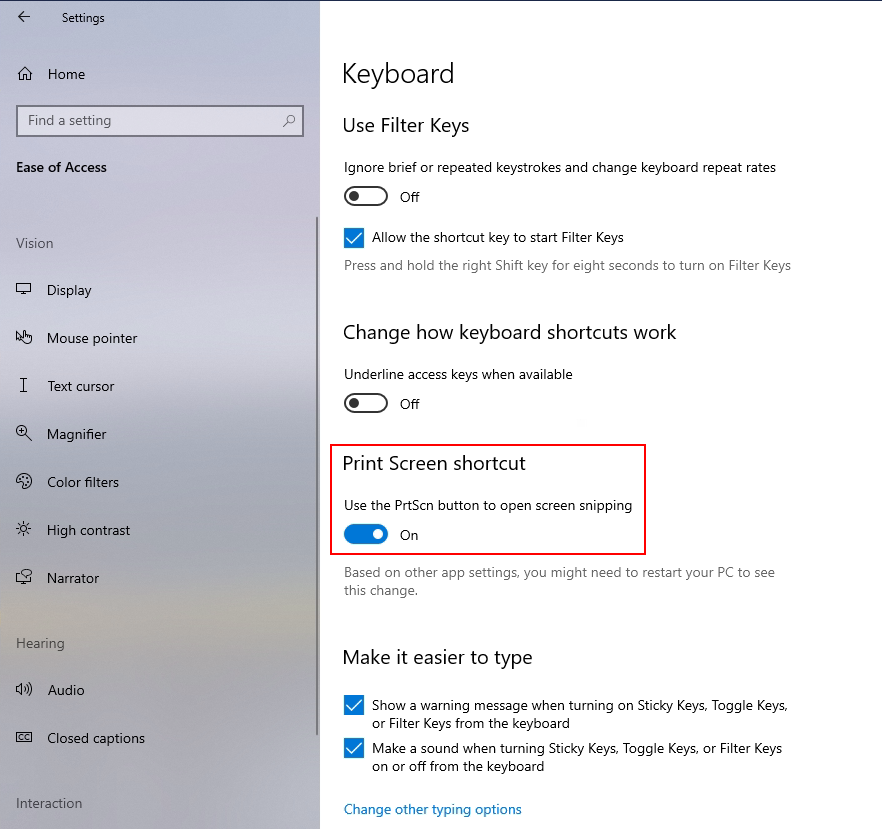
After activating the print screen shortcut, it is possible to snip and share a screenshot via the print button (prt sc).

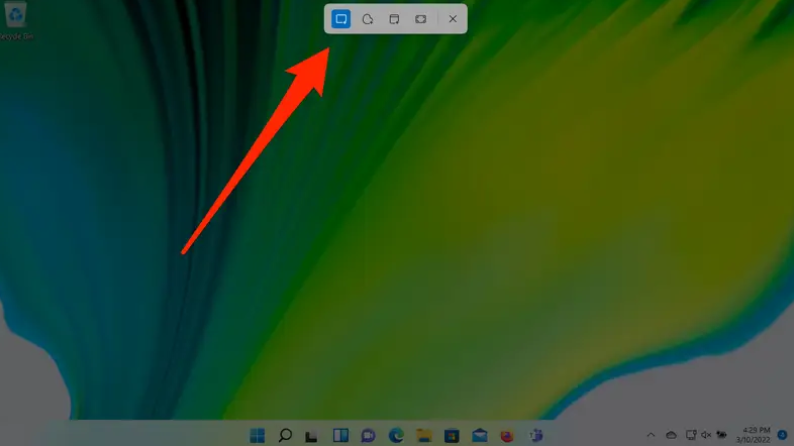
The Snipping Tool in Windows 11

Although the Snipping Tool exists in Windows 10, it’s not usually the screenshot tool you’ll want to use. In Windows 11, the Snipping Tool got a major upgrade and it’s now the best way to take custom screenshots.

To start the Snipping Tool in Windows 11, you can search for it or press the Windows Key + Shift + S. Your screen will go dim and a toolbar of screenshot options will appear at the top of the screen. This toolbar will let you take a rectangular, freeform, full-window, or a full-screen capture, as well as time your screenshot for the amount of seconds you’ll need to pull up the window you need to capture.

Snipping Tool in Windows 11

Windows Print Screen (PrtScn) button

Depending on your hardware, you may use the Windows Logo Key  + PrtScn button as a shortcut for print screen. If your device does not have the PrtScn button, you may use Fn + Windows logo key  + Space Bar to take a screenshot, which can then be printed. 

To locate your screenshots, open File Explorer from the taskbar. On the side navigation pane, select the Pictures folder, and select Screenshots.

Find text string in files and subdirectories

Search and find for text and strings in files and subdirectories with result in variable

Usually when searching for strings in files, we use Windows explorer or Windows search. In Linux Gnome uses nautilus or nemo, on macOS we use the finder.

Command-Line commands help with automated processing by scripts and batch processes. This post shows how to search and find for text strings in files in Windows Command Prompt and in the Linux shell.

findstr text strings in the command prompt

The Windows Command Prompt (cmd) a good use provide the findstr command with Windows+R run cmd as the following example shows.

findstr /s /i "dolor" *.*
doc.txt:Lorem ipsum dolor sit amet

If you want to assign the result of a variable for further processing in scripts. This can be made possible in a for loop, the following lines are stored and executed in a batch file.

@echo off
for /f "delims=" %%A in ('dir ^| findstr /s /i "dolor" *.*') do set "var=%%A"
echo %var%

With echo the entire line is output with the searched word dolor, if you want to narrow the output only to the characters of a word, this can be achieved with variable parameters.

doc.txt:Lorem ipsum dolor sit amet 
1234567890123456789012345678901234

From the sign 20 our word is dolor, it is 5 characters long.
The CLI input findstr dolor now brings dolor to the output found in the doc.txt file.

@echo off 
for /f "delims=" %%A in ('dir ^| findstr /s /i %1 *.*') do set "var=%%A" 
echo %var:~20,5%

The variable var is assigned the output of findstr.

Find text strings in files using Linux shell

$ grep -r "dolor" *
Dokumente/doc.txt:Lorem ipsum dolor sit amet

In the Linux bash Console does grep and find are used.

$ find . -type f -print0 | xargs -0 grep "dolor"
./Dokumente/doc.txt:Lorem ipsum dolor sit amet

The text search with grep is as follows, the result is assigned to the variable var, and output with echo.

$ var=`grep -r "dolor" *`
$ echo $var
Dokumente/doc.txt:Lorem ipsum dolor sit amet

When searching with grep, you do not want to output the entire line, but only the third word.

$ var=`grep -r "dolor" * | awk '{ print $3 }'`
$ echo $var
dolor

There are many other possibilities especially in the Linux bash, the command find is very extensive and offers with xargs also regular expressions and other commands for handing over, with find –help you get all possible applications. The only point here is to show an introduction to the application and procedure.

Remarks

This post shows how to find for text string in files in the command line. Typically, when searching for strings in files, we use Windows Explorer or Windows Search. On Linux we use Gnome Nautilus or Nemo, and on macOS we use the Finder.

Command line commands help with automated processing through scripts and batch processes. This shows how to search for text strings in files in the Windows command prompt and Linux shell and assign the results to variables.