Category Archives: Howto Tutorials (EN)

Knowledge Network for Tutorials, Howto’s, Workaround, DevOps Code for Professionals.

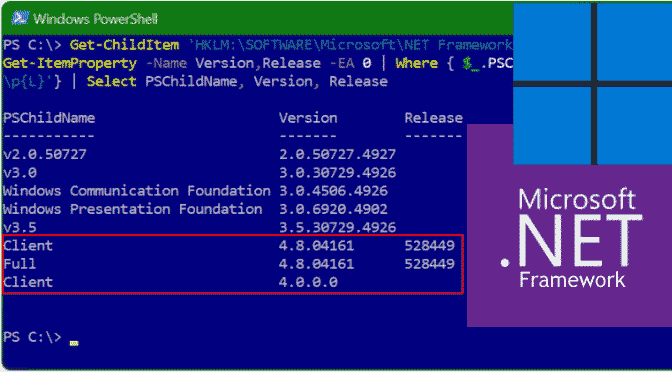
How to check .NET version with PowerShell

To check the .NET Framework version with PowerShell on Windows 10 and Windows 11, follow these steps.

In this tutorial you show how to check the installed .NET Framework version by using PowerShell. Here we go, hit the key on your keyboard and typing “powershell”, right-click the top result and choose Run as administrator.

Check .NET Framework version in PowerShell

Paste the following line into PowerShell and hit the Enter key.

Get-ChildItem 'HKLM:\SOFTWARE\Microsoft\NET Framework Setup\NDP' -Recurse | Get-ItemProperty -Name Version,Release -EA 0 | Where { $_.PSChildName -match '^(?!S)\p{L}'} | Select PSChildName, Version, Release

If you ran the command above, PowerShell will return the information for both the client and the full version of .NET Framework installed on Windows 10 or if you are already using Windows 11.

How to check .NET version with PowerShell

Enable .NET Framework 3.5 by using PowerShell

For a Windows Server 2012 or later installation that isn’t connected to the Internet, you can use PowerShell to add .NET Framework 3.5 and provide access to the \sources\sxs folder on the installation media. The \sources\sxs folder can be copied to network share (for example, \network\share\sxs) to make it easily accessible to multiple computers. The target computer account DOMAIN\SERVERNAME$ must have at least read access to the network share.

Start Windows PowerShell in the Administrator Command Prompt by typing.

powershell

To install .NET Framework 3.5 from installation media located on a network share, use the following command.

Install-WindowsFeature Net-Framework-Core -source \network\share\sxs

To verify installation, run the following command.

Get-WindowsFeature

Use .NET classes with PowerShell

The PowerShell itself was developed on the basis of the .NET Framework 2.0. In addition, all objects within PowerShell are based on the .NET object model and the classes from the .NET framework can also be used with basic functions, i.e. without the help of other tools.

This means that PowerShell users have access to an enormous function library that can be used to cover many use cases. However, in-depth knowledge of the .NET framework is absolutely necessary. This article shows basic access.

Static properties and methods can thus be called directly. There is no need to instantiate the class, i.e. to create an object.
Removing OneDrive completely from Windows

OneDrive removing in Windows 10 and Windows 11, if you don’t need the pre-installed cloud app, OneDrive can be completely uninstalled from Windows, the icons are also removed from the taskbar and Explorer as well as from the Start menu. We’ll show you how to remove OneDrive from Windows – here’s how it works.

we shouldn’t share our data on onedrive

To removing OneDrive from Windows, in the first step, insert the following lines into an editor, just do it with the text editor notepad.exe.

@echo off
REM OneDrive uninstall
taskkill /f /im OneDrive.exe
IF EXIST %SystemRoot%\SysWOW64\OneDriveSetup.exe %SystemRoot%\SysWOW64\OneDriveSetup.exe /uninstall
IF EXIST %SystemRoot%\System32\OneDriveSetup.exe %SystemRoot%\System32\OneDriveSetup.exe /uninstall
REG ADD "HKCR\CLSID\{018D5C66-4533-4307-9B53-224DE2ED1FE6}" /v "System.IsPinnedToNameSpaceTree" /t REG_DWORD /d "0" /f
REG ADD "HKCR\WOW6432Node\CLSID\{018D5C66-4533-4307-9B53-224DE2ED1FE6}" /v "System.IsPinnedToNameSpaceTree" /t REG_DWORD /d "0" /f

Insert the Code lines Copy Paste into the Notepad editor.

Save the contents of Notepad as onedrive-uninstall.cmd file, i.e. to the Documents folder.

Removing OneDrive from Windows Now

Then, in the second step, run the batch file onedrive-uninstalll.cmd. To do this, press the key and type Command Prompt on your keyboard, and select Run as administrator.

In the open command prompt, switch to the directory where the file onedrive-uninstall.cmd is stored, with enter the change directory command cd %userprofile%\documents press enter then run the batch file. This will completely removing OneDrive from your Windows.

The saved batch file can now be copied to other systems to remove OneDrive for additional computers if necessary.

What is Microsoft OneDrive? (formerly SkyDrive) is a file hosting service operated by Microsoft. First launched in August 2007, it enables registered users to share and synchronize their files. OneDrive also works as the storage backend of the web version of Microsoft Office. The app offers 5 GB of storage space free of charge, with 100 GB, 1 TB. OneDrive provide 6 TB storage options available either separately or with Microsoft 365 subscriptions.

Privacy concerns, complete loss of access to data

Data stored on OneDrive is subject to monitoring through technologies like PhotoDNA. Any content that is in violation of Microsoft’s Code of Conduct is subject to removal, and may lead to temporary or permanent shutdown of the associated Microsoft account. Closing an account without pre-notice is in most cases illegal in many jurisdictions, like in Germany. This has led to privacy concerns in relation to data stored on OneDrive. Microsoft has responded by indicating that “strict internal policies in place to limit access to a user’s data”, and that advanced mechanisms, such as Microsoft’s automated PhotoDNA scanning tool, are utilized to ensure users abide with the Code of Conduct and that their account does not contain files in contravention thereof, such as partial human nudity (including art or drawings), or any online surveys.