How to get Linux Mint Recovery Mode

When Linux Mint is installed on the computer and no other operating systems are available, the Grub Boot menu is hidden by default. In order to get the Grub menu with the Linux Mint Recovery Mode at startup, the right Shift key has to be pressed after switching on, unfortunately this does not work with virtual machines, here you have to set up the Grub menu persistently.

Enable Linux Mint Recovery Menu

If the Grub menu should appear at each start to get the recovery menu for system repairs, or to pass kernel parameters, edit the file 90_custom.cfg as root:

First become root with sudo su –

$ vi /etc/default/grub.d/90_custom.cfg

then add the following lines:

GRUB_TIMEOUT="5"
GRUB_TIMEOUT_STYLE="menu"

If the file 90_custom.cfg does not exist, simply create it with an editor of your choice.

After editing, run the following command:

$ sudo update-grub

Reboot:
The grub boot menu will appear the next time you start

Linux Mint Recovery Menu

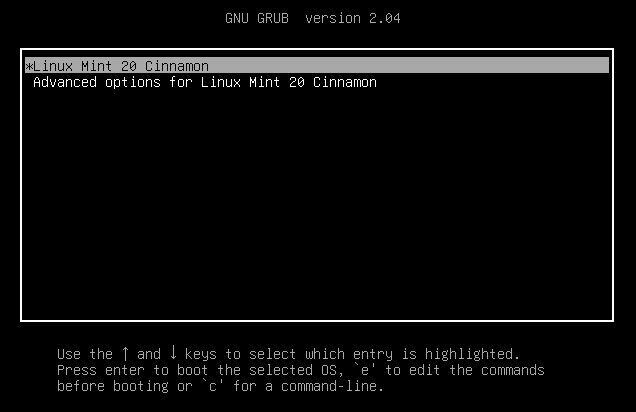
Choose the second entry “Advanced options for Linux Mint 20”.

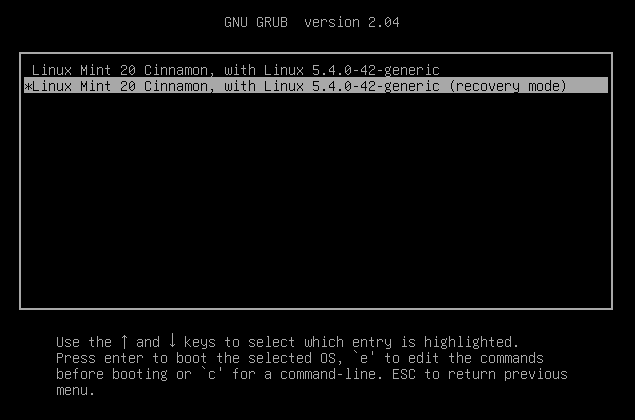
The recovery menu with repair options and the root shell appears promptly.

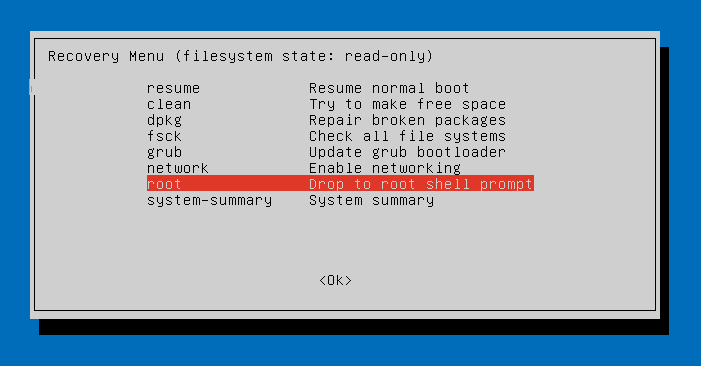
Choose “Drop to root shell prompt” that opens the Single Mode Console.

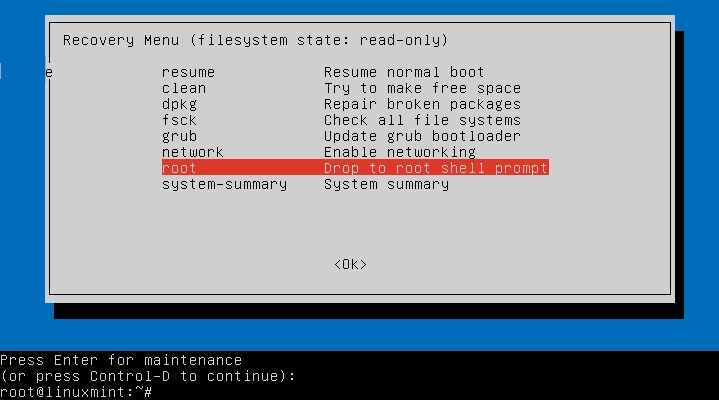
Linux Mint Recovery Mode (Single Mode)

Enter in maintenance console. Here you are root and have write permissions on the file system. The single-user runlevel is the lowest operating state for maintenance, in which only system resources such as hard drives or file systems are active.

root password forgotten

Here are some of the most self-inflicted errors. If the root password has been forgotten, a new one can now be assigned.

root@localhost:# passwd root

sudo rulebook plugin could not be initialized

Improper changes to the sudoers file may result in errors.

$ sudo visudo
>>> /etc/sudoers: syntax error near line 24 <<<
sudo: parse error in /etc/sudoers near line 24
sudo: no valid sudoers sources found, quitting

If sudo is no longer possible in the standard runlevel and you have locked out yourself as root, sudo can be restored.

Before /etc/sudoers can be changed, the file must be given write permission.

$ chmod u+w /etc/sudoers && vi /etc/sudoers

After editing, sudoers must be protected again.

$ chmod u-w /etc/sudoers

Here is the sudoers original file of Linux Mint 20 in case it has been changed to unusable.

#
This file MUST be edited with the 'visudo' command as root.
#
Please consider adding local content in /etc/sudoers.d/ instead of
Directly modifying this file.
#
See the man page for details on how to write a sudoers file.
#
Defaults env_reset
Defaults mail_badpass
Defaults secure_path="/usr/local/sbin:/usr/local/bin:/usr/sbin:/usr/bin:/sbin:/bin:/snap/bin"

Host alias specification

User alias specification

Cmnd alias specification

User privilege specification
root ALL=(ALL:ALL) ALL

Members of the admin group may gain root privileges
%admin ALL=(ALL) ALL

Allow members of group sudo to execute any command
%sudo ALL=(ALL:ALL) ALL

See sudoers(5) for more information on "#include" directives:

#includedir /etc/sudoers.d

Note! Changes should always only be made with visudo.

Hard drive has no free space

If there is no more free disk space, the logs can no longer be saved, which leads to system downtime, here the space allocation can be checked in the Single User Mode Console to create free space again.

$ tree -ah /var/log -L 1
$ tree --you -d -shaC | grep -Ev '[^ ]( ** ){2}

If the tree command does not exist on the system, one of the following (disk usage) commands can help.

$ sudo du -hc --max-depth=0 /var
$ sudo du -ah /var | sort -n -r | head -n 5
$ sudo du /home -Sh | sort -rh | head -5

Check SHA256 hash with Windows 10

How to Check File Integrity

SHA256 hash values provide information about the integrity of a file, for example, they can protect against manipulated programs. Unixoid operating systems already have the checksum tools like sha256sum on-board. Windows 10 includes a cmdlet in PowerShell with which the checksums can be quickly checked.

What are checksums

To ensure the integrity of a file, checksums (MD5, SHA256, SHA512, …) are created. A checksum is formed over all bytes of a file (the byte values are multiplied by different numbers according to certain rules.) The value calculated in this way uniquely identifies the file content. If you re-generate the checksum at a later time (or on another computer) and compare it with the first one, you can see whether the file has been modified. This principle is also often used to check whether a file transfer has taken place without errors.

Check SHA256 hash checksum

Checking the hash signature is particularly suitable for downloads. An ISO image or archive file can be checked for integrity and authenticity after downloading. The manufacturers and developers publish signatures with which an image of integrity and authenticity can be compared by means of the SHA256 hash or MD5 hash value. So that the unchanged origin and originality can be ensured without this being the case with a man-in-the-middle attack.

PowerShell Get-FileApply Hash

This example checks the Linux Mint 20 ISO image that was previously downloaded. To verify the integrity of an ISO image, the SHA256 sum is generated and compared, with the SHA256 hash in the sha256sum file.txt,which is also downloaded.

The files linuxmint-20-cinnamon-64bit.iso and sha256sum.txt are copied to a folder, then you open PowerShell and switch to the folder where the cmdlet Get-FileHash is now executed.

Get-FileHash linuxmint-20-cinnamon-64bit.iso -Algorithm SHA256

Algorithm       Hash                                                                   Path
---------       ----                                                                   ----
SHA256          2F6AE466EC9B7C6255E997B82F162AE88BFE640A8DF16D3E2F495B6281120AF9       C:\linuxmint-20-cinnamon-64bit

The SHA256 hash of the ISO image is generated.

Then open the previously downloaded file sha256sum.txt which contains the hash. Checksum hash are often referred to as checksum or file fingerprint.

Get-Content sha256sum.txt
2f6ae466ec9b7c6255e997b82f162ae88bfe640a8df16d3e2f495b6281120af9 *linuxmint-20-cinnamon-64bit.iso

As you can see, sha256sum.txt contains the hash string in lowercase, but the hash is calculated by Get-FileHash in uppercase, so that we can then use the hash for the comparison, we convert it from sha256sum.txt to an uppercase string with ToUpper().

$text="2f6ae466ec9b7c6255e997b82f162ae88bfe640a8df16d3e2f495b6281120af9".ToUpper()

Write-Host $text
2F6AE466EC9B7C6255E997B82F162AE88BFE640A8DF16D3E2F495B6281120AF9

The hash string of Get-Content sha256sum.txt is inserted between the quotation marks in $text.

Get-FileHash Parameter -Algorithm

algorithm specifies the cryptographic hash function to use to calculate the hash value from the contents of the specified file or stream. The acceptable values for this parameter are:

  • SHA1
  • SHA256
  • SHA384
  • SHA512
  • MD5

If no value is specified or the parameter is omitted, the default value is SHA256.

For security reasons, MD5 and SHA1, which are no longer considered secure, and they should only be used for simple change verification, but not to generate hash values for files that need to be protected from attack or tampering.

The procedure can then look like the following in a PowerShell script for this example.

$text="2f6ae466ec9b7c6255e997b82f162ae88bfe640a8df16d3e2f495b6281120af9".ToUpper()
$hash=(Get-FileHash linuxmint-20-cinnamon-64bit.iso -Algorithm SHA256 | Select-Object -Property Hash | ft -HideTableHeaders)
Write-Host $text
Write-Host $hash

The comparison of both hash values with the following line in PowerShell.

[string]$text -eq [string]$hash

Hash Calculate and Compare

The following script calculates the hash value and compares it with Compare-Object and the fingerprint from the signature.

Get-FileHash -Path linuxmint-20-cinnamon-64bit.iso -Algorithm SHA256 | Compare-Object -ReferenceObject "2F6AE466EC9B7C6255E997B82F162AE88BFE640A8DF16D3E2F495B6281120AF9" -DifferenceObject {$_.Hash}

If the checksums match, no output appears.

If the hash values does not match, then both objects are displayed.

Exit mobile version