Outlook 2019 (Office 365) displays an error message when you try to print an email. The error happens both when trying to print file > as well as with right-click -> quick print, the same error message always appears. However, documents from Word or Excel can be printed on the printer.
Symptom
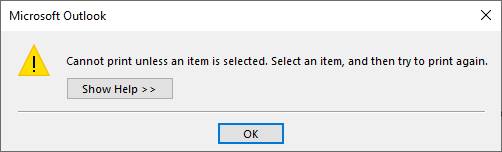
Cannot print unless an item is selected, Select an item, and then try to print again.
Outlook: Cannot print unless an item is selected.
Solution
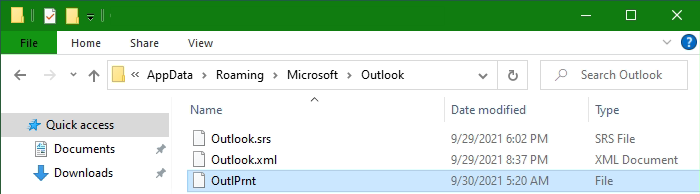
Exit Outlook and open File Explorer, type %APPDATA% in the address bar, and change to the Microsoft and Outlook directory. The full path is C:\Users\%username%\AppData\Roaming\Microsoft\Outlook. Search for the file OutlPrnt, if it exists, it can be deleted (only this one file).
The next time you start Outlook, the OutlPrnt file is regenerated, so the error is fixed and emails can be printed again.
The file OutlPrnt is re-created after going to File => Print => Print Options => Preview in Outlook.
Conclusion
In this post, we describe what to do when you get the error message “Cannot print unless an item is selected”. Sometimes it can happen that Outlook 2019 (Office 365) displays an error message when you try to print an email. The error happens both when trying to print file > as well as with right-click -> quick print, the same error message always appears. However, documents from Word or Excel can be printed well.
Microsoft Outlook is the preferred email client used to send and receive emails by accessing Microsoft Exchange Server email. Outlook also provides access contact, email calendar and task management features.
Z-Push is an open source application you’ll show how to install Z-Push. It’s for synchronizing ActiveSync compatible devices such as mobile phones, tablets and Outlook 2013 and later. Many years of experience in synchronization based on ActiveSync made Z-Push the leading open source push synchronization for many backends.
The main wireless synchronization platforms are ActiveSync for communication with Exchange Server and Research-in-Motion (RIM) BlackBerry Enterprise Server (BES). Both solutions require proprietary server-side software from the manufacturer, which limits the use of Personal Information Manager (PIMs) to either wired synchronization or third-party synchronization, which requires the installation of client software on the PDA.
This is where open source Z-Push comes in. It is an implementation of Microsoft’s ActiveSync protocol, which uses wirelessly for ActiveSync-enabled devices with multiple platforms, including Apple iPhone and iPad, Android and Blackberry 10 devices. With Open Source Z-Push, any PHP-based groupware package can be fully synchronized with any ActiveSync-compatible device.
How to Install Z-Push on Ubuntu
The distribution used in this guide is Ubuntu Server 20.04 LTS with Apache 2.4 and Kopano. Z-Push is installed from the repository as root:
After installation, the main directory can be found under the path /usr/share/z-push. The configuration files are located under /etc/z-push.
If the Kopano server is on another host, MAPI_SERVER in /etc/z-push/kopano.conf.php must be adapted to the environment.
Z-push logging is not enabled in the default configuration, but can be very useful. For the log file you create a directory with mkdir /var/log/z-push, then activate the logging approx. at line 116, with nano or vi /etc/z-push/z-push.conf.php