Linux System Time Synchronization with Network Time Protocol (NTP)
This post shows the synchronization of the system time with the atomic time of the NTP server in the Linux command line. Proper system time is essential for computer systems and creates the prerequisite for a smooth boost to the interacting services. The following command-line tools are used to check and adjust system time.
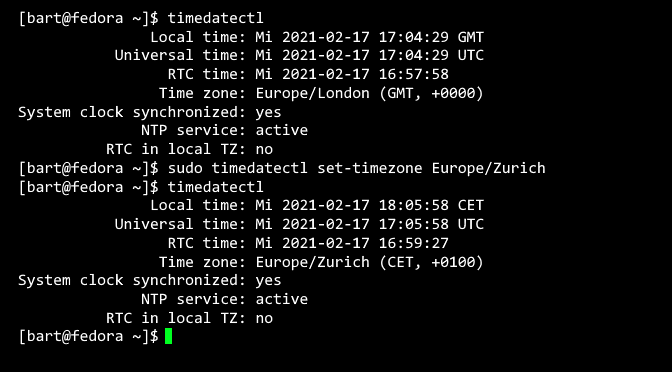
To querying the current system time with date and timedatectl:
$ date
Fri Feb 19 10:15:46 CET 2021
$ timedatectl
               Local time: Fri 2021-02-19 10:15:46 GMT
           Universal time: Fri 2021-02-19 09:15:46 UTC
                 RTC time: Fri 2021-02-19 09:15:44
                Time zone: Europe/Zurich (CET, +0100)
System clock synchronized: yes
              NTP service: active
          RTC in local TZ: n
The time synchronization on a server is carried out by an NTP daemon to synchronize the system time and ensure that the systems function properly. Atomic time can be synchronized by NTP servers on the Internet, such as Google Public Network Time Protocol (NTP) time.google.com
NTP-Daemon deploying
Installing NTP daemon on Debian Linux-based systems:
$ sudo apt install ntp ntpdata -yInstall NTP daemon on RHEL/CentOS/Fedora systems:
$ sudo dnf install ntp ntpdate -yNTP Pool Server pool.ntp.org tries to find the closest available server. The NTP pool project is a dynamic pool of time servers. The NTP pool servers can be edited in /etc/ntp.conf.
pool time.google.com
pool europe.pool.ntp.org
Before the ntpd service can be started, the system time must be set manually (in the range of a few minutes). This can be done with hit date or here run timedatectl set-time or via the NTP pool with ntpdate pool.ntp.org
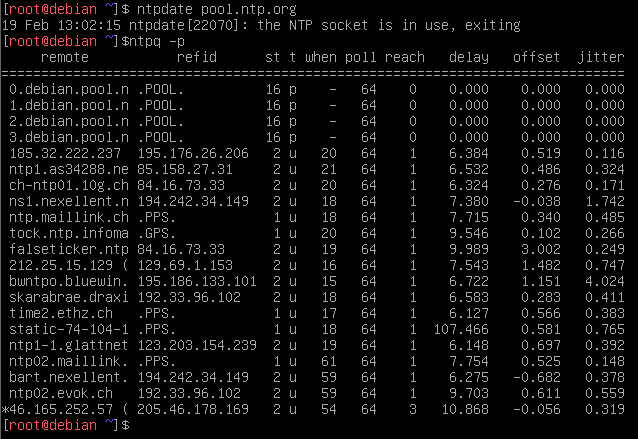
$ sudo ntpdate pool.ntp.org
$ sudo ntpq -pn
$ sudo ntpq -c rv
ntpdate shows the current system time be synchronized with an NTP server. The deviations of the current system time from the times of the servers in the NTP pool can be queried with ntpq:

Now run the NTP daemon and link it in systemd for automatic start:
$ sudo systemctl start ntp.service
$ sudo systemctl enable ntp.service
systemd-timesyncd configuring
The systemd-timesyncd service is already installed on many distributions. The configuration files control the time synchronization of the NTP network.
The network time synchronization for the systemd-timesyncd service includes the file /etc/systemd/timesyncd.conf
The timesyncd.conf configuration file can be as follows.
# See timesyncd.conf(5) for details.

[Time]
NTP=ch.pool.ntp.org
FallbackNTP=0.ch.pool.ntp.org 1.ch.pool.ntp.org 2.ch.pool.ntp.org 3.ch.pool.ntp.org 4.ch.pool.ntp.org
RootDistanceMaxSec=5
PollIntervalMinSec=32
PollIntervalMaxSec=2048
use NTP servers that are in your zone for local time synchronization, see pool.ntp.org
So that systemd-timesyncd is started automatically, the command enable the service accordingly:
$ sudo systemctl enable systemd-timesyncd
$ sudo systemctl start systemd-timesyncd
With a systemd-based system, run the following command to check the service status:
$ timedatectl status
               Local time: Fr 2021-02-19 10:15:46 CET
           Universal time: Fr 2021-02-19 09:15:46 UTC
                 RTC time: Fr 2021-02-19 09:15:44
                Time zone: Europe/Zurich (CET, +0100)
System clock synchronized: no
              NTP service: n/a
          RTC in local TZ: no
The output on lines 7 and 8 means that the time synchronization is not carried out. To enable synchronization with the following command:
$ sudo timedatectl set-ntp trueQuery the NTP service status again, after a few seconds the output shows System clock synchronized: yes and NTP service: active. The NTP service status should show something like this:
$ timedatectl status
               Local time: Fr 2021-02-19 10:15:46 CET
           Universal time: Fr 2021-02-19 09:15:46 UTC
                 RTC time: Fr 2021-02-19 09:15:44
                Time zone: Europe/Zurich (CET, +0100)
System clock synchronized: yes
              NTP service: active
          RTC in local TZ: no
Kerberos authentication
Kerberos authentication is currently the standard authentication technology under Windows; Apple macOS, FreeBSD and Linux systems also use Kerberos implementations. When authenticating in an environment using Kerberos, a synchronous system time is of fundamental importance for interacting systems.
Since Kerberos requires three entities for authentication, it works as a ticket authorization by a third party, if the system time exceed a certain drift limit, a token created by Kerberos expires after a certain time and the ticket becomes invalid.
Kerberos has also become the standard for websites and SSO implementations across platforms. In Active Directory Domain Services (AD DS), when integrating NAS and other devices for access to network resources, it is necessary to ensure a consistent system time. For logging like syslog, the precise timestamp for the evaluation of the events and for the error analysis are important.