All posts by Don Matteo

lebt in Zürich, ist System Engineer MCP bei A-Enterprise GmbH. Mitglied des UNBLOG Network. Author und Blogger zu den Themen, Linux und Open Source. Tutorials für Windows, VMware, Synology, Fortinet.

Create Windows Quick Launch Toolbar

How to create new Windows Quick Launch Toolbar

The Quick Launch toolbar that Microsoft introduced with Windows XP is still available on Windows 10 and 11, but it takes a little tweak.

Create the Quick Launch toolbar

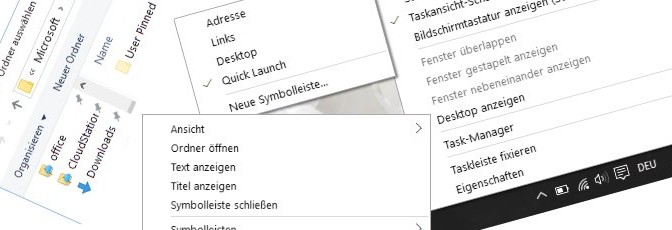
Here’s how to create the Quick Launch toolbar by right-clicking in the Taskbar then on the top select Toolbars > New Toolbar, choose Quick Launch.

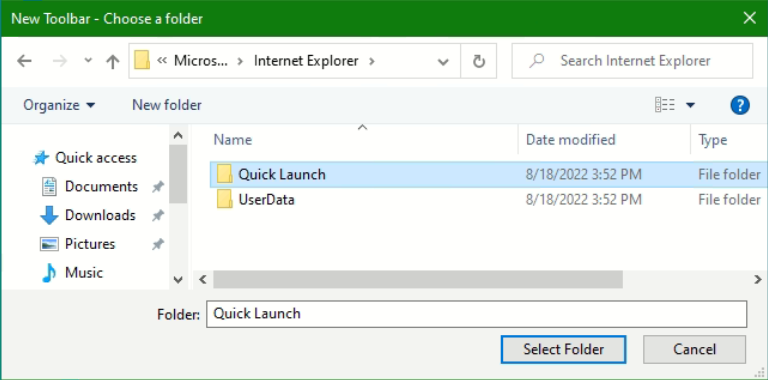
Under the following path, the New Toolbar opens as Quick Launch.

C:\Users\[username]\AppData\Roaming\Microsoft\Internet Explorer\Quick Launch

  You can also use the system environment variable %APPDATA%

cd "%APPDATA%\Microsoft\Internet Explorer\Quick Launch"

After adding the Quick Launch, links with Drag & Drop can be dragged in, best if you have deactivated the taskbar fixer.

What still needs to be set with a right-click over the new Quick Launch in the taskbar is to activate the Show Text and Show title so that the symbols become visible.

The Quick Launch Toolbar Story

The Quick Launch bar was introduced in Windows XP, and sat on the far left side of the Taskbar next to the Start button. It provided a quick and easy way to access programs and your desktop.

In Windows 7, the Quick Launch toolbar was removed from the Taskbar. But it’s still available in Windows 7, 8, 10 and 11. If you know how to add it back. Why would you want the Quick Launch toolbar back when you can pin programs to the Taskbar? The Quick Launch bar also contains the Show Desktop feature. Which is a more obvious place than that small rectangle on the far right side of the Taskbar (especially in Windows 8 and 10). Maybe you prefer to use a more old-school, ungrouped taskbar with shortcuts on the side. In any case, we’ll show you how to add the Quick Launch toolbar to the Taskbar in Windows 11.

Microsoft SQL Server 2014 SSRS Instances

SQL Server, which is used for ERP and Business Intelligence applications, where the OLAP services of the SQL Server come into operation, so Microsoft Dynamics AX Application Object Server (AOS) or the Business Intelligence Frontend of Cubeware uses these interfaces. This requires deploying instances of SQL Server Reporting Services and SQL Server Analysis Services for analysis, planning, and reporting processes generated during database queries.

This post describes how to deploy SQL Server Reporting Services (SSRS) and SQL Server Analysis Services (SSAS) to an already installed SQL Server instance. The installation takes place on a Windows Server 2012 R2 running as a virtual machine in a VMware ESXi host. The installation media is a Microsoft SQL Server 2014 that is mounted as an ISO image in the VM as drive G:.

It is important here that the setup is run from the installation media, here on drive G:, and not the “SQL Server Installation Center” from the program menu or Modern UI.

After accepting the license terms continue with the option New SQL Server stand-alone installation or add features to an existing installation.

Perform a new installation of SQL Server 2014

Enter the license code or select Evalutaion.

SQL Server Feature Installation.

Select the Analysis Services and Reporting Services features.

Definition of the new SQL Server instance, here BISRV as database instance for business intelligence.

As an account name, it is recommended to use a service account created in Active-Directory, here our account s_ssrsrv which was created in AD under the OU, Service Accounts, this should be a member of the local administrators group at the SQL Server, so that the necessary permissions are available later in the creation of the BI cubes and reports.

User account of Multidimensional and Data Mining Mode is the administrator and our SQL Service Account s_ssrsrv.

With Install only it goes on.

Here the selection of the components and configuration to be installed can be checked again, confirm with install or go back step by step with Back to make any changes.

After Complete shows the status of the installation process, the installation is complete with status 0 error.

After installing the SSRS and SSAS Services, the new instance must be configured with SQL Server 2014 Reporting Services Configuration Manager.

SQL Server 2014 Reporting Services Configuration Manager

Selecting the new Report Server instance, SQL Server 2014 Reporting Services and Analysis Services can now be configured for our BI.