All posts by Don Matteo

lebt in der Schweiz, ist System Engineer MCP bei A-Enterprise GmbH. Mitglied des UNBLOG Knowledge Network. Author und Blogger zu den Themen, Tutorials für Linux und Open Source.

How to Install OpenSSL on Windows 10-11

Tutorial: OpenSSL provision on Windows 10 and Windows 11

OpenSSL was previously reserved for Linux operating systems or had to be compiled from the source code itself under Mac and Windows. With Win32/Win64 OpenSSL, the open source software library can also be run on 32-bit and 64-bit Windows OS (x86/i386) and can be integrated on Windows machines via installer.

OpenSSL is widely used and found by encryption in numerous application and secure connections, as well as for SSL/TLS connections HTTPS, including cryptography in SSH, OpenVPN and DNSSEC.

The Win32/Win64 OpenSSL installation project from Shining Light Productions (slproweb.com) carrying the ease of deployment of OpenSSL for Microsoft Windows. The installation consists of downloading and unpacking the binaries, which eliminates the need to compile source code.

Installation

This tutorial shows two methods to deploy OpenSSL on Windows 10 and Windows 11. The simple method right at the beginning, by running Windows Package Manager with hit the Windows-logo+R keys and enter cmd in the Run box then click OK, or press and hit cmd then click the command prompt icon.


Click Start
and hit cmd

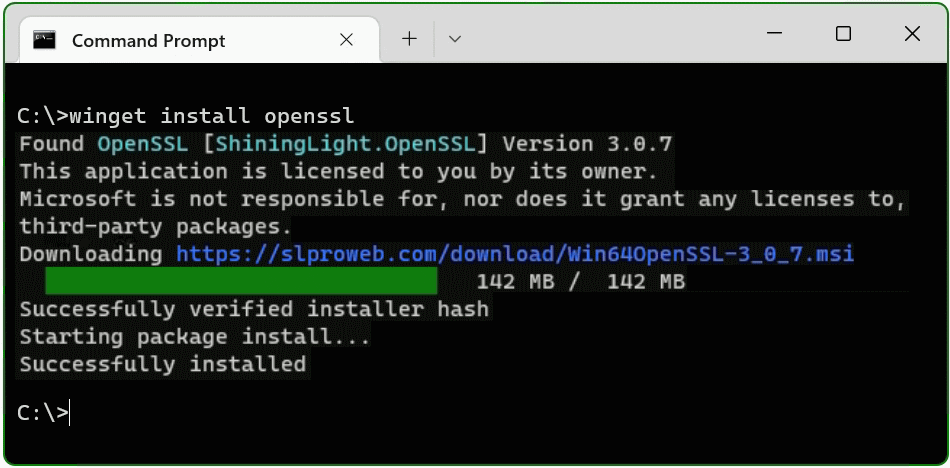
In the now opened command prompt ran the following command, if you are not authorized as administrator with the logged in user, you can select “Run as administrator”.

C:\> winget install openssl

The Windows package manager “winget” allows you to install applications and other packages by using the command line. If winget is started for the first time, you will be prompted to confirm the source agreement terms, by hit the Y key.

The OpenSSL package is now installed. The second method is to download and install the package.

Install Win64 OpenSSL package manually

The table (screenshot) on the slproweb.com website contains the versions for Win32 and Win64 OpenSSL as EXE and MSI installers.

Website: https://slproweb.com/products/Win32OpenSSL.html

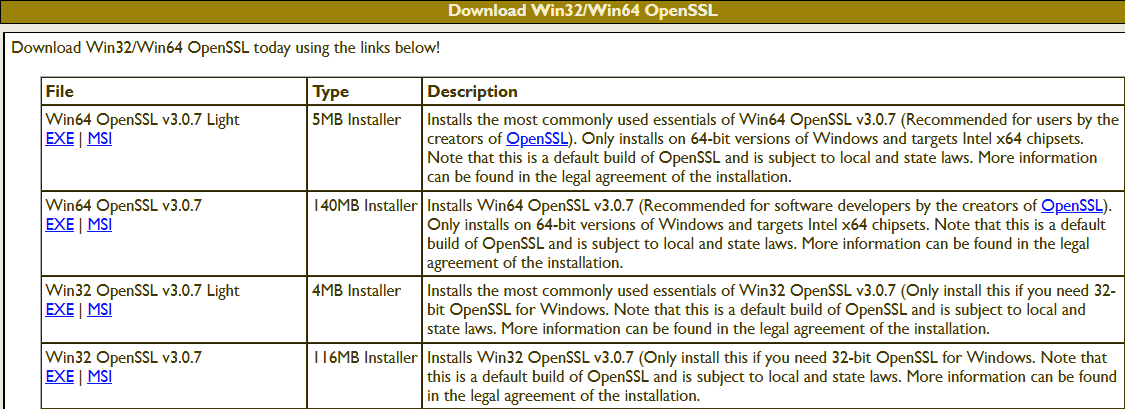
Recommended here is the latest version with the most commonly used essentials of Win64 OpenSSL v3.0.7, at the time of writing this article, it is Win64 OpenSSL v3.0.7 EXE Light, at the top of the first line.

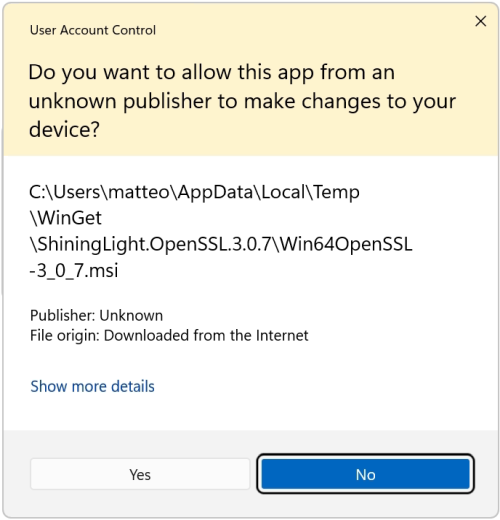
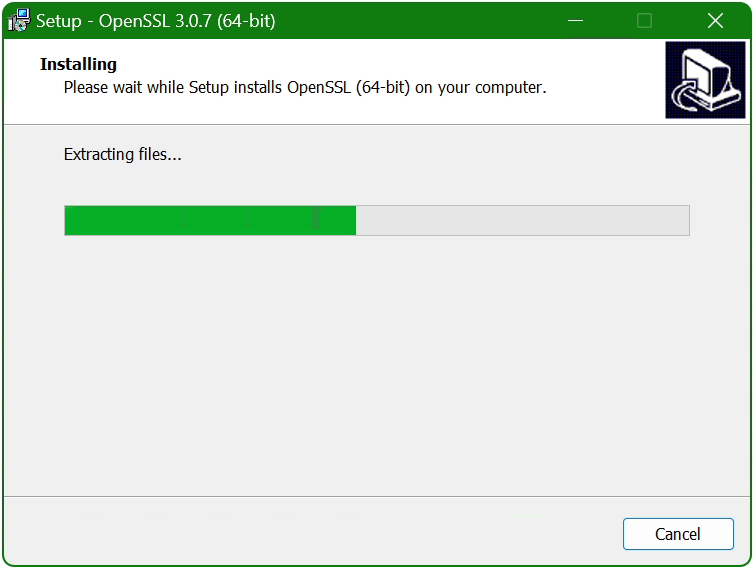
Double-click to execute the file Win64OpenSSL_Light-3_0_7.exe will the setup wizard appears. Confirm the Windows Account Control (UAC) with Yes to continue the installation.

The setup wizard unpacks and copies the OpenSSL files.

Set up the OpenSSL environment

After the OpenSSL files are copied and installed, the search path and environment variable are now added to the operating system, with + R and paste SYSTEMPROPERTIESADVANCED and click OK.

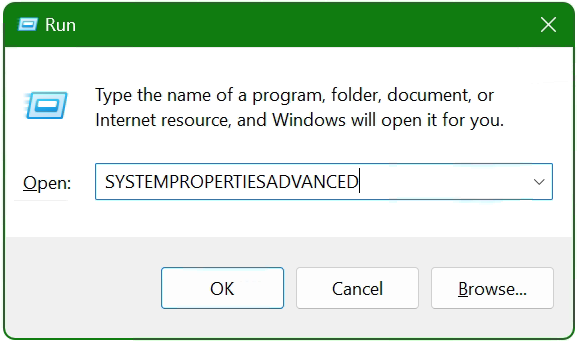
The System Properties window opens.

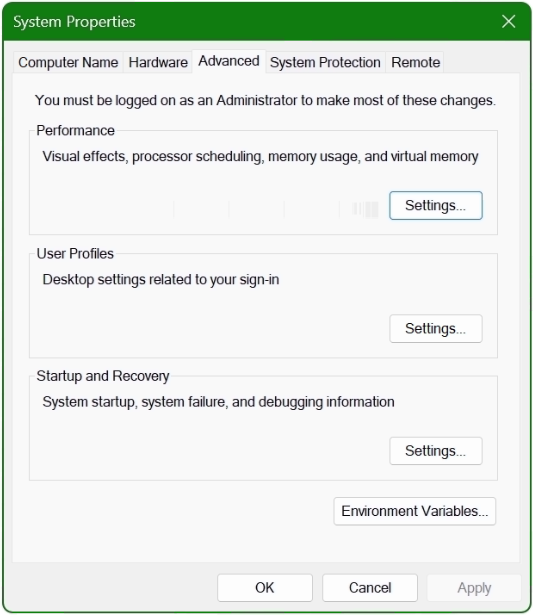
Click the Environment Variables button at the bottom.

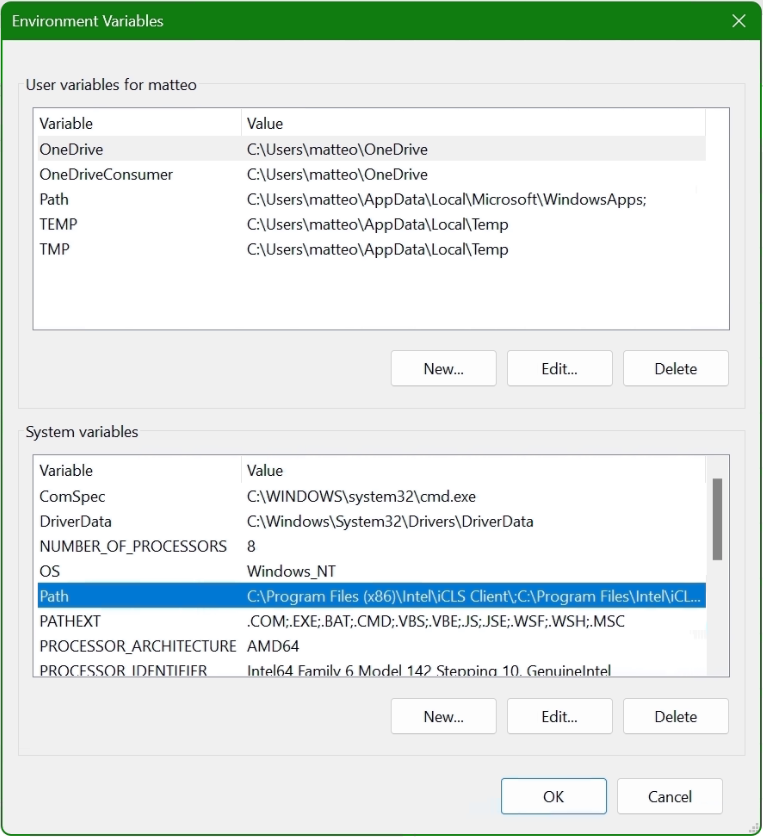
In the lower area System Variables, select the Path line with the mouse and click on the Edit button.

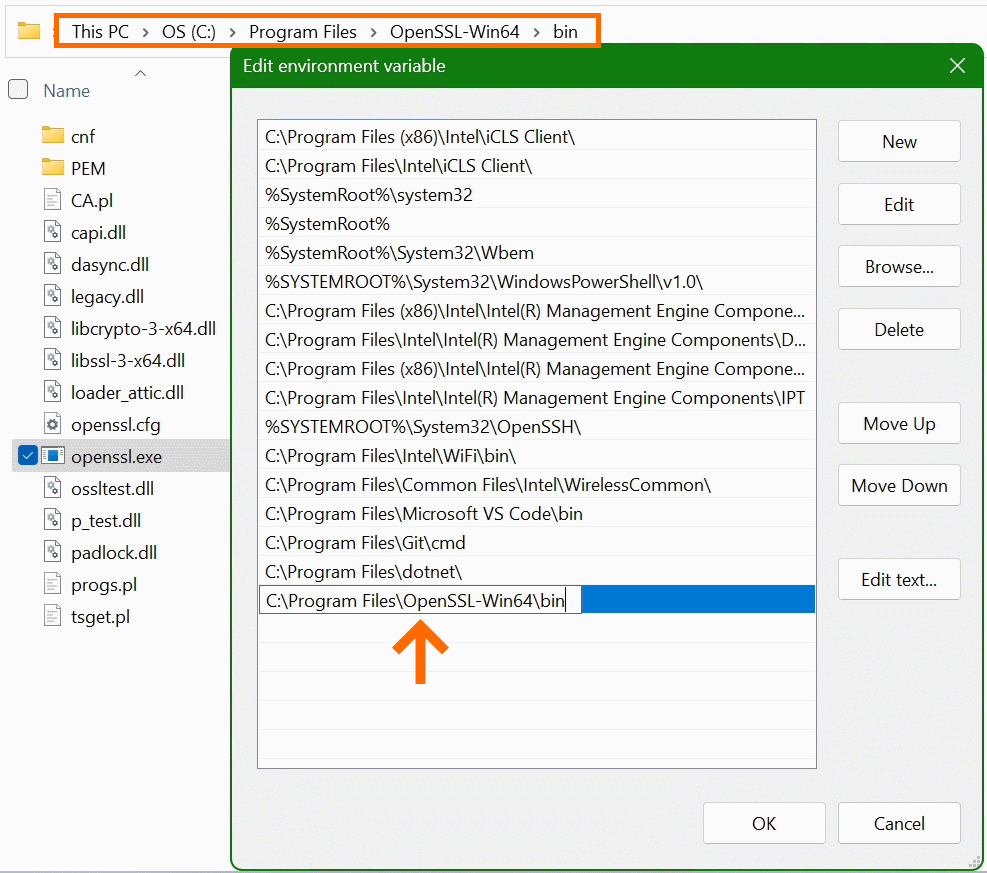
In the “Edit Environment Variables” window, click New to add the path to the OpenSSL-Win64\bin folder under Program files. The path in which the file openssl.exe is located can be found with Windows Explorer and copied to the clipboard, there is also the possibility to choose the path to the bin folder with the Browse button. Confirm the action with OK.

Now add another system variable with click New.

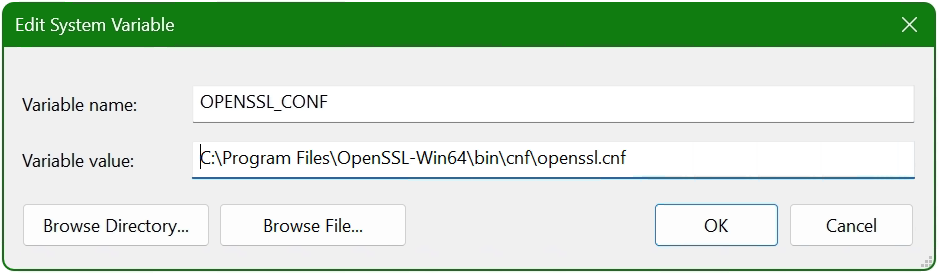
Enter OPENSSL_CONF in the Variable name field. In the next field insert the path to which the file openssl.cnf is located, here it is C:\Program Files\OpenSSL-Win64\bin\cnf\openssl.cnf

The installation is now complete and OpenSSL can be used. First of all, there is the opportunity to check the OpenSSL provisioned release.

C:\> openssl version -a
OpenSSL 3.0.7 1 Nov 2022 (Library: OpenSSL 3.0.7 1 Nov 2022)
built on: Tue Nov  1 16:04:12 2022 UTC
...
C:\> openssl version -d
OPENSSLDIR: "C:\Program Files\Common Files\SSL"

The OpenSSL Toolkit is a versatile utility with many options, but under Windows there is not the possibility of using the man page, as is known on Linux. However, the openssl help command provides context-sensitive help, such asopenssl help s_clientor useopenssl help x509oropenssl help reqto show just a few examples. Help is also offered on the documentation pages on the web, where manpages can also be found.

Useful OpenSSL Examples

A few of the most commonly used openssl command examples in the console are shown below, note that this is not a comprehensive collection of all possible applicable commands of this powerful open source toolkit.

openssl x509 -noout -text -in ca-cert.pem

Displaying and print the ca-cert.pem certificate file in plain text.

openssl req -text -noout -verify -in x509-check.csr

View and verify the contents of CSR x509-check.csr in plain text.

openssl rsa -check -in rootCA.key

Verify key consistency of the rootCA.key file.

openssl x509 -noout -modulus -in ca-cert.pem | openssl md5

Check md5 checksum of certificate ca-cert.pem file.

openssl crl2pkcs7 -nocrl -certfile servercert.pem -out c:\temp\servercert.p7b

Convert certificate from pem to p7b format and write to temp folder.

openssl pkcs12 -export -in rootCA.pem -inkey rootCA.key -out c:\temp\rootCA.p12 -name "PKCS12 certificate"

Convert certificate rootCA.pem to PKCS12 format as rootCA.p12 file.

openssl req -new -newkey rsa:2048 -sha256 -days 365 -nodes -x509 -keyout server.key -out server.crt

Generate SSL certificate and key on a single line, using SHA256 with RSA 2048 encryption, the certificate will be valid for 1 year.

openssl s_client -connect imap.gmail.com:993

Check connection to imap.gmail.com service 993 to get more useful results like than as in telnet.

openssl s_client -crlf -connect smtp.gmail.com:587 -starttls smtp

Try to connect service 587 on smtp.gmail.com using the starttls protocol, possibly to check a firewall policy for its effect.

openssl s_client -verify_quiet -brief www.ietf.org:443

Check protocol version and ciphersuite, peer certificate and hash used.

openssl rand -base64 20

Generate a random password in base64 using OpenSSL, can be used as a passphrase to hide private keys from spying eyes.

These were just a few examples, because openssl is a versatile toolkit that offers numerous application options.

Conclusion

The OpenSSL open-source library for cryptography is more important than ever and indispensable. Connections are encrypted and protected, so why shouldn’t the OpenSSL Toolkit be used on Windows? Creating and managing Digital X. 509 certificates, check algorithms for data encryption such as Chiper Suite, digital fingerprint, MD5 and SHA hash values can be checked, which was previously reserved only for Linux.

Sources Links:
slproweb.com Win32/Win64 OpenSSL Installation Project for Windows
openssl.org Cryptography and SSL/TLS Toolkit

How to fetchmail on Debian 11

fetchmail on Debian with Postfix retrieving and forwarding e-mails

The fetchmail utility can run in daemon mode to repeatedly poll one or more systems at a certain interval, here on a debian system, collecting mail from servers that support all popular mail retrieval services, such as the POP3 and IMAP.

This tutorial show you how to use fetchmail on a Debian 11 (bullseye) with Postfix. The e-mails from external mail service providers are retrieved and forwarded to the recipients to the mailbox server which receives e-mails from the smarthost. No forwarding is required for the mail accounts, but the e-mails can be scanned by the smarthost for viruses and SPAM before they are delivered to the user’s mailbox.

How to install fetchmail on Debian

fetchmail can be deployed from the Debian standard repository.

$ sudo apt install -y fetchmail

Enable daemon mode in/etc/default/fetchmail

# This file will be used to declare some vars for fetchmail
#
# Uncomment the following if you don't want localized log messages
# export LC_ALL=C

# If you want to specify any additional OPTION to the start
# scripts specify them here
# OPTIONS=...

# Declare here if we want to start fetchmail. 'yes' or 'no'
START_DAEMON=yes

Change START_DAEMON from no to yes.

Create fetchmail global recourcen configuration fetchmailrc for operation as a daemon in/etc/fetchmailrc on debian.

Set Daemon 900
set no syslog
set logfile /var/log/fetchmail
Set Postmaster "Postmaster"
set no bouncemail
set no spambounce
set properties ""

poll pop.gmx.net with proto POP3
user 'john@gmx.net' there with password 'M1HXGLKQJ9OZPCA6V34R' is john@foo.org here options fetchall nokeep ssl sslcommonname mail.gmx.net smtphost localhost

fetchmail poll is fetching emails

fetchmail poll line is created for each mail server from which emails are fetched. Every 15 minutes, the external mailbox from john@gmx.net is retrieved from the POP3 server mail.gmx.net and delivered to the user john@foo.org with smtphost via localhost using Postfix to the mailbox server. So that the logging does not end up in /var/log/mail.log, they are logged in /var/log/fetchmail instead

The Common Name (CN) from the certificate, which must be passed with sslcommonname, can be determined using the web browser, or with hit the following command in the Linux shell or from the Windows command prompt.

$ openssl s_client -connect pop.gmail.com:995 | grep "CN="
# with Windows OS
C:\> openssl s_client pop.gmail.com:995 | findstr "CN ="

  On Windows 10/11, OpenSSL must first be provided, the binaries are available at slproweb.com, or you can install the package with hit the command winget install openssl

fetchmail options

fetchmail provides a number of syntactic features to make it easier to read fetchmailrc. While it is possible to provide credentials for a server on a row, common configurations are specified over a number of different lines. fetchmail is insensitive to whitespace unless the argument is between quotation marks.

There are several options for the Poll statement (for example, nofetchall (default), fetchall, keep, or nokeep).The meanings are as follows:

nofetchall: Get only new messages (default).Unless otherwise specified (e.g. fetchall, keep), this means nofetchall.
fetchall: Fetches all messages, whether seen or not.
keep: Does not delete messages on the server.
nokeep: Deletes the read messages from the server.

Set owner fetchmail for the file fetchmailrc on debian.

$ chown fetchmail /etc/fetchmailrc
$ chmod 0600 /etc/fetchmailrc

The fetchmail daemon restarts.

$ systemctl restart fetchmail

The fetchmail conversation to the external server can be checked with the following command.

$ fetchmail -vv -N --ssl -p pop3 -P 995 -ujohn@gmx.net mail.gmx.net

Test the fetchmailrc configuration file.

$ fetchmail -v -a -k -f /etc/fetchmailrc

Check the fetchmail process on our debian server.

$ ps -ef | grep -v grep | Grep Fetchmail

The output may look something like this.

fetchma+ 23566 1 0 2022 ?        00:01:42 fetchmail -vv -d 900 -a -f /etc/fetchmailrc -L /var/log/fetchmail

Logging now takes place in the fetchmail file on the debian.

$ tail -f /var/log/fetchmail

Something like the following is logged in the fetchmail log file.

fetchmail: awakened at Sat 21 Jan 2023 08:55:45 AM CET
fetchmail: 6.3.24 querying pop.gmx.net (protocol POP3) at Sat 21 Jan 2023 08:55:45 AM CET: poll started
fetchmail: Trying to connect to 212.227.17.169/995...connected.
fetchmail: Certificate chain, from root to peer, starting at depth 2:
fetchmail: Issuer Organization: T-Systems Enterprise Services GmbH
fetchmail: Issuer CommonName: T-TeleSec GlobalRoot Class 3
fetchmail: Server certificate:
fetchmail: Subject CommonName: mail.gmx.net
fetchmail: pop.gmx.net key fingerprint: 36:6D:93:38:DE:58:A2:8B:6D:61:F7:76:1F:56:70:BF
fetchmail: SSL/TLS: using protocol TLSv1.2, cipher ECDHE-RSA-AES256-GCM-SHA384, 256/256 secret/processed bits
fetchmail: POP3< +OK POP server ready H migmx106 1MMFyQ-1p2A592gZq-00YABU
fetchmail: POP3> CAPA
fetchmail: POP3< +OK Capability list follows
fetchmail: POP3< TOP
fetchmail: POP3< UIDL
fetchmail: POP3< USER
fetchmail: POP3< SASL PLAIN
fetchmail: POP3< IMPLEMENTATION trinity
fetchmail: POP3< .
fetchmail: POP3> USER john@gmx.net
fetchmail: POP3< +OK password required for user "john@gmx.net"
fetchmail: POP3> PASS *
fetchmail: POP3< +OK mailbox "john@gmx.net" has 0 messages (0 octets) H migmx106
fetchmail: selecting or re-polling default folder
fetchmail: POP3> STAT
fetchmail: POP3< +OK 0 0
fetchmail: No mail for john@gmx.net at pop.gmx.net
fetchmail: POP3> QUIT
fetchmail: POP3< +OK POP server signing off
fetchmail: 6.3.24 querying pop.gmx.net (protocol POP3) at Sat 21 Jan 2023 08:55:45 AM CET: poll completed
fetchmail: New UID list from pop.gmx.net: <empty>
fetchmail: not swapping UID lists, no UIDs seen this query
fetchmail: Query status=1 (NOMAIL)
fetchmail: sleeping at Sat 21 Jan 2023 08:55:45 AM CET for 900 seconds

  The example shows a login sequence in a somewhat shortened form.

The fetchmail man page provides a lot of useful information.

$ man fetchmail