How to install phpMyAdmin with PHP8 on Debian 12
This tutorial shows how to install phpMyAdmin on Debian 12 with Apache2 and PHP8. For administration and management of MySQL and MariaDB databases from web browsers.
On Debian 11, the easiest way to install phpMyAdmin is via the Package Manager, withapt install phpmyadminbut this is no longer up-to-date since php 8 is provided.
Since Debian 11 installs from the default repository, phpMyAdmin is provided for PHP 7.4, but if requires a newer PHP version, i.e. for current CMS such as WordPress, where PHP 8 or newer is recommended, phpMyAdmin can be installed manually in just a few steps.
INSTALLATION
The phpMyAdmin installation on Debian is done here as root by using “su -“, for the packages Apache2, MariaDB and PHP 8.2 provided by DEB.SURY.ORG.
First of all, required service packages are installed.
$ apt install lsb-release apt-transport-https ca-certificates wget gnupg -yAdd the Sury Repository for PHP8 on the system.
$ wget -O /etc/apt/trusted.gpg.d/php.gpg https://packages.sury.org/php/apt.gpg
$ echo "deb https://packages.sury.org/php/ $(lsb_release -sc) main" | tee /etc/apt/sources.list.d/php.list
Update the package lists as follows.
$ apt updateIf the Apache2 web server is not already installed.
$ apt install apache2 -yNow install PHP 8.2 with the most important PHP modules.
$ apt install php8.2 php8.2-common php8.2-cli php8.2-curl php8.2-imap php8.2-apcu php8.2-intl php8.2-cgi php8.2-mbstring php8.2-gd php8.2-mysql php8.2-opcache php8.2-bcmath php8.2-xml php8.2-xsl php8.2-zip php8.2-bz2 libapache2-mod-php8.2 -yUpdate the packages as follows.
$ apt update && apt upgrade -y
$ [ -f /var/run/reboot-required ] && reboot -f
Install MariaDB
The next step is to install the MariaDB server and (MySQL) client.
$ apt install mariadb-server mariadb-client -yThen complete the configuration of the MariaDB server.
$ mysql_secure_installationSince the root password for the database is not yet set, press Enter to skip the initial query. Complete the following queries:
- Switch to unix_socket authentication [Y/n] – Enter n to skip.
- Set root password? [Y/n] – Type y and press Enter to create a root password for your database. If you already have a root password, enter n to not change the root password.
- Remove anonymous users? [Y/n] – Type y and press Enter.
- Disallow root login remotely? [Y/n] – Type y and press Enter.
- Remove test database and access to it? [Y/n] – Type y and confirm with Enter.
- Reload privilege tables now? [Y/n] – Type y and confirm with Enter.
MariaDB is now operational.
Install phpMyAdmin on Debian
First change the directory into install phpMyAdmin on Debian.
$ cd /usr/shareTo download phpMyAdmin run the command as follows.
$ wget https://www.phpmyadmin.net/downloads/phpMyAdmin-latest-all-languages.zip -O phpmyadmin.zipUnzip the archive you just downloaded as follows.
$ unzip phpmyadmin.zipAfter unzipping, remove the downloaded archive.
$ rm -f phpmyadmin.zipThen rename the unzipped directory.
$ mv phpMyAdmin-*-all-languages phpmyadminAnd change the permissions to the phpMyAdmin directory.
$ chmod -R 0755 phpmyadminApache2 config for phpMyAdmin
Now create an Apache2 configuration file for phpMyAdmin /etc/apache2/conf-available/phpmyadmin.conf.
Paste the following content into the terminal shell.
$ cat << EOF > /etc/apache2/conf-available/phpmyadmin.conf
Alias /phpmyadmin /usr/share/phpmyadmin

<Directory /usr/share/phpmyadmin>
    Options SymLinksIfOwnerMatch
    DirectoryIndex index.php
</Directory>

<Directory /usr/share/phpmyadmin/templates>
    Require all denied
</Directory>
<Directory /usr/share/phpmyadmin/libraries>
    Require all denied
</Directory>
<Directory /usr/share/phpmyadmin/setup/lib>
    Require all denied
</Directory>
EOF
Check the new Apache2 configuration you just modified.
$ apachectl -t
Syntax OK
Enable the Apache2 configuration file you just created.
$ a2enconf phpmyadminAnd reload the Apache2 web server.
$ systemctl reload apache2Create the temporary directory that phpMyAdmin needs.
$ mkdir /usr/share/phpmyadmin/tmp/Now grant the web server user the required owner rights.
$ chown -R www-data:www-data /usr/share/phpmyadmin/tmp/Up to and including Debian 10 and Ubuntu, password authentication to the MariaDB server is not possible by default for root login (e.g. via phpMyAdmin) for security reasons. On Debian 11, however, this is possible. For Debian 10, the following steps can be performed to allow root login using a password as well.
$ mysql -u root
UPDATE mysql.user SET plugin = 'mysql_native_password' WHERE user = 'root' AND plugin = 'unix_socket';
FLUSH PRIVILEGES;
Quit
The Apache2 web server with PHP 8, the MariaDB server and phpMyAdmin is now ready to use.
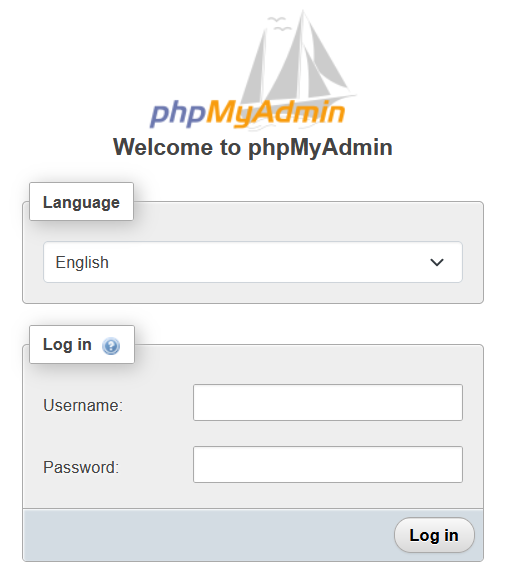
The phpMyAdmin website can be reached by adding /phpmyadmin to the IP address or FQDN in the browser URL.
for example: http://192.168.1.2/phpmyadmin

View and change PHP version
If several PHP versions are installed on the system, an installed PHP version can be activated for the Apache2 web server.
The corresponding module is activated with the Apache helper, with the command a2enmod, and deactivated with a2dismod.
$ a2dismod php7.4
$ a2enmod php8.2
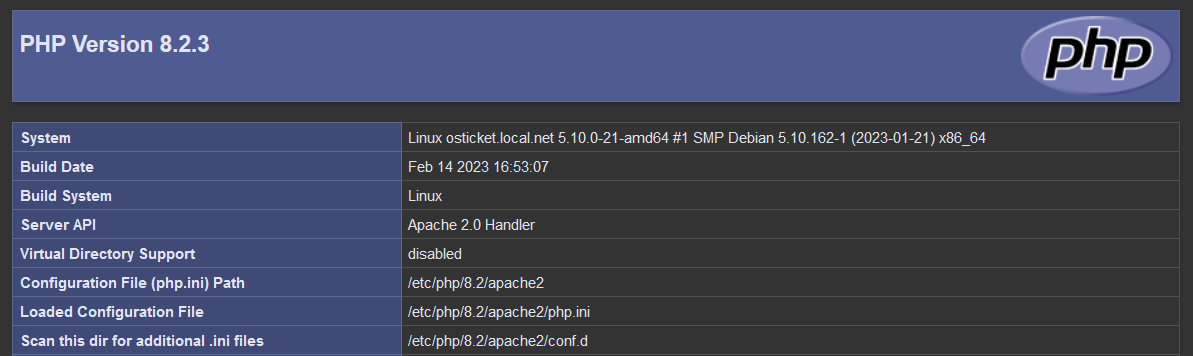
$ systemctl restart apache2The current PHP version and modules are displayed by creating a php file with the following content. If no other Apache2 site is available, this can be saved as phpinfo.php in the docroot at /usr/share/phpmyadmin.
<?php
phpinfo();
?>
The PHP settings for the Apache2 web server are displayed in tabular form in the web browser. i.e. http://192.168.1.2/phpinfo.php

For productive systems, phpinfo should be removed again.