Access to OPNsense Web GUI via WAN after installation

After initializing an OPNsense as a virtual machine, access to Web GUI via WAN is denied. With a newly deployed OPNsense virtual machine on a hypervisor. Such as a VMware ESXi host, the Web GUI cannot yet be reached directly from the internet.

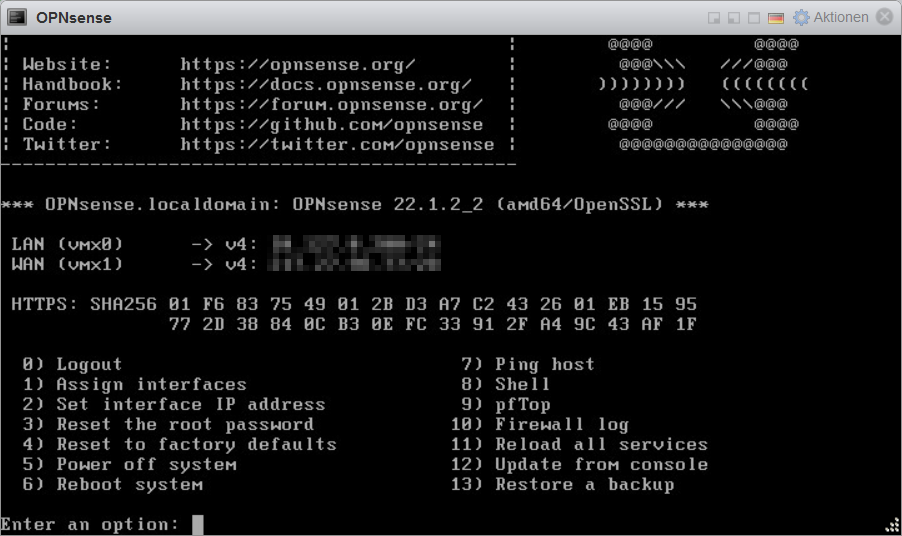
Assign interfaces and Set interface IP address

In order to be able to access the OPNsense GUI via WAN, as with every new installation. You have to call up and follow the wizard with the option 1) Assign interfaces and 2) Set interface IP address. This to lay the basis for the OPNsense. With the interfaces and the IP configuration for the WAN and LAN interface.

Access to OPNsense Web GUI via WAN, OPNsense VMware ESXi Console

Next step, the firewall packet filter (pf) must be disabled in the vSphere console of the virtual machine.

Disable packet filter

With option 8) Shell execute the command pfctl -d:

root@OPNsense:~ # pfctl -d
pf disabled

Now the Web GUI can be opened via the WAN IP address in a browser.

Permanent access to OPNsense GUI via WAN

In order to enable permanent access to OPNsense GUI via WAN. A new rule must be created under Firewall – Rules – WAN with pass in to this firewall.

OPNsense – Firewall – Rules – WAN. Click for Zoom.

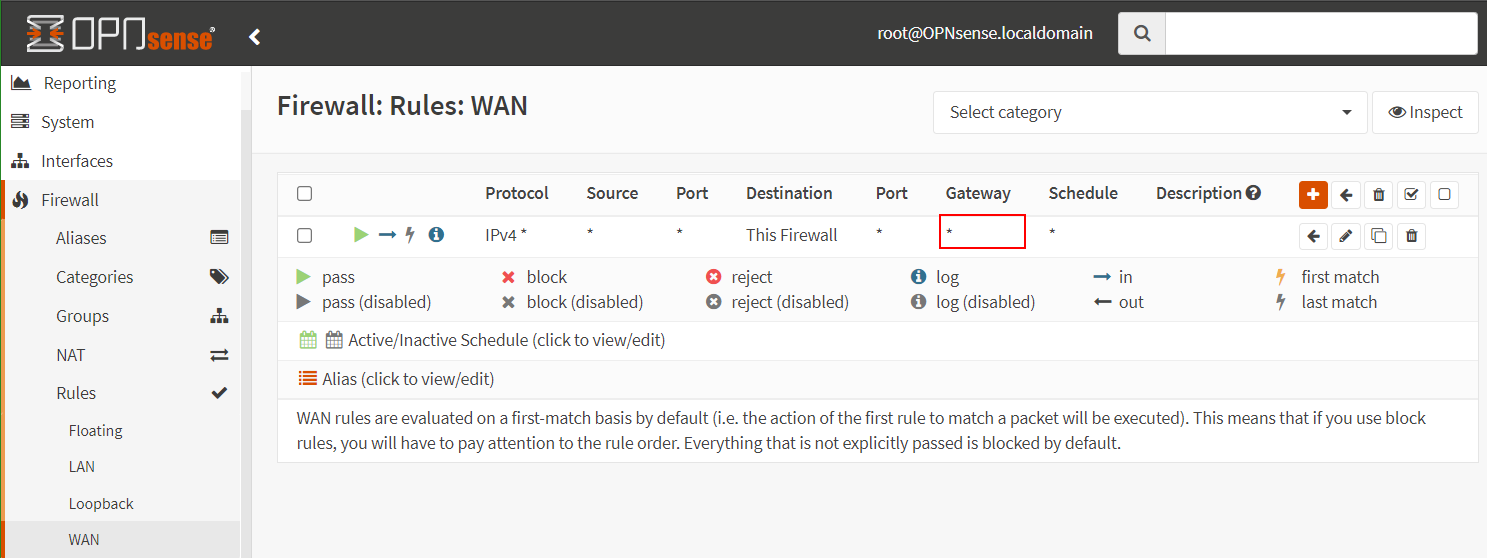
IMPORTANT! Do not explicitly select a gateway, the gateway must be default. The gateway previously created in the console with Set interface IP address is only required for the WAN interface configuration.

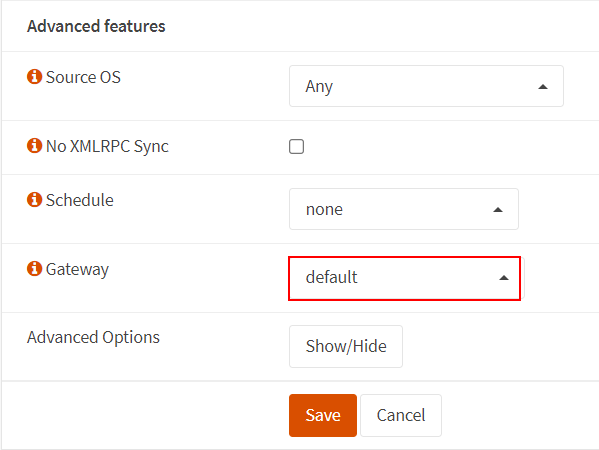
After the default gateway has been selected, the OPNsense must be restarted. With the command reboot, or with option 6 from the OPNsense console menu.

Note! after each restart, the packet-filter (pf) firewall is enabled, the command pfctl -e to enable the pf-firewall is not required. At the beginning, when setting up the OPNsense do not add a second gateway.

  It should not go unmentioned here that the OPNsense is adequately protected against misuse and brute force attacks. It is recommended to only allow the WAN rule for access to the OPNsense web GUI from known sources. Also a user-defined port number for the web GUI can be defined under System – Settings – Administration for TCP Port in order to override the default setting (80 for HTTP, 443 for HTTPS). For this purpose, 2FA TOTP authentication with Google Authenticator is also possible, this in the post here.

The next relevant post might also be helpful How to Setup OPNsense as a Virtual Machine.

Microsoft Windows replaces netbios with mDNS

Multicast DNS (mDNS) is supported by starting with Microsoft Windows 10 1703, Microsoft is now preparing to completely replace NetBIOS and Link-Local Multicast Name Resolution (LLMNR) with mDNS. In Windows 11 previews, NetBIOS name resolution is configured as a fallback by default for the time being.

Originally developed by Apple, mDNS is a name resolution protocol that does not require a central DNS server. It sends a request via multicast to all devices in the network. The one to which the desired host name applies, also responds with a multicast packet to the entire network.

Multiple mDNS resolvers

mDNS resolvers listen on UDP port 5353. In practice, several resolvers are active at the same time. In addition to the operating system, these include Chromium-based web browsers or Microsoft Teams clients.

Active mDNS resolvers can be output in PowerShell:

Get-NetUDPEndpoint -LocalPort 5353 | Select-Object LocalAddress,LocalPort,OwningProcess, @{ Name="Process"; Expression={((Get-Process -Id $_.OwningProcess).Name )} }

There is no central instance in the form of a DNS server by mDNS. It cannot be ruled out that several devices on a network use the same host name.

One danger is where malicious programs settle over UDP port 5353 and forward clients via DNS spoofing to hosts of cybercriminal origin.

Disable Windows mDNS replace NetBIOS

Because of these circumstances, administrators might consider disabling mDNS. However, Microsoft recommends that you refrain from generally disabling it. Otherwise communication with various devices on the network, such as printers or wireless devices, could be affected.

If companies still prefer such a measure, then Microsoft recommends that you use Windows Firewall to block only incoming requests. The Windows Firewall contains the predefined rule “mDNS (UDP-In)”.

Open Windows Firewall with hit the keys Windows+R and insert firewall.cpl to run it, then go to Advanced Settings .

Windows Firewall – Advanced Settings

You should disable mDNS only for the domain profile and the public profile, but enable it for private networks. To ensure that employees in the home office can use devices that are designed for mDNS.

mDNS replaces NetBIOS and LLMNR

Another reason not to disable mDNS prematurely is that Microsoft is increasingly relying on this protocol. In current previews of Windows 11, NetBIOS runs in “Learning Mode” by default. This outdated protocol only comes into play after requests to mDNS and LLMNR have failed.

The default behavior of LLMNR has not changed yet. The default behavior of LLMNR has not changed yet. Microsoft plans to use mDNS as the default for name resolution in the future.

If certain applications still require NetBIOS, a new Group Policy can be configured accordingly. In addition to the aforementioned learning mode. They offers the options to completely allow name resolution via NetBIOS, to prevent it completely or to block it only in public networks.

Exit mobile version