Sometimes we need to create a self-signed certificate for websites over HTTPS. Especially in labs and for testing purposes, like testing a web app or for the intranet portal. This tutorial shows here with Windows 11, the procedure to easily issue and install self-signed certificates in PowerShell.
Content
Previously, you had to use makecert.exe such as included in the Windows SDK to create self-signed certificates. Since Windows 8 this can be done in PowerShell there has been the New-SelfSignedCertificate cmdlet. Self-signed certificates can be used for client and server authentication or code signing.
Using the New-SelfSignedCertificate cmdlet
Open PowerShell as Administrator and paste in the following commands.
New-SelfSignedCertificate -DnsName "localdomain.local", "dev.ops.local" -CertStoreLocation "cert:\LocalMachine\My"
$pass=ConvertTo-SecureString "pass123" -AsPlainText -force
$file="$env:temp\SelfSignedCert.pfx"
Export-PFXCertificate -cert cert:\LocalMachine\My\<Thumbprint output during first command> -file $file -Password $pass
Import-PfxCertificate -FilePath $file cert:\LocalMachine\root -Password $pass
This example creates a self-signed SSL server certificate in the computer MY store. With the subject alternative name set to localdomain.local. dev.ops.local and Subject and Issuer name set to localdomain.local.
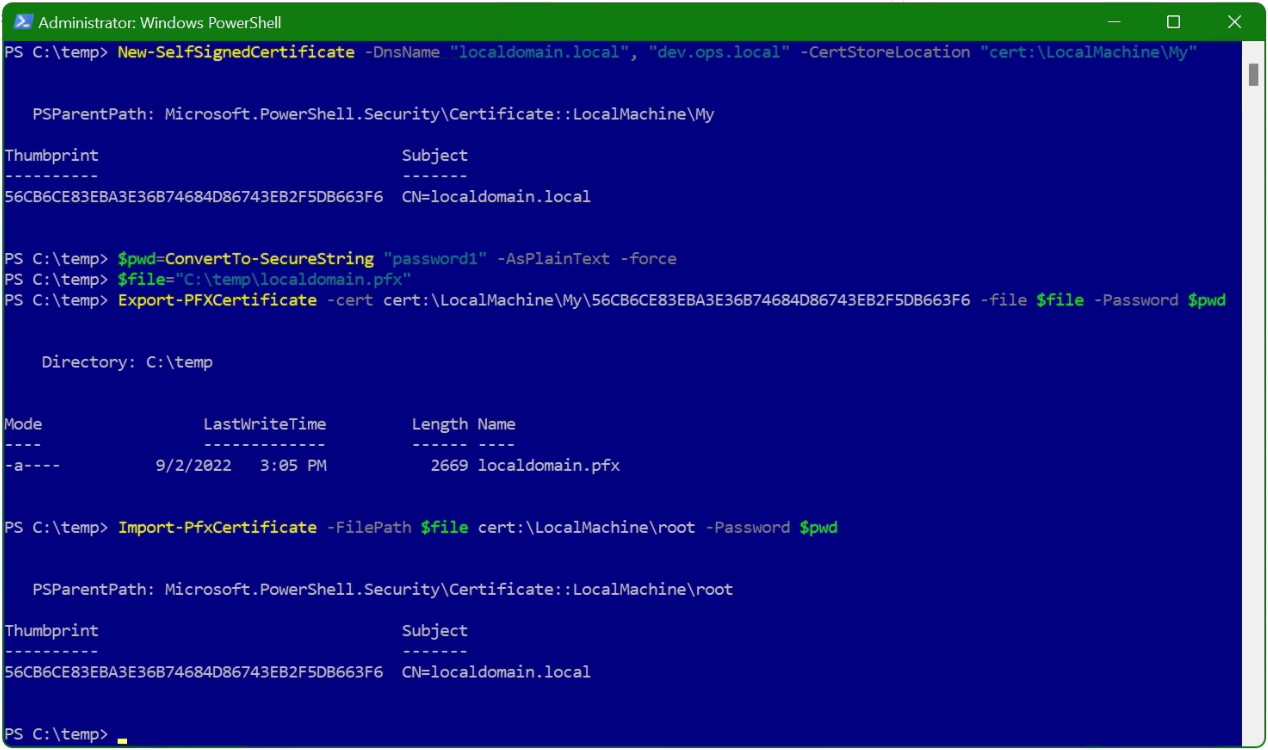
Note. replace the placeholder for should be your thumbprint.
Note. Set the PowerShell Execution Policy from Restricted to RemoteSigned or Unrestricted to allow local PowerShell scripts to run.
PS C:\> Set-ExecutionPolicy RemoteSignedAfter the self-signed certificate has been created. It is exported in PFX format so that it can then be imported into the certificate store.
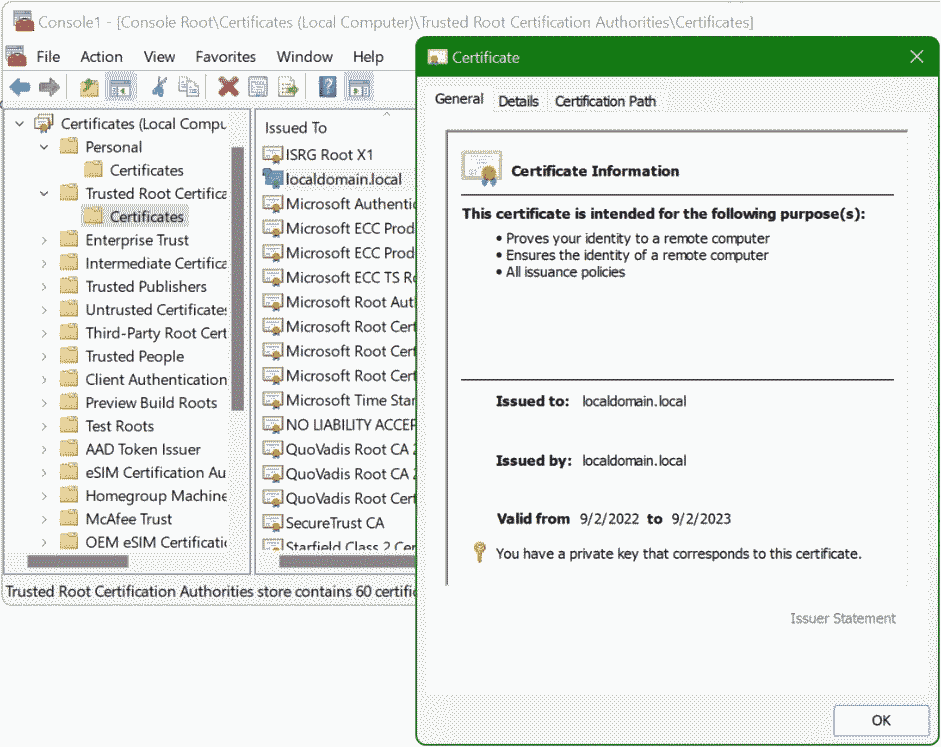
The certificate you just issued can now be found in the Certificate Manager (CERTLM.MSC) of the Microsoft Management Console (mmc) under Trusted Root Certification Authorities.

Automatic creating Self-Signed Certificate
To create self-signed certificate automated without any input, it does not require any further actions. It uses the computer name and if exist the domain name to issue the self-signed certificate.
New-SelfSignedCertificate -DnsName "$env:COMPUTERNAME.$env:USERDNSDOMAIN" -CertStoreLocation "cert:\LocalMachine\My"
$pass=ConvertTo-SecureString "pass123" -AsPlainText -force
$file="$env:temp\SelfSignedCert.pfx"
$thumbprint=Get-ChildItem -Path Cert:\LocalMachine\MY | Where-Object {$_.Subject -Match "$env:COMPUTERNAME.$env:USERDNSDOMAIN"} | Select-Object Thumbprint -ExpandProperty "Thumbprint"
Export-PFXCertificate -cert cert:\LocalMachine\My\"$thumbprint" -file $file -Password $pass
Import-PfxCertificate -FilePath $file cert:\LocalMachine\root -Password $pass
The thumbprint is written to the variable “$thumbprint” in line 4 so that it can then be append in the export command.
PS C:\> Get-ChildItem -Path Cert:\LocalMachine\MY | Where-Object {$_.Subject -Match "$env:COMPUTERNAME.$env:USERDNSDOMAIN"} | Select-Object ThumbprintThe self-signed certificate just created can shown with this command.
If the certificate requires a specific Common Name (CN), this script can be run. It prompts for a Common Name to create the self-signed certificate according to the URL.
$CommonName=Read-Host -Prompt 'Enter a Common Name (CN)'
if ($CommonName) {
	Write-Output "Self-Signed Certificate [$CommonName] processing.."
} else {
	Write-Warning -Message "Missing Common Name (CN)!"
	Break;
}
New-SelfSignedCertificate -DnsName "$CommonName" -CertStoreLocation "cert:\LocalMachine\My"
$pass=ConvertTo-SecureString "pass123" -AsPlainText -force
$file="$env:temp\$CommonName.pfx"
$thumbprint=Get-ChildItem -Path Cert:\LocalMachine\MY | Where-Object {$_.Subject -Match "$CommonName"} | Select-Object Thumbprint -ExpandProperty "Thumbprint"
Export-PFXCertificate -cert cert:\LocalMachine\My\"$thumbprint" -file $file -Password $pass
Import-PfxCertificate -FilePath $file cert:\LocalMachine\root -Password $pass