
Samba is a free software suite that enables interoperability of file and printer sharing across different operating systems, this tutorial shows the Samba Setup to emulating a Windows Share on a Debian Server. It uses the Server Message Block (SMB)/Common Internet File System (CIFS) protocol and allows Windows clients to connect to Linux/Unix servers and vice versa. In this tutorial, we will install and fully configure Samba as a Standalone Server on a Debian 12 Linux.

We will configure a share in the smb.conf file and create Samba users. Once configured, users from Windows and other Linux machines can access the shares via their network file explorer or the command line and connect to the server’s IP address.
At this point a preface. The content in this tutorial about setup Samba file share have been successfully tested on Debian 12. The reason for this guide came about after I tried to implement various instructions that we can find in a wide variety of choices, with rather limited success. Therefore, I would like to publish a tutorial here for a tested adequate configuration. Please note the additional notes regarding possible deviations to your environment and requirements. However, it should be aproved for most intended use cases.
Install Samba Server and smbclient
Let’s start by installing the Samba packages on the Debian 12 Linux machine they you have prepared with static IP and DNS.
sudo apt install samba smbclient cifs-utils -yFirst step configuring the smb.conf file it contains runtime configuration information for the Samba programs.
sudo vi /etc/samba/smb.conf
If you are not familiar with vim may nano might be your choies!
Leave the rest of smb.conf as it is, in the Global section workgroup = WORKGROUP should be set and the following settings are preferable. The interface name you get with ifconfig command or ip addr show
apt install net-tools
[global]
    workgroup = WORKGROUP
    interfaces = 127.0.0.0/8 ens192
    bind interfaces only = yes
Configure Samba Standalone Server
Add samba file share by insert these lines bottom to the end of smb.conf
[public]
   comment = Public Folder
   path = /home/samba/public
   writable = yes
   guest ok = yes
   guest only = yes
   force create mode = 775
   force directory mode = 775

[myshare]
    comment = My Share
    path = /home/samba/myshare
    read only = no
    guest ok = no
    writable = yes
    valid users = smbuser @smbgroup
    write list = smbuser @smbgroup
    create mask = 0664
    directory mask = 0775
    force create mode = 0664
    force directory mode = 2775
    force group = smbgroup
    inherit permissions = yes
Next run some commands in the terminal shell. To create a directory that will be shared, a group and a user should have access to the samba share.
sudo groupadd smbgroup
sudo useradd -M -s /sbin/nologin smbuser
sudo usermod -aG smbgroup smbuser
sudo mkdir -p /home/samba/myshare/
sudo chown -R smbuser /home/samba/
sudo chgrp -R smbgroup /home/samba/
sudo chmod 2775 /home/samba/
sudo smbpasswd -a smbuser
sudo smbpasswd -e smbuser
Let’s testing with this useful utility you can check the settings.
testparm -sThe final step activate the newly provided samba configuration.
sudo systemctl restart smbd nmbdsmbclient views all shares that have been successfully created.
smbclient -L localhost -U %

       Sharename       Type      Comment
       ---------       ----      -------
       print$          Disk      Printer Drivers
       public          Disk      Public Folder
       myshare         Disk      My Share
       IPC$            IPC       IPC Service (Samba 4.17.12)
       nobody          Disk      Home Directories
SMB1 disabled -- no workgroup available
If you use a firewall on the samba server then samba must be opened.
sudo ufw allow sambaSamba File Share Access from Windows
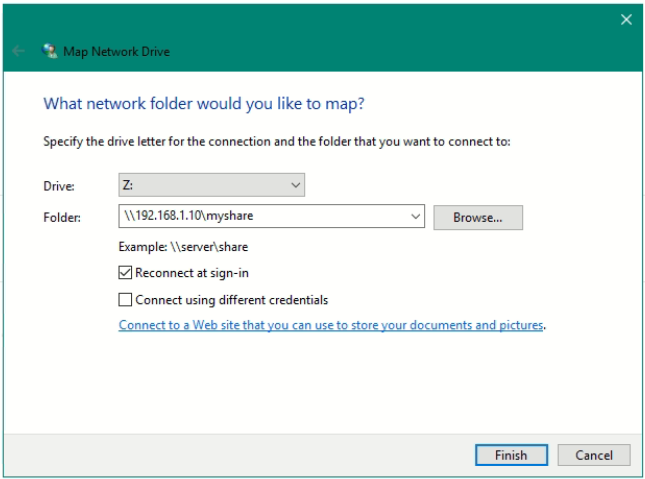
Now access the samba share by logging in with smbuser from Windows.
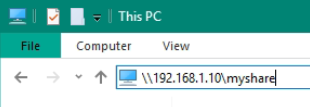

If you want to map a network drive permanently, click on map network drive in the file explorer ribbon computer tab.

Samba File Share Access from Linux
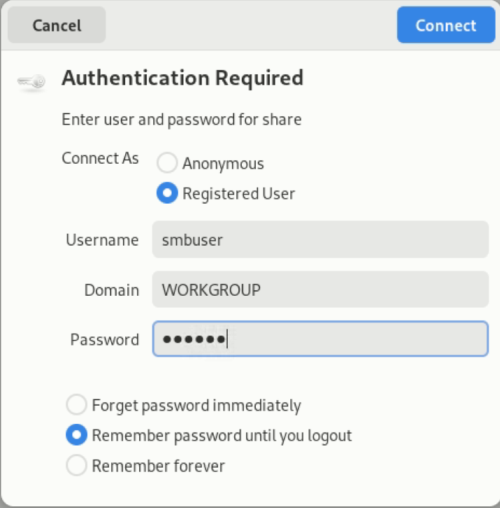
From another Linux use smbclient to access the samba share in the CLI.
smbclient //SERVER_IP/myshare -U smbuserIf using a graphical interface like Gnome File, Nemo, Nautilus or Caja use smb://SERVER_IP/myshare.
Troubleshooting
If you want to access the Samba share from a Windows Server 2016 or 2019 and newer. The key AllowInsecureGuestAuth must be set to 1 in the registry.
To do this, run the following command in a command prompt opened as an administrator.
REG ADD "HKLM\SYSTEM\CurrentControlSet\Services\LanmanWorkstation\Parameters" /v "AllowInsecureGuestAuth" /t REG_DWORD /d "1" /fAlternatively open the group policy editor gpedit.msc and go to
Computer Configuration > Administrative Templates > Network > Lanman Workstation, and enable Enable insecure guest logons.
If you cannot reach the Samba share from other hosts where icmp is responding, check the ports TCP/445 and TCP/139 allow incoming traffic.
Check and ensure that SMB and NetBIOS Over TCP/IP (NBT) File and Printer Sharing (NB session outgoing) is allowed by the Windows Firewall. Open the mmc console by hit Win+E key enter firewall.cpl and click ok, choose advanced settings.
You may check the Samba NMB Daemon and SMB Daemon status.
sudo systemctl status nmbd.service smbd.serviceSamba File Share Logging on Debian
If you experience any problems, check the samba logs for current events.
sudo journalctl -f -u nmbd
sudo journalctl -f -u smbd
If logon is successful, an output like this will appear.
Sep 14 08:02:04 SMBSERVER systemd[1]: Started smbd.service - Samba SMB Daemon.
Sep 14 08:04:22 SMBSERVER smbd[15068]: pam_unix(samba:session): session opened for user smbuser(uid=1003) by (uid=0)
Network Time Protocol for Samba File Share
Precise time is the basic of every device, so always check if the server has a synchronous time. Check the date and time with the date command, also consider implementing an NTP time server. Open a terminal and run the following command to install the ntp package.
sudo apt install ntp -yConfigure NTP (optional) you can edit the NTP configuration to customize NTP behavior. Such as adding specific NTP servers from your location or configuring it as an NTP server for your local network.
sudo vi /etc/ntpsec/ntp.confAfter making any changes to the configuration file, restart the NTP service to apply the changes.
sudo systemctl restart ntpsecNow may you want check the status of NTP synchronization using the ntpq command also check the current time.
ntpq -p
timedatectl status
date