Synology DSM with SSH Terminal by GateOne

How to deploy GateOne Terminal emulator SSH client on Synology DSM, GateOne you can find at SynoCommunity packages.

GateOne is a web-based HTML5 driven open-source terminal emulator with a powerful SSH client that can be used to run any terminal application from the browser and provide virtual terminal connections. GateOne can be used as a supplement to web-based management interfaces. This post shows how to deploy and use GateOne with Synology DSM.

GateOne for each browser they supports WebSocket, a browser plugin is not required

Synology DSM with SSH Terminal by GateOne

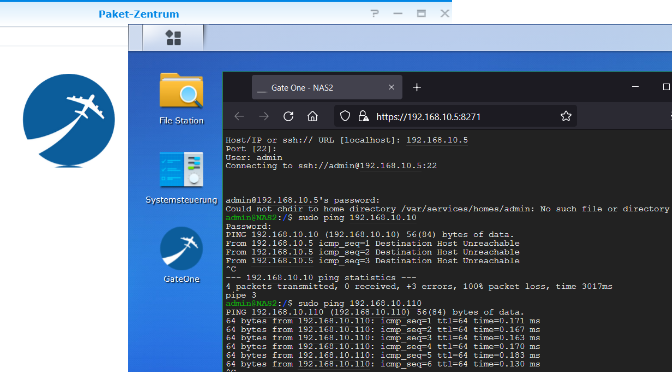
Synology DSM does not provide a way for diagnostic tasks such as ping or traceroute, with an embedded SSH client these functions comes available. The GateOne SSH client offers other useful applications, such as bypassing a proxy, or if there is no VPN to the NAS and the firewall only allows port 443 (HTTPS) for the browser.

GateOne is not provided or managed by Synology itself, but can be retrieved from the SynoCommunity repository. The SynoCommunity offers free packages for Synology NAS devices.

Note. GateOne version 0.9.3 for DSM 5/6, support for DSM 7 is currently not available (23.8.2021).

Add the SynoCommunity packages repository from which get GateOne SSH

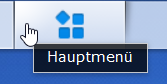
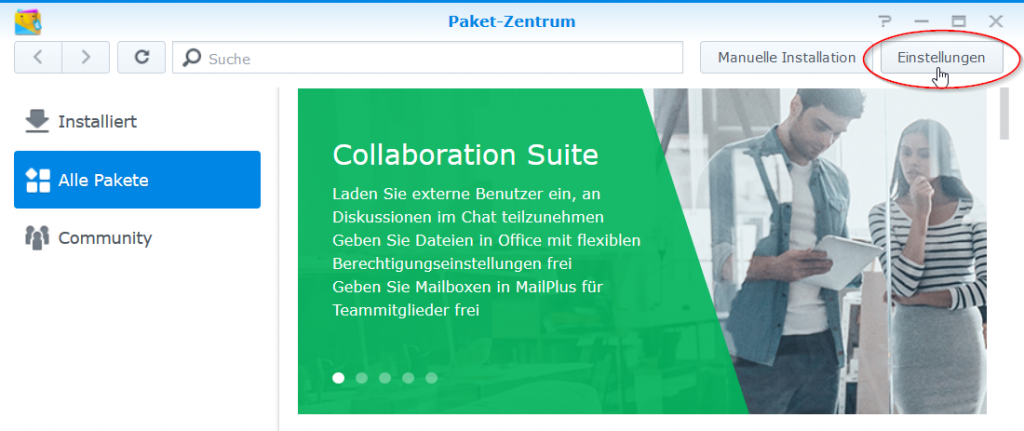
From DSM you open the main menu with the icon at the top left, there you will find the package center.

Click on the Icon Package Center to open it, then on button Settings.

Synology Package Center
Synology Packet Center Settings

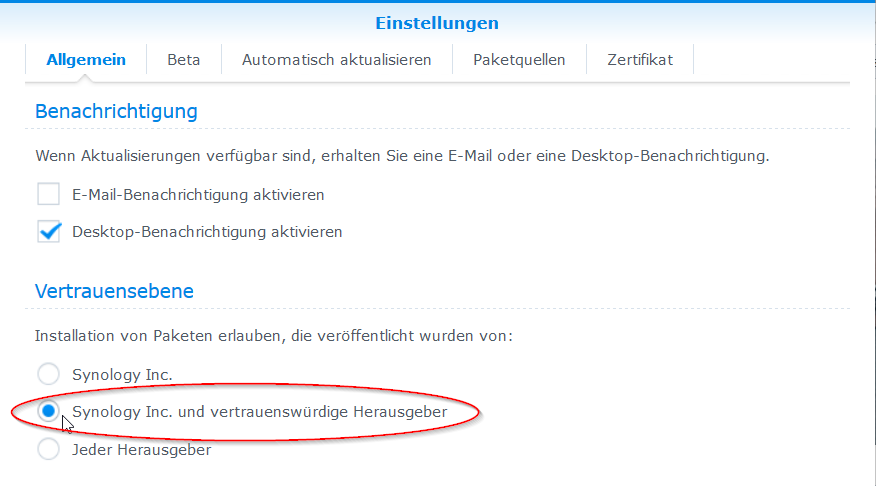
In the General pane that opens, under Trust level, select Synology Inc. and Trusted Publishers.

Synology DSM with SSH Terminal by GateOne

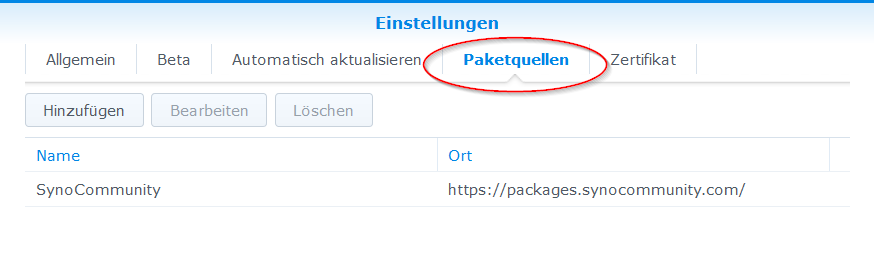
Then go to the Package Sources section.

Synology DSM with SSH Terminal by GateOne

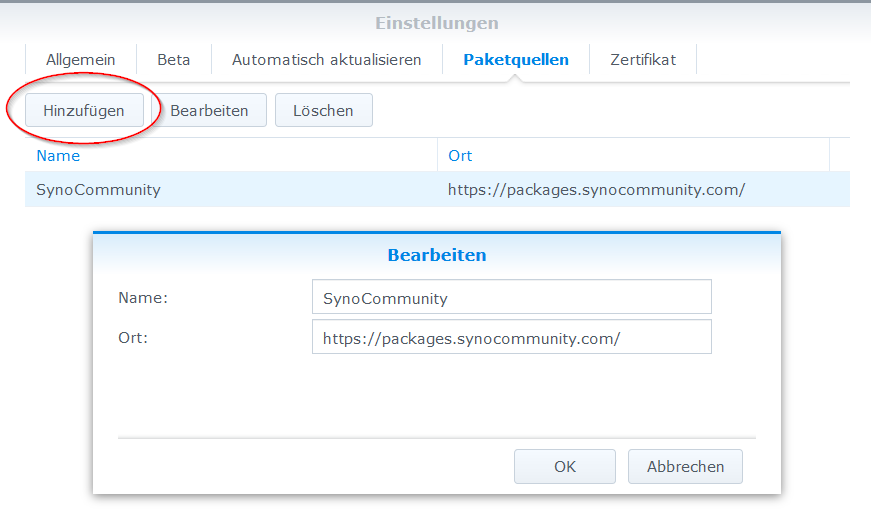
Click the Add button and insert the package source, enter SynoCommunity as the name and paste the URL https://packages.synocommunity.com/ for location and click OK.

Synology Packet Center Add synocommunity packages

Now packages can be installed from SynoCommunity, here you enter gateone in the search field at the top of the magnifying glass.

GateOne

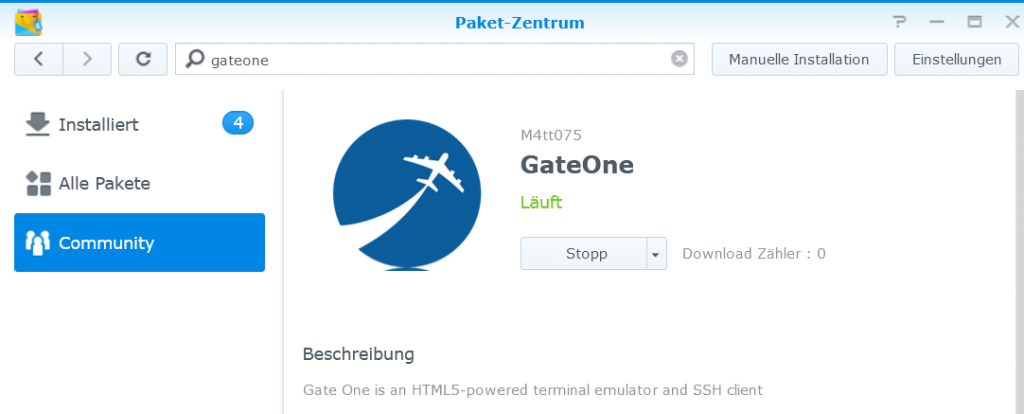
After GateOne appears from the community package source, the app is provided by clicking install.

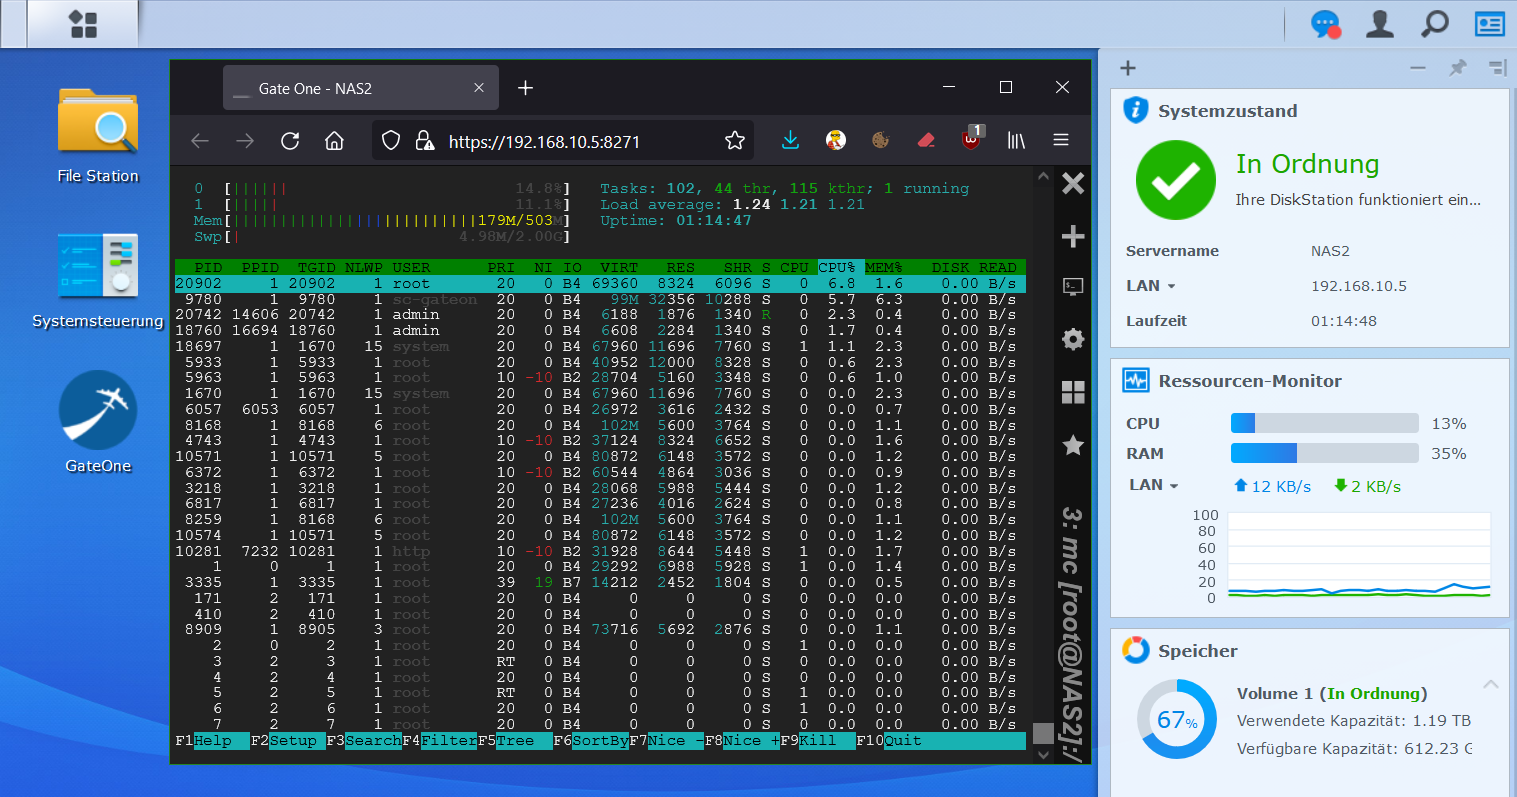
There are now many possible applications with GateOne.

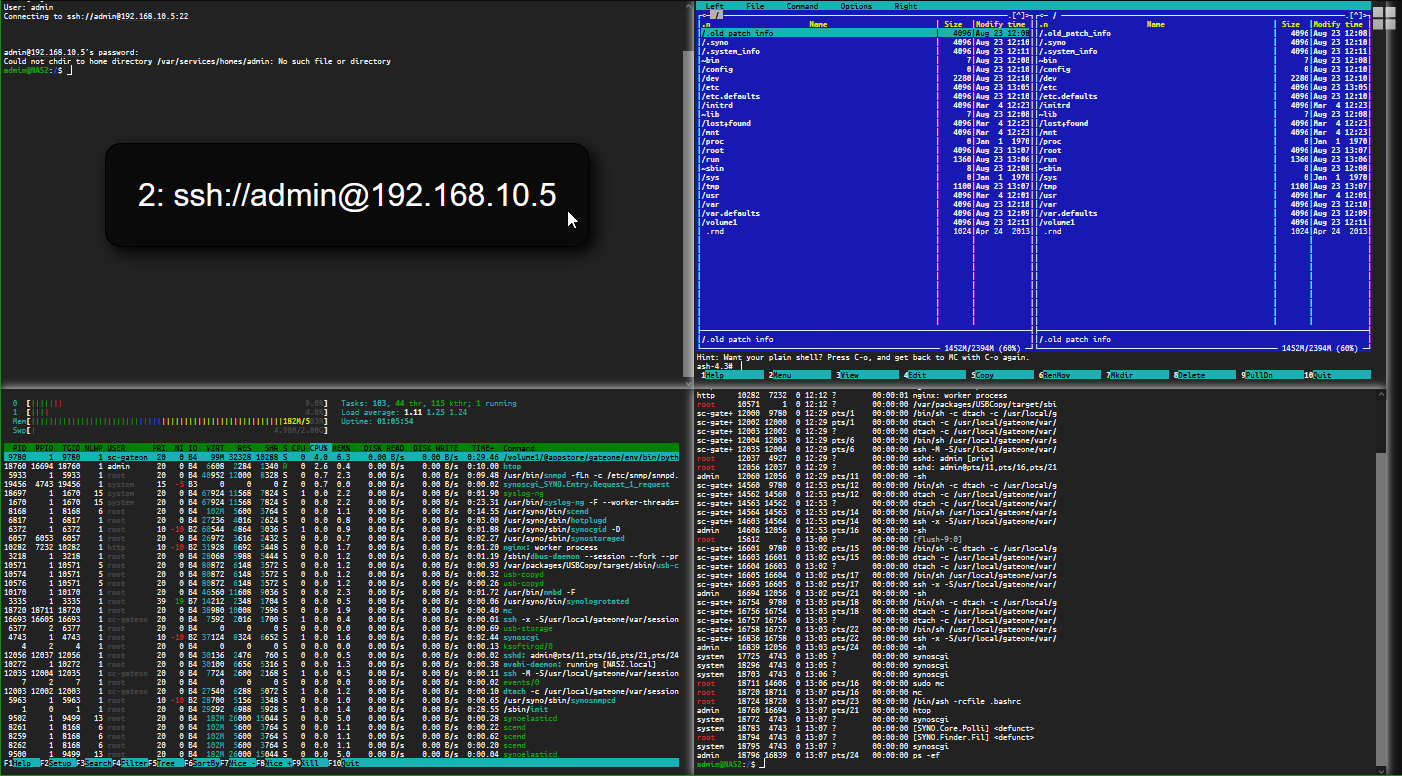
Note. In order to be able to access the NAS itself via SSH, the SSH service must be activated in the DSM control panel, how to do it can find here. The most commands require sudo permission, i.e. sudo ping.

What is Websocket ?

The WebSocket protocol is a TCP-based network protocol that was designed to establish a bidirectional connection between a web application and a WebSocket server or a web server that also supports WebSockets

How to Forward Mails to Gmail using Postfix

Send email using Postfix (MTA) Mail Transfer Agent via Gmail Relayhost

Emails sending with Postfix (MTA) Mail Transfer Agent via Gmail relay host. E-mails are delivered via Gmail account, the clients in the local network use Postfix as a local SMTP gateway. This tutorial shows how to do this.

In situations using like multifunctional devices, or apps that do not support authentication via Mail Submission and STARTTLS (port 587), then e-mails can send via local Postfix MTA without need to authenticate to a mail server.

If CentOS Linux is used, the required packages are installed as root.

$ yum update && yum install -y postfix mailx cyrus-sasl cyrus-sasl-plain

On a Debian and Ubuntu, the package installation is as follows.

$ apt-get update && apt-get install -y postfix mailutils

Now edit Postfix configuration by opening the file /etc/postfix/main.cf

mynetworks = 127.0.0.0/8 192.168.1.0/24
myhostname = 12.34.56.78.dynamic.yline.res.cust.isp.net
mydestination = $myhostname, localhost.$mydomain, localhost
inet_interfaces = all
inet_protocols = ipv4
relayhost = [smtp.gmail.com]:587
smtp_use_tls = yes
smtp_sasl_auth_enable = yes
smtp_sasl_security_options =
smtp_sasl_password_maps = hash:/etc/postfix/sasl_passwd
smtp_tls_CAfile = /etc/pki/tls/certs/ca-bundle.crt

Enter the local networks in mynetworks. As myhostname the PTR resource record that can be resolved on the Internet for determining the PTR record, hit the following command to run in a terminal, or click here.

$ curl -s ifconfig.co | xargs host
12.34.56.78.in-addr.arpa domain name pointer 12.34.56.78.dynamic.yline.res.cust.isp.net

Next, a /etc/postfix/sasl_passwd file is created with the following content.

[smtp.gmail.com]:587 myown@gmail.com:password

Instead of myown@gmail.com use your own Gmail account, replace password with your account password.

Run postmap to create the file sasl_passwd as Berkeley DB.

postmap /etc/postfix/sasl_passwd

Hint. Run postmap after each change.

Now Postfix is restarted to activate the configuration.

systemctl restart postfix

Verify the Postfix configuration with this line in the terminal.

echo "Here is a text." | mail -v -s "Test subject" -r myown@gmail.com other@domain.com

Replace myown@gmail.com with your valid Gmail address, and for other@domain.com enter a valid recipient email.

Note. This Google Account requires disabled settings under Security – Sign in to Google – go to Security Verification and set two factor Off, and access to the Google Account when accessed by less secure apps must be On.

Postfix logging with syslog in the log file /var/log/maillog in which you can check whether the e-mail was sent and accepted by smtp.gmail.com.

tail -25 /var/log/maillog
mailq

Use mailq to check the queue for any rejected mails.

If you find authentication errors in maillog, the Google Account security settings must be checked.

Note. To help keep your account secure, from May 30, 2022, ​​Google no longer supports the use of third-party apps or devices which ask you to sign in to your Google Account using only your username and password.

status=deferred (SASL authentication failed; server smtp.gmail.com[108.177.126.108] said: 534-5.7.9 Application-specific password required. Learn more at?534 5.7.9

Note. after several sending attempts, then rejected (bounced) mails are in the queue remains, use the command mailq to show them, ran postsuper -d to remove deferred mails from queue.

postsuper -d ALL