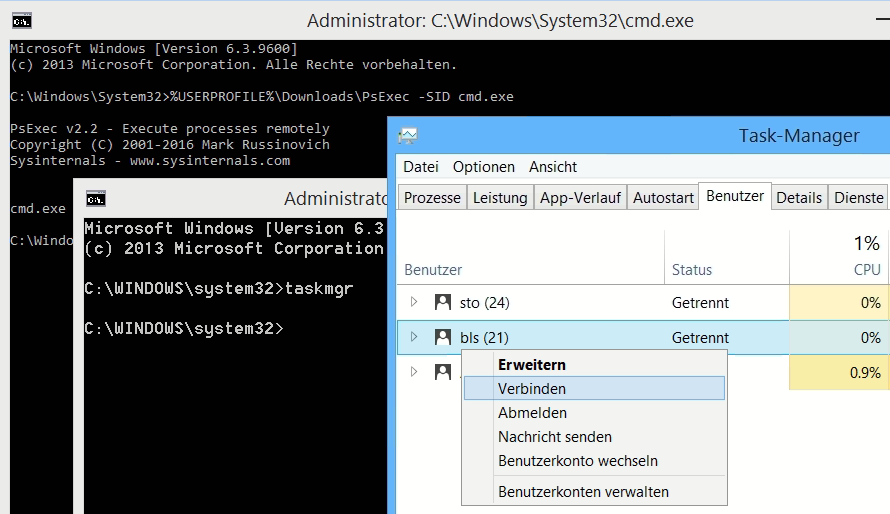
Switch users from Windows TaskManager without need the admin password.
In order for administrators to understand a user’s problem, they need to log on as the user, who usually need their password, but if the user is not at their workplace, the admin can reset his password to get his user profile afterwards. This article shows how to do it without a user password.
Users switching by Windows TaskManager and PsExec
This will be done using the PsExec tool, which we copied to the download folder before.
PsExec by Mark Russinovich is part of the Sysinternals Suite, which is now part of Microsoft, Sysinternals are system tools developed as freeware, PsExec can be downloaded here.
The help desk employee opens a Command Prompt with raised right and performs the following command:
%USERPROFILE%\Downloads\PsExec -SID cmd.exe
From the second command prompt, which is now open, the task manager (taskmgr) is started:
Figure: Task manager run from Command Prompt.
Now in the task manager with the mouse go over the corresponding user, and with the right mouse button click on Connect, the switch to the user now happens without entering a password.
Especially on a terminal server, this solution is very effective for admins, where several users are logged in, wherethe admin can switch to its session without a user password. It should also be mentioned here that this is not a security vulnerability, otherwise the admin can also do and leave what he wants, for users with normal rights this procedure is not possible.
Since Windows 8, Task Manager has two views. The first time Task Manager is invoked by a user, it shows in a simplified summary mode (described in the user experience as Fewer Details). It can be switched to a more detailed mode by clicking More Details. This setting is remembered for that user on that machine.
Since at least Windows 2000, the CPU usage can be displayed as a tray icon in the task bar for quick glance.
Linux has build in SSH from the start, Apple has also integrated Secure Shell into macOS, Microsoft provide OpenSSH on Windows 10 from 1803 and Server 2019 as an optional feature. There are also SSH Tunnels and SSH port forwarding known from tools like PuTTY and KiTTY. So why use SSH only as Terminal (TTY), as VPN Tunnel there are useful opportunities too, for example, VPN is not able because firewall is not capable, or additional software cannot be installed in corporate networks, because the required authorization is not given. An SSH Reverse Tunnel is always useful for devices they are not reachable behind the firewall.
How to use SSH as a VPN Tunnel with port forwarding use OpenSSH on Linux, macOS and Windows
Here as an example, a tunnel is built from host A to host B, host B is a web server from which the intranet page is to be opened http://192.168.111.10 on Host A. The only requirement is that there is a NAT mapping via port 22 to host B on the firewall (NAT router) and that the SSH service is present on each host.
Illustration: ssh tunnel host A to host B
Run the command in the Linux terminal on Host A as follows:
On Host A, the web page can now be opened http://localhost. The SSH tunnel enable port forwarding for TCP port 80 on Host B from 192.168.111.10 to the localhost 127.0.0.1 on Host A, the external port is 45680. Just we log on to Host B with user cherry.
The parameters: -L = Local port -N = do not run a remote command -p = External SSH port (NAT port on firewall) -T = do not open a terminal
On Host B the SSH daemon must be configured and activated, in the configuration file /etc/ssh/sshd_config the following settings are required, for many Linux distributions this is default.
# Force SSH Protocol 2
Protocol 2

#Turn on Privileged Separation for security
UsePrivilegeSeparation yes

#Deny root login
PermitRootLogin no

#Do not allow empty passwords
PermitEmptyPasswords no

# installations will only check .ssh/authorized_keys
AuthorizedKeysFile      .ssh/authorized_keys

# Forward my X Sessions
X11Forwarding yes
X11DisplayOffset 10

# I hate Motd displays
PrintMotd no

# It's alliivee
TCPKeepAlive yes

#AllowTcpForwarding yes
The lines commented out with hash mean they are default values, e.g. #AllowTcpForwarding is by default yes.
Hint! OpenSSH also available on Synology NAS, FreeNAS, FreePBX Distro, OpenWrt, Raspberry Pi (Raspbian) and now on Windows Servers.
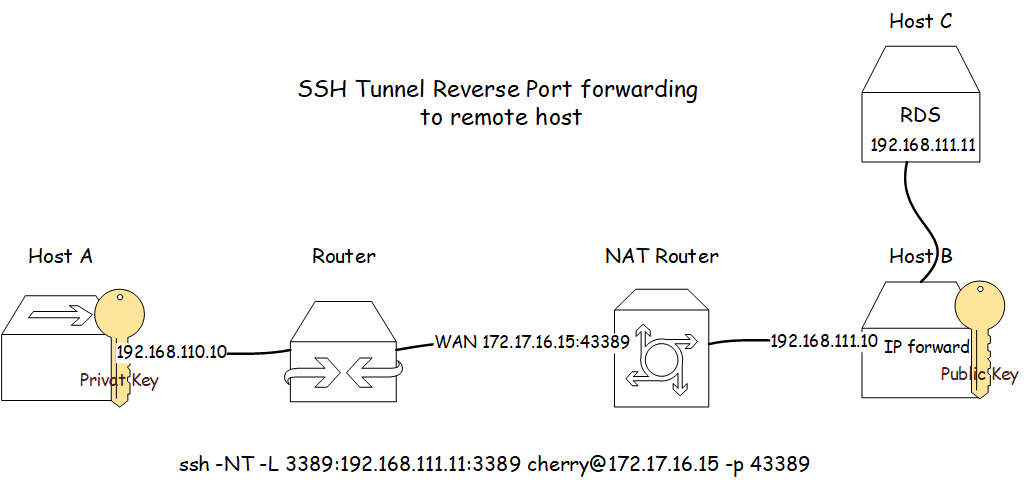
SSH Tunnel to Remote Host C
In this example, an SSH Tunnel is built from Host A to Host C, Host C is an RDS terminal server, Host B serves as a port forwarder.
Illustration: ssh tunnel host A to host C
Run the command in the Linux terminal on Host A as follows:
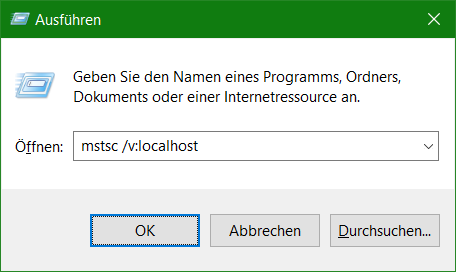
The Remote Desktop session to Host C is built via localhost on Host A, by pressing the Win + R key opens Run, to confirm the input mstsc /v:localhost with OK.
This example uses the tcp port 3389 for RDP as both internal and external port. All unprivileged ports (-L) higher than 1024 can be used, if a port other than 3389 is used, then the port must be passed to RDP for execution, e.g. mstsc /v:localhost:44389
For Host B, the kernel must be enabled for IP forwarding, which is command for this in the shell as root:
$ net.ipv4.ip_forward = 1
Alternatively, echo in the Shell Console does the same thing:
The value 1 for activation, 0 applies deactivation. The change is not boot persistent, so that after the next start the IP forwarding is active again, edit using nano or sudo vi /etc/sysctl.conf
Controls IP packet forwarding
net.ipv4.ip_forward = 1
It is recommended to use an SSH key for authentication, a key pair can be created as follows:
$ ssh-keygen -f ~/.ssh/key_rsa -t rsa -b 4096
The public key ~/.ssh/key_rsa.pub is stored in the user’s home path, here in this example on Host B under the path in the file .ssh/authorized_keys.
Authentication using SSH keys is not only more secure, there are other advantages, for example, the user is not asked to enter a password, also the SSH tunnel and other commands can be executed from a script.
SSH Tunnel on macOS
For Apple macOS, SSH is available after activation, open Terminal and run this command as follows:
$ sudo systemsetup -setremotelogin on
After that, the SSH Tunnel can be set up under macOS.
Remote Desktop for Mac Gateway on localhost is now registered and the RDP session can be opened, in this way terminal servers are protected and can only be reached via SSH.
macOS also offers the possibility for automation and uses launchd and the launch system services, the following script is created at: @/Library/LaunchDaemons/server.hostc.client.cherry.home.plist with the following content:
Windows 10 OpenSSH client can be found in the settings, under Apps & Features – Optional Features – OpenSSH Client.
UNBLOG verwendet Cookies, um Dein Online-Erlebnis zu verbessern. Mit "ACCEPT" gibst Du Deine Zustimmung zur Nutzung dieser Website und unseren Datenschutzbestimmungen, oder wähle Cookie settings.
Diese Website verwendet Cookies, um Ihre Erfahrung zu verbessern, während Sie durch die Website navigieren. Von diesen werden die Cookies, die nach Bedarf kategorisiert werden, in Ihrem Browser gespeichert, da sie für das Funktionieren der grundlegenden Funktionen der Website wesentlich sind. Wir verwenden auch Cookies von Drittanbietern, mit denen wir analysieren und verstehen können, wie Sie diese Website nutzen. Diese Cookies werden nur mit Ihrer Zustimmung in Ihrem Browser gespeichert. Sie haben auch die Möglichkeit, diese Cookies zu deaktivieren. Das Deaktivieren einiger dieser Cookies kann sich jedoch auf Ihre Browser-Erfahrung auswirken.
Notwendige Cookies sind unbedingt erforderlich, damit die Website ordnungsgemäß funktioniert. Diese Kategorie enthält nur Cookies, die grundlegende Funktionen und Sicherheitsmerkmale der Website gewährleisten. Diese Cookies speichern keine persönlichen Informationen.
Alle Cookies, die für die Funktion der Website möglicherweise nicht besonders erforderlich sind und speziell zur Erfassung personenbezogener Daten des Benutzers über Analysen, Anzeigen und andere eingebettete Inhalte verwendet werden, werden als nicht erforderliche Cookies bezeichnet. Es ist obligatorisch, die Zustimmung des Benutzers einzuholen, bevor diese Cookies auf Ihrer Website ausgeführt werden.