Helpdesk and support administrators have to know on which computer the employee is currently working on. Windows does not display the Computer name on desktop, it’s need for a trip to the system settings, or you have to typing commands in the prompt.
Add computer names in taskbar
An easy way to display computer names in the taskbar is to create a new toolbar, but before that a folder must be created, which is created by run the following command in a command prompt opened with Win+Rcmd.
mkdir %APPDATA%\%COMPUTERNAME%
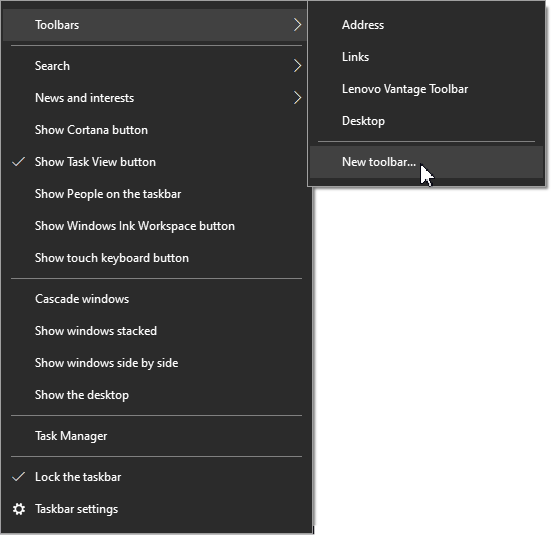
Now click the right mouse button in the taskbar and choose Toolbars here select New toolbar…
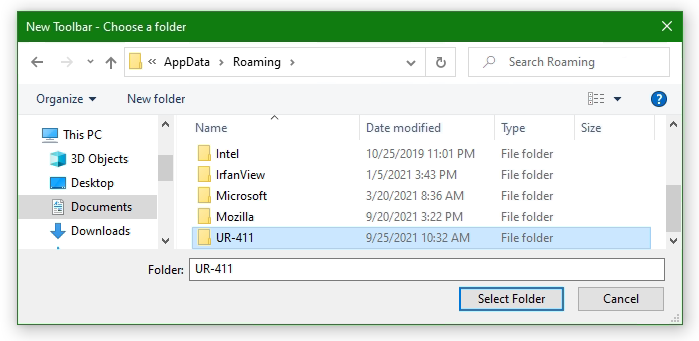
In the address field enter %APPDATA% as the path and select the folder with the computer name in Choose a folder window, now click the Select Folder button.
Now the computer name appears already in the taskbar. If the taskbar is not fixed, fix taskbar with right-click. The toolbar with the computer name can now be brought to the desired position.
Status information in netlogon script
In addition, status information about the authenticated user can be displayed with computer name in the taskbar. Insert the following lines into a batch file and call them in the netlogon script.
@echo off
IF NOT EXIST %APPDATA%\%COMPUTERNAME%\ (
mkdir %APPDATA%\%COMPUTERNAME%
) ELSE (
echo Directory %COMPUTERNAME% exist
)
PowerShell -ExecutionPolicy Unrestricted -Command "Get-NetIPAddress | Select-Object InterfaceIndex,InterfaceAlias,IPAddress | Sort-Object -Property InterfaceIndex | Out-File -FilePath $env:APPDATA\$env:COMPUTERNAME\$env:USERNAME.txt"
PowerShell -ExecutionPolicy Unrestricted -Command "Get-PSDrive | Where {$_.Free -gt 0} | Out-File -Append -FilePath $env:APPDATA\$env:COMPUTERNAME\$env:USERNAME.txt"
wmic useraccount where (name='%username%' and domain='%userdomain%') get domain,name,sid >> %APPDATA%\%COMPUTERNAME%\%USERNAME%.txt
$env:APPDATA\$env:COMPUTERNAME
A PowerShell Script Set-StatusToolbar.ps1 creates the directory and file identical to the batch above.
This post shows how helpdesk and support administrators can quickly see at a glance which is the computer name that the user is currently working on. Windows does not intend to display the computer name on the desktop or taskbar. You must first go to System settings or type commands in command prompt to find out what the computer is called. With this easy solution, the computer name can be known instantly without any clicks.
Firefox Sync Server running self-hosted, for bookmarks available synchronously on any device, including the timeline, tabs, add-ons, settings, and credentials, which can be matched on request.
The Mozilla-hosted Firefox account server can be easily used in combination with a self-hosted synchronization server and storage. Authentication and encryption protocols are designed so that the account server does not know the user’s plaintext password and therefore cannot access the stored synchronization data.
This tutorial shows how to install Firefox Sync Server (Sync 1.5 server) on Apache and Ubuntu 16.04.4 LTS. The Ubuntu server, here sync.server.net as an example, is accessible via the Apache 2.4 web server on the Internet.
Firefox Sync Server Installation
Prerequisite for Sync 1.5 servers is Python 2.7 and Python Virtualenv, python-dev, make, git, as well as the C and C++ compiler. To ensure this, the following pacts will be made available:
The Firefox Sync Server is configured using the ini file to pass different runtime settings. The syncserver .ini file serves as a starting point.
Most settings can be applied before the sync server runs, the URL that can be reached for clients must be adapted to the sync server. For productive use, we open the syncserver .ini file and edit the public_url:
$ vi /opt/syncserver/syncserver.ini

[syncserver]
public_url = https://sync.server.net/
Change the public_url from localhost:5000 to our sync.server.net. In another section, the configuration is set up on the HTTPS protocol.
Then adjust the sqluri for our data beacon:
sqluri = sqlite:////opt/syncserver/syncserver.db
A secret key with the random generator is generated from a terminal, running the following line:
$ head -c 20 /dev/urandom | sha1sum
60bev0b7bd2f56dxea3794fb97f03c824e70e21d
Enter this key generated in the syncserver.ini file:
secret = 60bev0b7bd2f56dxea3794fb97f03c824e70e21d
Assign enough rights to the database:
chmod 660 /opt/syncserver/syncserver.db
Create automatic start in systemd for Firefox Sync:
Now the Let’s Encrypt certificate can be created, certbot makes it easy for us, the SSL configuration required for our virtual host is created automatically.
$ certbot --apache -d sync.server.net
Under /etc/apache2/sites-enabled is now the symlink of this to file sync.server.net-le-ssl.conf shows, this is stored under/etc/apache2/sites-available.
$ ls /etc/apache2/sites-enabled/sync.server.net-le-ssl.conf
/etc/apache2/sites-enabled/sync.server.net-le-ssl.conf
In the file sync.server.net-le-ssl.conf, the WSGI configuration still needs to be added, we edit sync.server.net-le-ssl.conf, which then shows the following content:
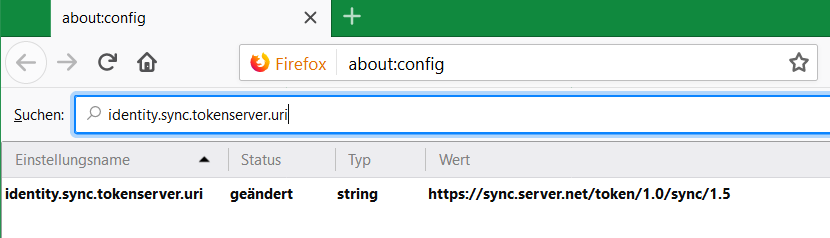
In order for Firefox to be able to synchronize via its own sync server, the URL must be changed, for this purpose you enter about:config in the address bar and confirm with the enter key.
Firefox: about:config
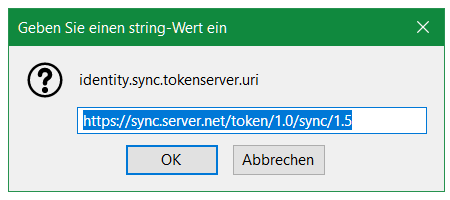
After confirming the warning, enter identity.sync.tokenserver.uri into the search box.
Firefox: identity.sync.tokenserver.uri
Double-clicking changes the value to your own sync server https://sync.server.net/token/1.0/sync/1.5
Finally, the Mozilla account is created via the following URL:
https://accounts.firefox.com
The account itself is located on the Mozilla server, the data is stored on the own sync server.
It is important that the synchronization was made only after the entry to the own sync server in Firefox. If bookmarks and data are on the sync server with Mozilla, the data can be deleted, with the following command lines:
Note that the Let’s Encrypt certbot for validation, the Firefox Sync Server must be reachable via port 80, for the firewall included in Ubuntu in the default, the command is as follows:
$ sudo ufw allow http
When you call the Firefox Sync Server URL, or https://sync.server.net in the browser, the following output should appear:
$ curl -k https://sync.server.ent
it works!
If the Apache web server does not start, the syntax of the configuration can be validated:
$ apache2ctl configtest
Syntax OK
After all accounts have been created, access to other users can be blocked in the syncserver .ini file:
$ allow_new_users = false
The Firefox Sync protocol contains the debug information in case of errors and can be queried with the following command in the browser line.
UNBLOG verwendet Cookies, um Dein Online-Erlebnis zu verbessern. Mit "ACCEPT" gibst Du Deine Zustimmung zur Nutzung dieser Website und unseren Datenschutzbestimmungen, oder wähle Cookie settings.
Diese Website verwendet Cookies, um Ihre Erfahrung zu verbessern, während Sie durch die Website navigieren. Von diesen werden die Cookies, die nach Bedarf kategorisiert werden, in Ihrem Browser gespeichert, da sie für das Funktionieren der grundlegenden Funktionen der Website wesentlich sind. Wir verwenden auch Cookies von Drittanbietern, mit denen wir analysieren und verstehen können, wie Sie diese Website nutzen. Diese Cookies werden nur mit Ihrer Zustimmung in Ihrem Browser gespeichert. Sie haben auch die Möglichkeit, diese Cookies zu deaktivieren. Das Deaktivieren einiger dieser Cookies kann sich jedoch auf Ihre Browser-Erfahrung auswirken.
Notwendige Cookies sind unbedingt erforderlich, damit die Website ordnungsgemäß funktioniert. Diese Kategorie enthält nur Cookies, die grundlegende Funktionen und Sicherheitsmerkmale der Website gewährleisten. Diese Cookies speichern keine persönlichen Informationen.
Alle Cookies, die für die Funktion der Website möglicherweise nicht besonders erforderlich sind und speziell zur Erfassung personenbezogener Daten des Benutzers über Analysen, Anzeigen und andere eingebettete Inhalte verwendet werden, werden als nicht erforderliche Cookies bezeichnet. Es ist obligatorisch, die Zustimmung des Benutzers einzuholen, bevor diese Cookies auf Ihrer Website ausgeführt werden.