
fetchmail daemon pick up e-mails and forward to local mailbox
fetchmail is a daemon for retrieving and forwarding e-mail; the Unix pioneer retrieves e-mail from remote mail servers and forwards them to the delivery system. The mail can then be retrieved using normal e-mail user agents such as mutt, elm, or mail.
What is fetchmail ?
The fetchmail e-mail program can run in daemon mode to repeatedly queries one or more systems at a given interval, it collects e-mails from servers that support all common e-mail retrieval services, such as POP3 and IMAP, also support the ESMTP-ETRN extension and the ODMR protocols.
This article describes how to use fetchmail on a CentOS smart host with Postfix. The e-mail from external mail service providers is retrieved and the recipient is redirected to the mailbox server that receives e-mail from the smart host. Mail accounts do not require forwarding, and the smart host also scans the e-mail for viruses and SPAM before they are delivered to the user’s mailbox.
Install fetchmail e-mail daemon
To install fetchmail e-mail daemon on CentOS 7, the extras repository is required, if not already available.
$ wget https://dl.fedoraproject.org/pub/epel/epel-release-latest-7.noarch.rpm
$ sudo rpm -Uvh epel-release-latest-7*.rpm
The fetchmail daemon can be installed from the CentOS Extras repository.
$ yum -y install fetchmailWe create the fetchmail configuration file for the daemon under /etc/sysconfig.
# This file will be used to declare some vars for fetchmail
#
# Uncomment the following if you dont want localized log messages
# export LC_ALL=C

# Declare here if we want to start fetchmail. 'yes' or 'no'
START_DAEMON=yes
Copy Paste /etc/sysconfig/fetchmail
The fetchmail e-mail daemon Init script is created, here for a CentOS host on this the Postfix MTA is already running. As root with vi /etc/rc.d/init.d/fetchmaild
#!/bin/sh
# chkconfig: 35 99 00
# description: Start and stop fetchmail

. /etc/init.d/functions

start() {
  echo "Starting fetchmaild..."
  su fetchmail -s /bin/sh -c "fetchmail -vv -d 900 -a -f /etc/fetchmailrc -L /var/log/fetchmail"
  }

stop() {
  echo "Shutting down fetchmaild..."
  su fetchmail -s /bin/sh -c "fetchmail --quit"
  }

case "$1" in
  start)
    start
    ;;
  stop)
    stop
    ;;
  restart)
    stop
    start
    ;;
  *)
    echo "Usage: $0 {start|stop|restart}"
    ;;
esac

exit 0
Copy Paste /etc/rc.d/init.d/fetchmail
Make the init script executable.
$ chmod 0755 /etc/rc.d/init.d/fetchmaildCreate the global fetchmailrc Recource configuration for operation as a daemon.
set daemon 900
set no syslog
set logfile /var/log/fetchmail
set postmaster "postmaster"
set no bouncemail
set no spambounce
set properties ""

poll mail.foo.org with proto POP3
user 'joe@foo.org' there with password 'secret' is joe.office@foo.com here options fetchall nokeep ssl smtphost localhost
Copy Paste /etc/fetchmailrc
For each mail server fetchmail retrieved from this e-mail, a poll line is created. The aim is to retrieve the external mailbox from joe@foo.org to the POP3 Server mail.foo.org and to be delivered to the user joe.office@foo.com via the localhost via Postfix to the Mailbox Server. To prevent logging in maillog, log is made in fetchmail instead of it.
Possibilities with fetchmail
fetchmail offers a number of syntactic subtleties to make it easier for fetchmailrc to read files. For example, the words and, with, has, wants, and options are ignored by fetchmail, as well as punctuation marks. While it is possible to provide credentials for a server on a row, common configurations are specified over a number of different lines. fetchmail is insensitive to whitespace unless the argument is in quotation marks and closing characters.
fetchmail options
There are fetchmail provide several options for the Poll statement (e.B. nofetchall (default), fetchall, keep, nokeep ).The meanings are as follows:
nofetchall: retrieve only new messages (default). Unless otherwise specified (i.e. fetchall, keep ), this means nofetchall.
fetchall: get all messages, seen or not.keep.
keep: do not delete any message on server.
nokeep: delete the read messages on server.
Create the fetchmail user and group and set the rights.
$ groupadd -r fetchmail
$ useradd -r -m -g fetchmail -s /sbin/nologin fetchmail
$ chown fetchmail /etc/fetchmailrc
$ chmod 0600 /etc/fetchmailrc
$ touch /var/log/fetchmail
$ chown fetchmail:fetchmail /var/log/fetchmail
$ chmod 0600 /var/log/fetchmail
The fetchmail e-mail daemon starts.
$ /etc/rc.d/init.d/fetchmaild startAfter changing the fetchmailrc configuration, the systemd daemon have to restart.
$ systemctl daemon-reloadfetchmail check
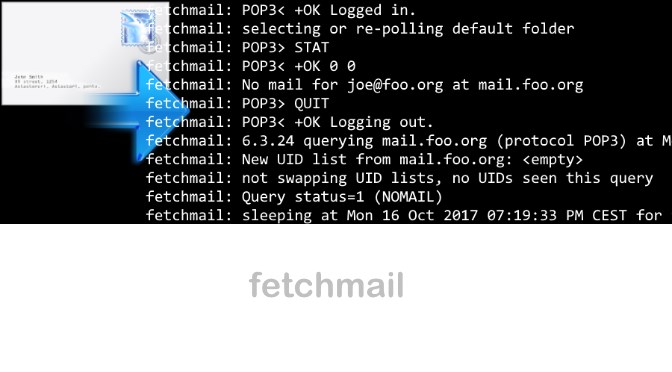
You can check the fetchmail e-mail daemon conversation to server with run the following command:
$ fetchmail -vv -N --ssl -p pop3 -P 995 -ujoe@foo.org mail.foo.orgTest the fetchmailrc configuration file.
$ fetchmail -v -a -k -f /etc/fetchmailrcCheck the fetchmail e-mail daemon process.
$ ps -ef | grep -v grep | grep fetchmailThe output may look something like this:
fetchma+ 4126 1 0 19:19 ?        00:00:00 fetchmail -vv -d 900 -a -f /etc/fetchmailrc -L /var/log/fetchmail
root 6488 3985 0 16:25 pts/0 00:00:00 su fetchmail
fetchmail daemon logging
fetchmail e-mail daemon logging now takes place in the fetchmail file.
$ tail -f /var/log/fetchmailThe fetchmail e-mail daemon man page outputs a lot of information.
$ man fetchmail