PuTTY SSH login with using puttygen key pairs
SSH authentication via asymmetric keys is more secure than using passwords, further public key authentication also enables automated login, for example to log in from scripts without a password request. The PuTTY Key Generator puttygen.exe is used to generate RSA (standard) or DSA and ECDSA key pairs.
- Generate PuTTY Key Pair in puttygen
- Save Public Key to server
- Use PuTTY with Private Key
- SSH configuration on Linux server
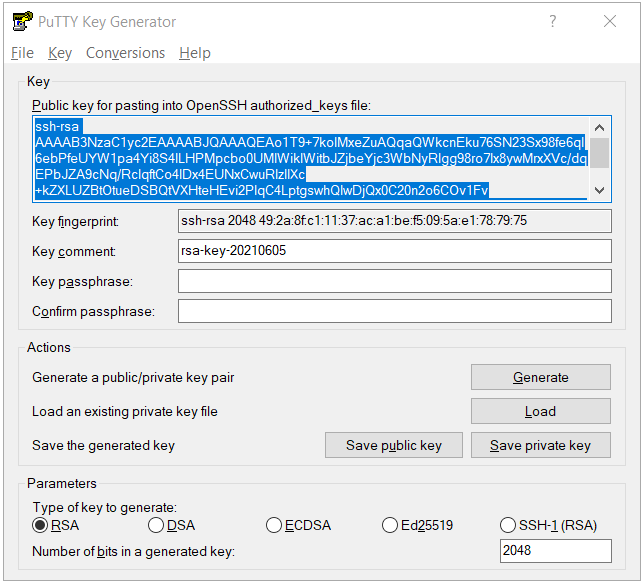
The tool can be found at putty.org via Download PuTTY, if you have install PuTTY using the putty-installer.msi, then puttygen can already be found in the Windows Start menu under PuTTY. To create an RSA key pair, just click on the Generate button. If you want to generate DSA or ECDSA keys, the desired algorithm can be choose at the parameter box with radio button.
Generate PuTTY Key Pair in puttygen
The necessary random mechanism is provided by moving the mouse freely in the free area of the dialog box during key generation. Then you can enter optionally Key passphrase.
To save the private key be click on the button Save private key, in the dialog “are you sure you want to save this key without a passphrase to protect it!“, you can decide to save with or without passphrase. The save of the public key is not absolutely necessary, because it can be calculated at any time from the private key.
The private key should be kept in a safe place, especially if the private key is not protected by a passphrase. Once a private key has been lost, unauthorized persons cannot do anything, if is protected by a passphrase. On the other hand, in the case of automated processing by scripts, a passphrase is not desired.
The file name and the path when saving are free of choice in the chooser, but the extension .ppk has spread for PuTTY keys, because there is a reference to the format that differs from Linux. PuTTY does not accept OpenSSH keys, but in the Conversions menu it is possible to import existing OpenSSH keys and also to export PuTTY keys.
Save Public Key to server
The public key should be published on the server, completely mark it with the mouse in the Key field and copy it to the clipboard with Ctrl+C.
Just log in with PuTTY again with username and password on the Linux server, open the file ~/.ssh/authorized_keys with an editor of choice and insert the public key from the clipboard.
Do not changed anything on the key, just copy & paste. The file authorized_keys can contain several keys one after the other, without spaces or lines in between.
Use PuTTY with Private Key
To use public key authentication next time you log in, go to the PuTTY start page Basic options for your PuTTY session in the Session area enter the IP address or the Host Name, for Saved Sessions you enter a desired name and click on Save, but first choose the file name of the private key in the Category under Connection click + on SSH they opens the Auth area with Private key file for authentication field. The easiest way to do this is to click on Browse and select the appropriate file in the file chooser.
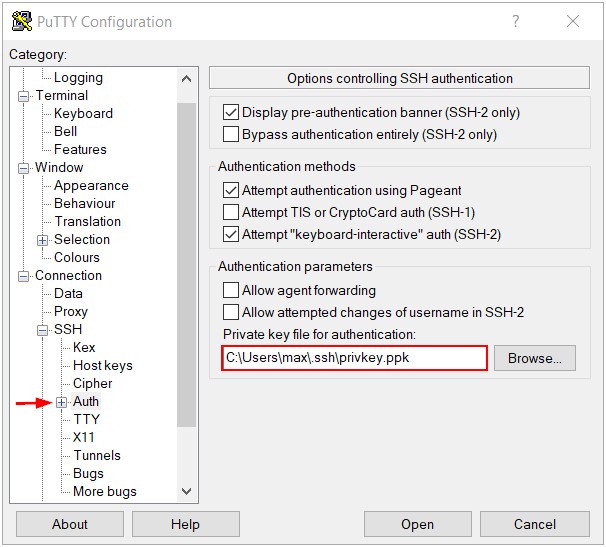
The credentials for each individual connection can be stored as a session. If a connection is now established to the Linux server, it requires the identity, so that the specified user name must have a public key specified in the file authorized_keys which matches the private key.
Now it asks for the passphrase (if entered) to activate the private key stored in the local .ppk file. If both keys are matched access will granted.
SSH configuration on Linux server
On the Linux server, the SSH server configuration for SSH authentication via asymmetric keys must be activated, with most Linux distributions public key authentication is activated by default /etc/ssh/sshd_config.
#PubkeyAuthentication yes
#RSAAuthentication yes
AuthorizedKeysFile      .ssh/authorized_keys
OpenSSH: A leading hash (#) character means that it is the default value, if you would change the value, removed # and modify the parameter.
The users manage their public keys under $home in the key file ~/.ssh/authorized_keys, after creating it with adduser the .ssh directory is usually not exist, in this case it is made as root for the user john as follows.
$ cd /home/john
$ mkdir .ssh
$ chown john:john .ssh
$ chmod 700 .ssh
$ touch .ssh/authorized_keys
$ chmod 600 .ssh/authorized_keys
The .ssh directory is not visible to other users.