Category Archives: Howto Tutorials (EN)

Knowledge Network for Tutorials, Howto’s, Workaround, DevOps Code for Professionals.

FortiClient TLS VPN connection failed

FortiClient Failed to establish the VPN connection by TLS. This may be caused by a mismatch in the TLS version. Please check the TLS version settings in the Advanced of the Internet options. (-5029)

Using FortiClient to establish an SSL-VPN connection to the FortiGate can output a warning message.

Symptom

FortiClient Warning. Failed to establish the VPN connection. This may be caused by a mismatch in the TLS version. Please check the TLS version settings in the Advanced of the Internet options. (-5029)

Cause

FortiClient TLS VPN connection failed

The now outdated cryptographic protocol TLS 1.0 is no longer enabled by default as of FortiOS 6.0. It is recommended to use at least TLS 1.1 (Cipher Suites) for authentication and data encryption. We are currently on TLS 1.3 which has been approved by the IETF (Internet Engineering Task Force).

Solution

If you want to continue use older FortiClient VPN connection that are only ready for use later with TLS 1.2 or higher may if planned client migration via update rollout, TLS 1.0 can be activated on the FortiGate.

This measure should only be used temporarily, TLS 1.0 is outdated and is no longer considered secure.

Check current TLS settings

Check the current TLS setting from the FortiGate VPN Console with CLI Command:

FG60E # get vpn ssl settings | grep tls
tlsv1-0             : disable
tlsv1-1             : enable
tlsv1-2             : enable
dtls-hello-timeout  : 10
dtls-tunnel         : enable

Activate in the CLI the Cipher Suite TLS 1.0.

config vpn ssl settings
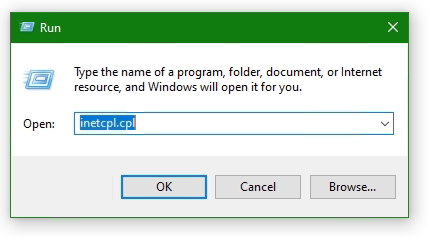
set tlsv1-0 enable

How to enable TLS 1.0 on Windows


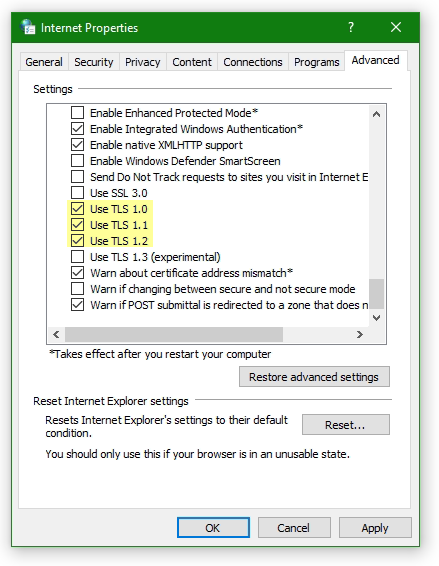
The TLS version 1.0 in the Microsoft Windows snap-in (inetcpl) Internet Options can also be activate.

Windows-Logo + R

Hit the key Win+R and enter inetcpl.cpl

Run inetcpl.cpl

In the opened Internet Options window Internet Properties click to Advanced tab and click Use TLS Version 1.0 to enable it.

TLS FortiClient VPN connection, Internet Options Advanced

Troubleshooting MTU size in VPN connections

According to FortiClient VPN TLS using on older Windows versions, or with routers with PPPoE Internet connection, errors when establishing SSL-VPN connections can be eliminated as follows.

It appears the FortiClient error message:

Unable to establish the VPN connection. The VPN server may be unreachable (-5)

Check MTU size using netsh in command prompt

To do this, check the MTU size of the network interfaces with the following command from an open command prompt

netsh interface ipv4 show subinterface

The output might look something like this:

C:\> netsh interface ipv4 show subinterface

   MTU  Medienerkennungsstatus   Bytes eingehend  Bytes ausgehend  Schnittstelle
------  ---------------  ---------  ---------  -------------
  1500                5          0          0  Ethernet
  1500                1  598892209   19487894  WiFi
  1500                5          0          0  Mobilfunk
  1500                1       5248     144442  VMware Network Adapter VMnet1
  1500                5          0          0  LAN-Verbindung* 1
  1500                1          0     134436  VMware Network Adapter VMnet8
  1500                5          0          0  LAN-Verbindung* 5
4294967295                1          0      67869  Loopback Pseudo-Interface 1
  1500                5          0          0  Bluetooth-Netzwerkverbindung
  1500                5          0          0  Ethernet 3

Check the MTU size and adjust to 1400 if necessary. In a command prompt opened as an administrator, with running netsh.

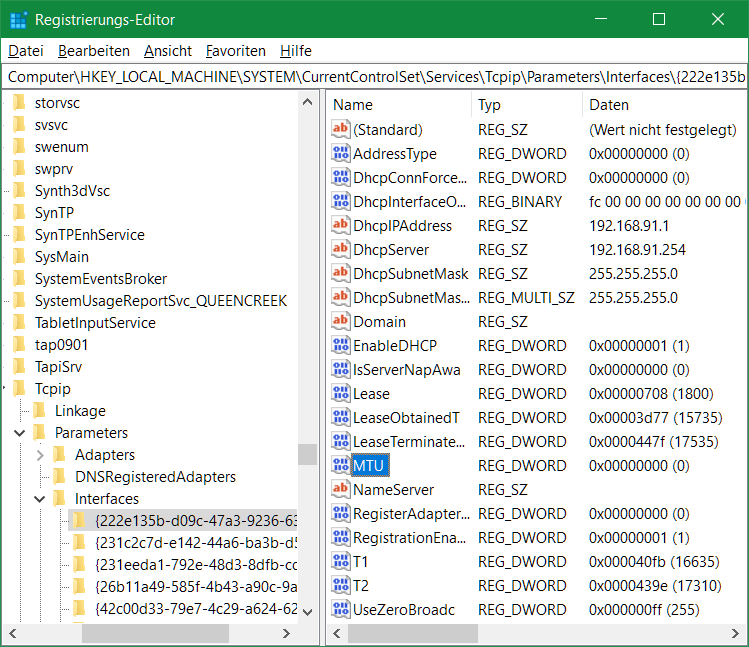
netsh interface ip4 set subinterface Ethernet mtu=1400 store=persistent

Alternatively, call Regedit and navigate to the following key.

Computer\HKEY_LOCAL_MACHINE\SYSTEM\CurrentControlSet\Services\Tcpip\Parameters\Interfaces

under the appropriate interface with the appropriate IP address, here {222e135b-d09c-47a3-9236-63a041a02ea6} change the key MTU with the value 578 hexadecimal.

TLS FortiClient VPN connection, regedit interfaces

After restarting the computer, the SSL-VPN connection can be established.

Generating a new ssh key use for Github

Howto deploy SSH Key authentication for Github with using VS Code Editor

After looking for an adequate solution in the word wide web, I came to the following workaround, which I describe here. I developing in VS Code on Windows 10 and don’t want to run commit and push in the Git Bash terminal again and again, especially because VS Code comes out of the box with all of the Git skills include.

Let’s get started, if you not allready have Git for Windows on your Windows 10, you have to download here.

Git Bash

First open Git Bash and go to directory ~/.ssh, if it’s not exist you can create in windows explorer under the users home path, or type mkdir .ssh in Git bash.

cd ~/.ssh
ssh-keygen -t rsa -b 4096 -C "your.email@domain.com"
clip < id_rsa.pub

A key pair as privat and public key are generated, a passphrase you can leave but keep the key on a safe place, the command clip copies the public key to the clipboard, which will be saved to Github account in the next step.

Go to Github and sign in with your account, open profile in the upper right corner, navigate to Settings and click SSH and GPG keys, click New SSH key, paste the public key into the key field, for title you can enter your.email@domain.com.

Now ready to go back to Git bash and enter the following commands, with option -T the host is entered in known_hosts, here you have to confirm with yes, the command git push authorized on Github by use the key in ~/.ssh/id_rsa.

cd ~/my_project
ssh -T git@github.com
git remote set-url origin git@github.com:account/my_project.git
git add -A
git commit -am "commit update"
git push

place instead of account your github account, and for my_project the name of your project you deploying.

Now open directory out from Git bash with VS Code.

$ code my_project

VS Code Editor offers git commands via the main toolbar and the icon menu.

vs code
vs code editor

Advanced configuration

By default ssh looks for the key in a file named id_rsa, if you want to authenticate to multiple hosts, the following directive applies in the file ~/.ssh/config

Host github.com
	HostName github.com
	User git
	IdentityFile ~/.ssh/id_rsa_github

Deploy Git on Linux Shell

If you use Linux “should be preferred” then the following command lines create a Git project directory and add README.md, further Commit and Push them.

git init
git config --global user.name "my_project"
git config --global user.email "your.email@domain.com"
touch README.md
git add .
git add README.md
git commit -m "add README"
git commit -m "Initial commit"
git push -u origin master