Windows Master Browser Lookup for NetBIOS Name and Elected Master Browser
The folders and printers shared by Windows clients appear in the client network environment. If the network environment remains empty, it is often the computer browser service. Windows attempts to view all PCs on a Windows network in the network environment.
Windows Workstation Service
First, you need to make sure that a Windows network is working properly at all. The Windows Workstation Service and Server services must be running, and the network connection properties must have file and printer sharing and the Microsoft Network Client active, and TCP/IP over NetBIOS must be enabled.
Note that clients that are not in a domain are in the same workgroup, the WORKGROUP and WORKING GROUP are different groups. If all this does not yet lead to success, one should search for the computer on the network, which has been delegated to the master browser.
NetBIOS Name Information
The NBTscan is a program for scanning IP networks for NetBIOS name information. It sends a NetBIOS status query to any address in the specified range and lists received information in a human-readable form. For each responding host, the IP address, NetBIOS computer name, user name, and MAC address of the computer are displayed.
C:\> nbtscan -s: -h -v 192.168.10.0/24To discover the master browser on a local network, the following content can be created in a batch file.
@Echo Off
Title Master Browser Lookup & Color 1A
call :IsAdmin

if not [%1]==[] goto lookup
echo use: nbt [ip address range]
echo example: nbt 192.168.10.0/24
goto:eof

:lookup
nbtscan -s: -h -v %1 | find "Master Browser"
for /f "delims=" %%A in ('nbtscan -s"   " -h -v %1 ^| find "Master Browser"') do set "var=%%A"
echo .
echo Elected Master Browser on %var:~0,15%
echo .
nbtstat -A %var:~0,15%
pause

:IsAdmin
Reg.exe query "HKU\S-1-5-19\Environment"
If Not %ERRORLEVEL% EQU 0 (
 cls & echo You must have administrator rights to continue ...
 pause & exit
)
cls
goto:eof
Using Copy Paste to the batch file .bat save and, when the IP network is committed, run as an administrator in the command prompt, the program nbtscan.exe and cygwin1.dll must be in the same directory, or the path to the program must be in the search path environment.
Download NBTScan
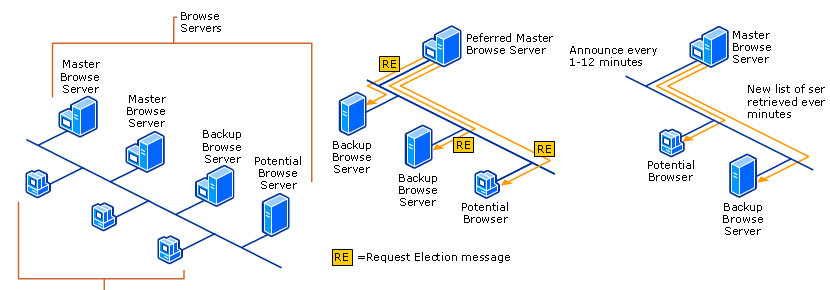
Master Browser Delegation
Often it helps when the PC of this is the master browser on its network to restart, so the choice to delegate another computer is triggered. Microsoft sets priorities here, by regulating the assignment (election) to the master browser is granted. Administrators don’t just want to leave it to random rules about who master browser should be, to do so, you open Regedit and go to the following key.
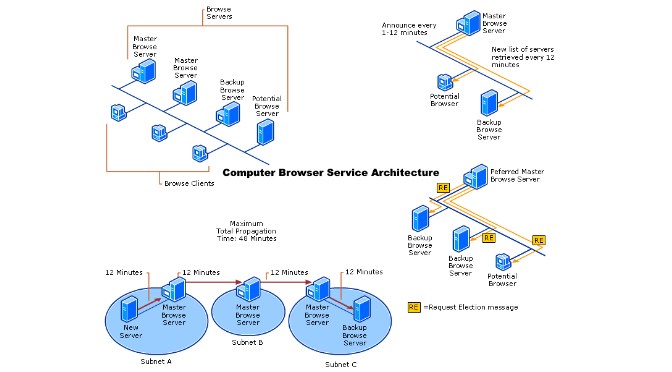
HKEY_LOCAL_MACHINE-SYSTEM\CurrentControlSet\Services\Browser\ParametersEdit the REG_SZ MaintainServerList key and set it to FALSE or TRUE, for disable or enable. For Windows XP and Server 2003, the REG_SZ key is IsDomainMaster with value FALSE / TRUE, and MaintainServerList with the value AUTO / NO / YES. The change does not take effect immediately and may take up to 48 minutes.
Linux Samba Master Browser
For Linux, the Samba configuration file smb.conf is responsible, in the following example, a Samba server with the highest priority is chosen as the master browser, suitable on a network without Windows PDC. In networks in these there is a Windows PDC it is not recommended.
[global]
    domain master = yes
    preferred master = yes
    local master = yes
    os level = 255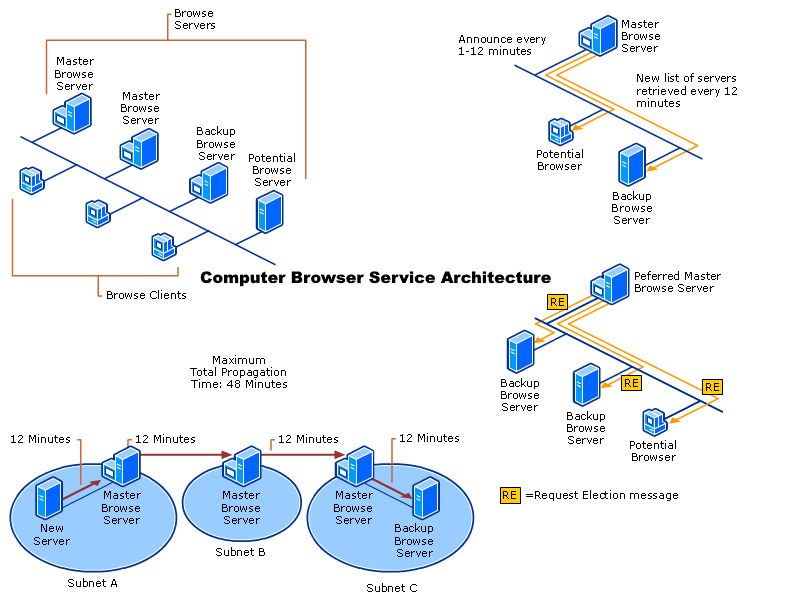
NBTStat is a command-line tool for troubleshooting NetBIOS name over TCP/IP (NetBT) resolution issues, it is part of the Windows standard. It shows protocol statistics and current TCP/IP connections with NetBT.
C:\> nbtstat -A 192.168.10.73
LAN connection 1:
Node IP[192.168.10.73] address: Rang[]e ID:

NetBIOS name table of the remote computer

    Name          Type  Status
    ---------------------------------------------
    AMX3000       <00>  CLEAR  Registered
    WORKGROUP     <00>  GROUP  Registered
    WORKGROUP     <1C>  GROUP  Registered
    AMX3000       <20>  CLEAR  Registered
    WORKGROUP     <1B>  CLEAR  Registered
    WORKGROUP     <1E>  GROUP  Registered
    ADMINISTRATOR <03>  CLEAR  Registered

    MAC Adresse = 00-0B-AB-0B-11-8E
NetBIOS name tables type <00> is output in hex.</00>
<00> specifies the domain to which this computer belongs
<03> Computer name assigned to the messenger service
<20> Computer name assigned to the server service
<1C> Internet group name registered with domain controller
<1B> Identifying a domain master browser name
<1E> Computer can be used as a backup browser in the domain
<03> Username currently logged on to this computer
<1D> Identify segment master browsers without a domain