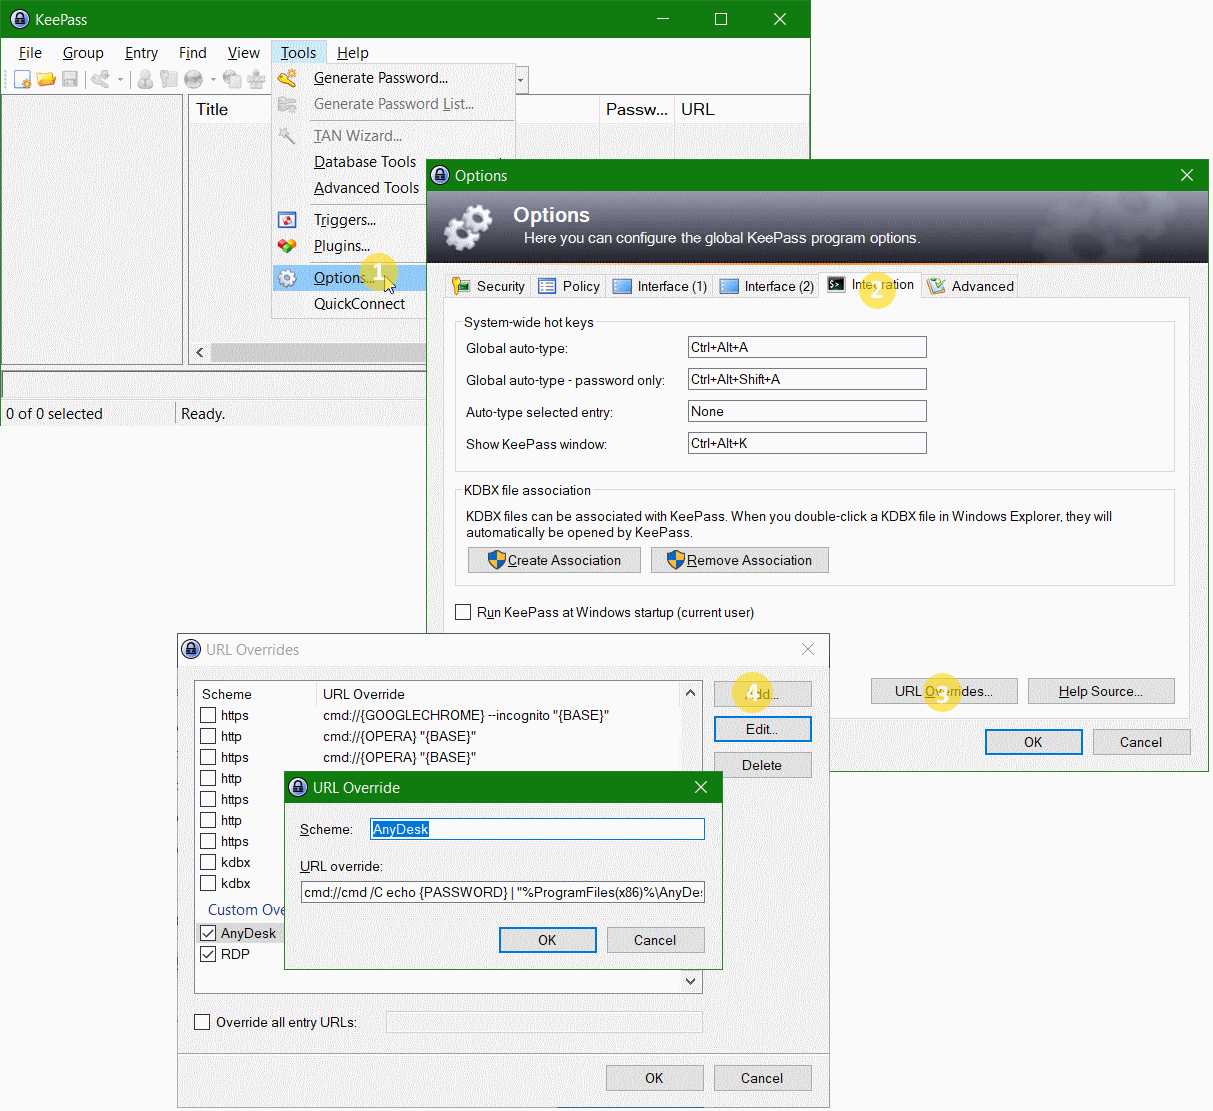
After adding the url override scheme for AnyDesk, the new URL can be use in KeePass. But first KeePass must be closed and restarted.
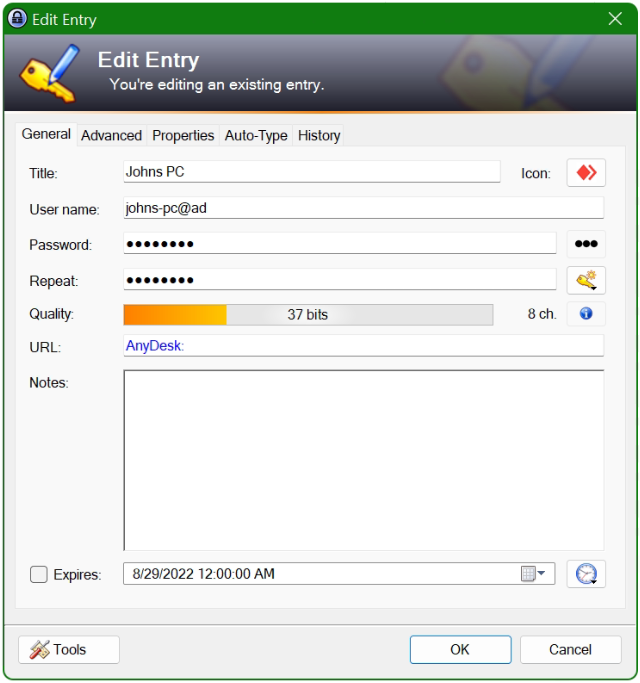
The URL AnyDesk:
Into the field URL insert AnyDesk: the AnyDesk ID or alias is entered as the User name, and for Password the AnyDesk password.
Let’s start AnyDesk session
By double-clicking on “AnyDesk” in the URL column, the session is started. User name and password are passed to AnyDesk.
The KeePass Password Manager
KeePass Password Safe is a free password manager program available under the terms of the GNU General Public License (GPL). KeePass encrypts the entire database, which can also contain usernames and the like.
AnyDesk remote desktop application
AnyDesk is a remote desktop application distributed by AnyDesk Software GmbH. The proprietary software program provides platform independent remote access to personal computers and other devices running the host application. It offers remote control, file transfer, and VPN functionality. AnyDesk is often used by technical support to provide remote assistance.
Conclusion
This tutorial shows how to use the KeePass Password Safe as an AnyDesk address book so that remote maintenance sessions can be started from KeePass.
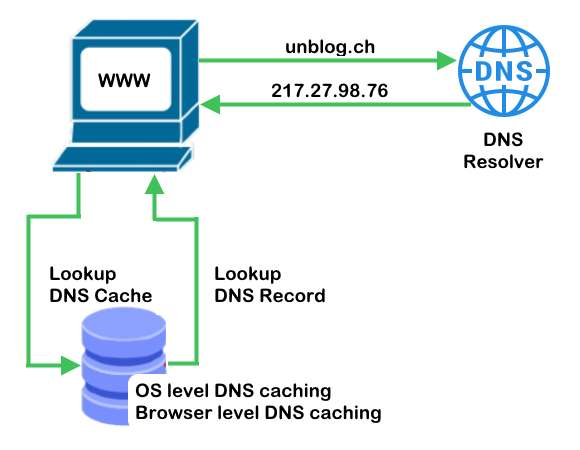
A DNS cache is a temporary database, containing records of all the recent and attempted visits for requested domains names, each sequence of a DNS query from Browser to the recursive resolver looks like this.
What is DNS caching?
The purpose of caching is to temporarily stored data in a location that results in improvements in performance and reliability for data requests. DNS caching involves storing data closer to the requesting client so that the DNS query can be resolved earlier and additional queries further down the DNS lookup chain can be avoided, thereby improving load times and reducing bandwidth/CPU consumption. DNS data can be cached in a variety of locations, each of which will store DNS records for a set amount of time determined by a time-to-live (TTL).
Browser level DNS caching
Modern web browsers are designed by default to cache DNS records for a set amount of time. The purpose here is obvious; the closer the DNS caching occurs to the web browser, the fewer processing steps must be taken in order to check the cache and make the correct requests to an IP address. When a request is made for a DNS record, the browser cache is the first location checked for the requested record.
In Chrome, you can see the status of your DNS cache by going to chrome://net-internals/#dns
this also applies to Microsoft Edge since it rendering on chromium.
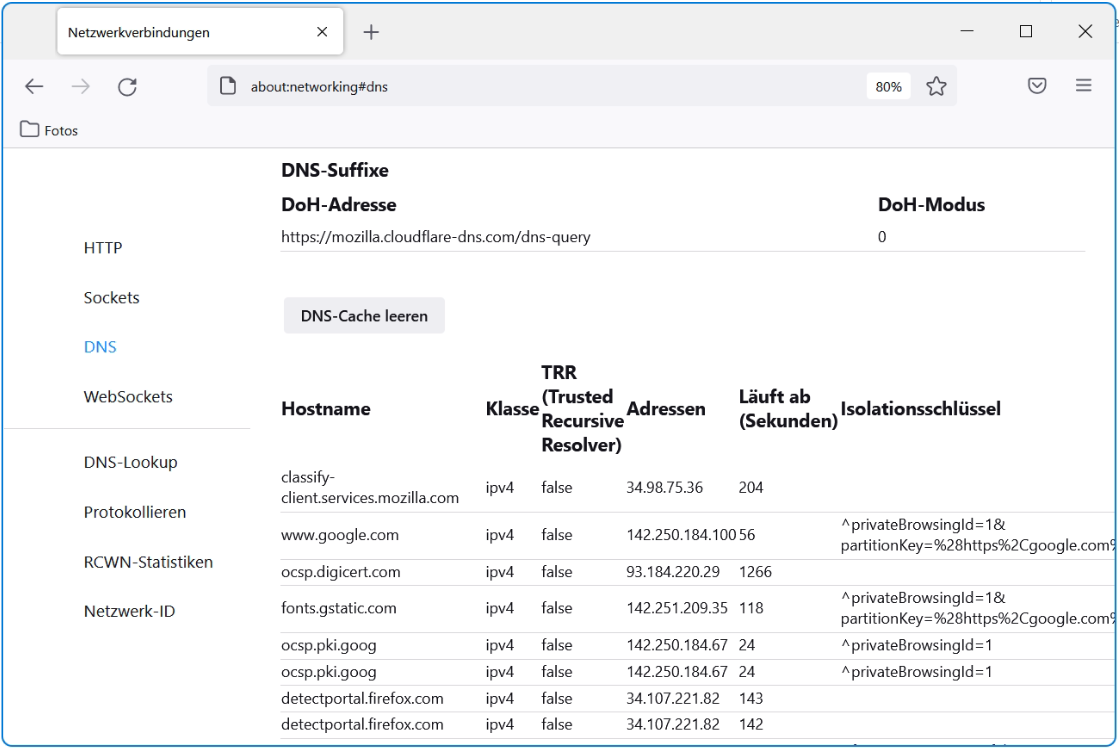
Mozilla Firefox lists entries in DNS cache with this URL about:networking#dns
Mozilla Firefox about:networking#dns
OS level DNS caching
The operating system level DNS resolver is the second and last local stop before a DNS query leaves your machine. The process inside your operating system that is designed to handle this query is commonly called a “stub resolver” or DNS client. When a stub resolver gets a request from an application, it first checks its own cache to see if it has the record. If it does not, it then sends a DNS query (with a recursive flag set), outside the local network to a DNS recursive resolver inside the Internet service provider (ISP).
When the recursive resolver inside the ISP receives a DNS query, like all previous steps, it will also check to see if the requested host-to-IP-address translation is already stored inside its local persistence layer.
How to check and query local DNS Cache
In some situations, the content of the DNS cache needs to be checked, such as when several instances of different level caching do not match, or to update the cache immediately if there are changes in the DNS.
When using Windows, the ipconfig command can be used to view the DNS cache content, To do this, open a command prompt with press Win+RcmdEnter to paste and run the following command.
C:\> ipconfig /displaydns
If you want to reset the DNS cache, for example because the cache is to be updated immediately, the flushdns option can be used.
C:\> ipconfig /flushdns
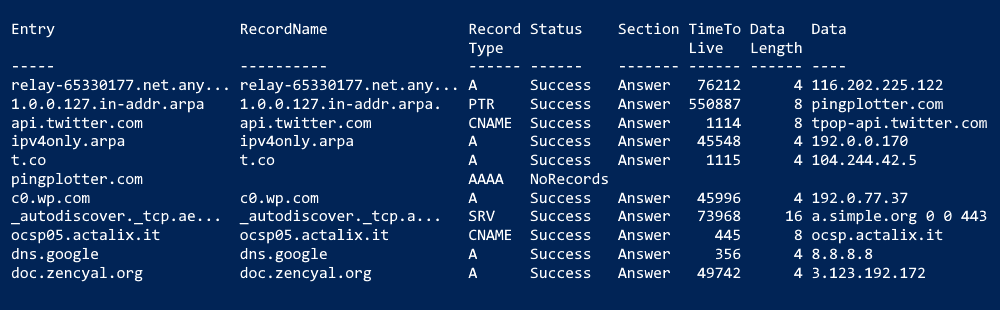
To retrieve the content of the DNS client cache can also get in the Windows PowerShell they give the Get-DnsClientCache cmdlet.
PS C:\> Get-DnsClientCache
The cmdlet is preferable, this output comes very nice and comfortable.
PowerShell Get-DnsClientCache
With Linux it is quite different, if using Linux Mint or another Ubuntu based OS, then resolvectl can help to show the cache content.
$ resolvectl query 217.27.98.76
The resolve query output appears something like this.
217.27.98.76: apache2.a-enterprise.ch          -- link: ens160

-- Information acquired via protocol DNS in 24.9ms.
-- Data is authenticated: no
DNS caching is not guaranteed to be present on every Linux system. In the traditional configuration (i.e. without systemd), apps would send DNS queries directly to the servers found in /etc/resolv.conf, so there’s no “system” DNS cache to be seen in the first place. Linux Distributions do often enable DNS caching by default, but the exact mechanism varies.
To show link and server status, try perform the status command.
$ resolvectl status
systemd-resolved as DNS cache
If you are using systemd-resolved as the DNS cache (which these days is indeed the closest thing to a “system DNS cache”), run systemctl kill -s USR1 systemd-resolved and it will dump all cache contents to the system journal (journalctl -b -u systemd-resolved) upon receiving the SIGUSR1.
Note. that the ‘systemd-resolved‘ tool is named resolvectl query in recent versions, which additionally has the --cache=no option to bypass caching done by systemd-resolved.
Testing this out, we can run journalctl for all DNS records in the cache, with launch the script will perform grep for IN records.
If there is a DNS caching on your Linux? you can verify this on your system with perform the ‘systemctl is-active‘ command.
$ systemctl is-active systemd-resolved
More usefull resolvectl query commands! this retrieve the MX record of the “icloud.com” domain.
$ resolvectl -t MX query icloud.com
To retrieve any TXT record of a domain.
$ resolvectl --legend=no -t TXT query outlook.com
Because we usually want to query the SPF record these days.
$ resolvectl -t TXT query gmail.com | grep "spf1"
this query looks something like this.
gmail.com IN TXT "v=spf1 redirect=_spf.google.com" - link: ens160
Resolve an SRV service type using resolvectl service option.
$ resolvectl service _xmpp-server._tcp gmail.com
To retrieve SRV entries of a domain, i.e. preferred for SCP by Outlook Anywhere.
$ resolvectl service _autodiscover._tcp hosttech.net
If you want to flush all local DNS caches, i.e. the cache is to be updated immediately, then the flush-caches option can be appended.
$ resolvectl flush-caches
Further help is given with hitting –help.
$ resolvectl --help
resolvectl [OPTIONS...] COMMAND ...

Send control commands to the network name resolution manager, or
resolve domain names, IPv4 and IPv6 addresses, DNS records, and services.

Commands:
  query HOSTNAME|ADDRESS...    Resolve domain names, IPv4 and IPv6 addresses
  service [[NAME] TYPE] DOMAIN Resolve service (SRV)
  openpgp EMAIL@DOMAIN...      Query OpenPGP public key
  tlsa DOMAIN[:PORT]...        Query TLS public key
  status [LINK...]             Show link and server status
  statistics                   Show resolver statistics
  reset-statistics             Reset resolver statistics
  flush-caches                 Flush all local DNS caches
  reset-server-features        Forget learnt DNS server feature levels
  dns [LINK [SERVER...]]       Get/set per-interface DNS server address
  domain [LINK [DOMAIN...]]    Get/set per-interface search domain
  default-route [LINK [BOOL]]  Get/set per-interface default route flag
  llmnr [LINK [MODE]]          Get/set per-interface LLMNR mode
  mdns [LINK [MODE]]           Get/set per-interface MulticastDNS mode
  dnsovertls [LINK [MODE]]     Get/set per-interface DNS-over-TLS mode
  dnssec [LINK [MODE]]         Get/set per-interface DNSSEC mode
  nta [LINK [DOMAIN...]]       Get/set per-interface DNSSEC NTA
  revert LINK                  Revert per-interface configuration

Options:
  -h --help                    Show this help
     --version                 Show package version
     --no-pager                Do not pipe output into a pager
  -4                           Resolve IPv4 addresses
  -6                           Resolve IPv6 addresses
  -i --interface=INTERFACE     Look on interface
  -p --protocol=PROTO|help     Look via protocol
  -t --type=TYPE|help          Query RR with DNS type
  -c --class=CLASS|help        Query RR with DNS class
     --service-address=BOOL    Resolve address for services (default: yes)
     --service-txt=BOOL        Resolve TXT records for services (default: yes)
     --cname=BOOL              Follow CNAME redirects (default: yes)
     --search=BOOL             Use search domains for single-label names
                                                              (default: yes)
     --raw[=payload|packet]    Dump the answer as binary data
     --legend=BOOL             Print headers and additional info (default: yes)

See the resolvectl(1) man page for details.
UNBLOG verwendet Cookies, um Dein Online-Erlebnis zu verbessern. Mit "ACCEPT" gibst Du Deine Zustimmung zur Nutzung dieser Website und unseren Datenschutzbestimmungen, oder wähle Cookie settings.
Diese Website verwendet Cookies, um Ihre Erfahrung zu verbessern, während Sie durch die Website navigieren. Von diesen werden die Cookies, die nach Bedarf kategorisiert werden, in Ihrem Browser gespeichert, da sie für das Funktionieren der grundlegenden Funktionen der Website wesentlich sind. Wir verwenden auch Cookies von Drittanbietern, mit denen wir analysieren und verstehen können, wie Sie diese Website nutzen. Diese Cookies werden nur mit Ihrer Zustimmung in Ihrem Browser gespeichert. Sie haben auch die Möglichkeit, diese Cookies zu deaktivieren. Das Deaktivieren einiger dieser Cookies kann sich jedoch auf Ihre Browser-Erfahrung auswirken.
Notwendige Cookies sind unbedingt erforderlich, damit die Website ordnungsgemäß funktioniert. Diese Kategorie enthält nur Cookies, die grundlegende Funktionen und Sicherheitsmerkmale der Website gewährleisten. Diese Cookies speichern keine persönlichen Informationen.
Alle Cookies, die für die Funktion der Website möglicherweise nicht besonders erforderlich sind und speziell zur Erfassung personenbezogener Daten des Benutzers über Analysen, Anzeigen und andere eingebettete Inhalte verwendet werden, werden als nicht erforderliche Cookies bezeichnet. Es ist obligatorisch, die Zustimmung des Benutzers einzuholen, bevor diese Cookies auf Ihrer Website ausgeführt werden.