Add alternate IP Address

Add alternate IP address to network interface

This post shows how to manage alternate IP settings for Windows, Linux and macOS. If network devices are to be managed in different subnets, it helps to add a second IP address to the network interface.

Add alternate IP address to network interface

Add alternate IP Address on Windows

In order to be able to use Windows for an additional network, the alternate IP settings are opened.

Windows Logo + R

To do this, press the keys Windows-Logo + R to open the Run box.

Open Run enter ncpa.cpl and click OK

Enter ncpa.cpl in the field and click OK.

The Network Connections Control Panel opens, choose an active network adapter that you are use.

add alternate ip address select active network connection

In the Network Connections panel; right-click on Properties above the active network adapter.

add alternate IP address, Control Panel Ethernet Properties

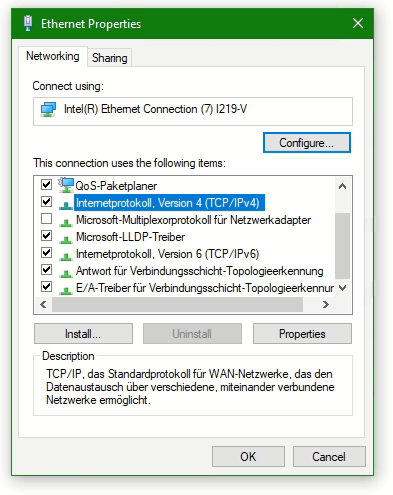
Select the line Internetprotocol Version 4 (TCP/IPv4) and click Properties. Note. do not disable with uncheck the Internetprotocol.

add alternate IP address

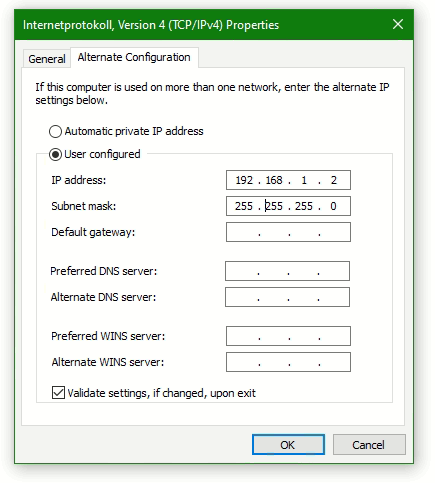
Enter an IP address in the Alternate Configuration tap, e.g. 192.168.1.2 and the subnet mask 255.255.255.0. Confirm the entry by clicking OK to activate the alternate IP address.

How to add alternate IP address on Linux

Linux can be provide multiple IP addresses configured for network interfaces. The following command shows how to temporarily add an alternate IP to a network interface (network card), as root or with sudo in the Linux shell.

$ ifconfig eth0:0 192.168.1.2 netmask 255.255.255.0 up

The network interface eth0 can be have a different name, with run ip link and ip address or ifconfig the network interfaces are displayed. All links, such as the loopback interface are output with an index number, depending on how the system is in use, probably using Docker or Virtualbox then virtual links such as virbr0 can also exist, or a WiFi interface like wlp2s0.

$ ip link
1: lo:  mtu 65536 qdisc noqueue state UNKNOWN mode DEFAULT group default qlen 1000
    link/loopback 00:00:00:00:00:00 brd 00:00:00:00:00:00
2: eno1:  mtu 1500 qdisc fq_codel state UP mode DEFAULT group default qlen 1000
    link/ether 00:23:24:57:c8:ce brd ff:ff:ff:ff:ff:ff
3: wlp2s0:  mtu 1500 qdisc noop state DOWN mode DEFAULT group default qlen 1000
    link/ether 46:ee:68:41:07:af brd ff:ff:ff:ff:ff:ff
4: virbr0:  mtu 1500 qdisc noqueue state DOWN mode DEFAULT group default qlen 1000
    link/ether 52:54:00:de:a3:2c brd ff:ff:ff:ff:ff:ff

With modern Linux distributions like Debian 10 (buster) or CentOS 7 and later, the command ip address can by run.

$ ip address add 192.168.1.2/24 dev eth0

How to add IP address on macOS

In macOS terminal add second IP address to interface en0.

$ sudo ifconfig en0 inet 192.168.1.2 netmask 255.255.255.0

The device can now be queried with ping or if provided try to connect via SSH or HTTP, for example to 192.168.1.100.

$ ssh -vv admin@192.168.1.100

For Linux and macOS, SSH is built in and can be used out of the box.

Unifi UAP Device Re adoption

Ubiquiti UAP device adoption with UniFi network application and SSH terminal

UniFi Device adoption is the process of connecting a UniFi device to a UniFi application in order to be managed by UniFi Controller.

This tutorial explains how Unifi UAP device adoption works, how to adopt devices to the UniFi Network application, and how to troubleshoot any issues that may arise.

The UniFi Network application scans and displays all devices that are unmanaged or managed by UniFi Controller. A UniFi UAP device that is not managed by any application will show a static white LED. This means that the device is available for discovery and adoption.

If the adoption process fails and the UAP device is no longer possible to adopt because the UniFi Controller reject it, for example after a failed provisioning, the first step to do is to remove the device that is no longer connected from the UniFi Controller by clicking on the Forget button.

UniFi Device adoption Disconnected click Forget

Manual set-inform via SSH

Now connect over SSH to the device, for example using PuTTY terminal or with Linux use SSH to the Unifi UAP Access Point.

SSH Terminal open to UniFi UAP with PuTTY
Open SSH Terminal to UniFi UAP with PuTTY
BusyBox v1.25.1 () built-in shell (ash)
 
 
  ___ ___      .__________.__
 |   |   |____ |__\_  ____/__|
 |   |   /    \|  ||  __) |  |   (c) 2010-2020
 |   |  |   |  \  ||  \   |  |   Ubiquiti Networks, Inc.
 |______|___|  /__||__/   |__|
            |_/                  https://www.ui.com/
 
      Welcome to UniFi UAP-AC-LR!
 
APBern-BZ.v4.3.28# info
 
Model:       UAP-AC-LR
Version:     4.3.28.11361
MAC Address: 18:e8:29:c0:b0:d6
IP Address:  192.168.1.20
Hostname:    APBern
Uptime:      104426 seconds
 
Status:      Server Reject (http://192.168.2.17:8080/inform)
APBern-BZ.v4.3.28#

If the Unifi UAP status Server Reject is displayed, then you can reset the UAP, using the following command-line from the SSH terminal.

sudo syswrapper.sh restore-default

During the reset, the Unifi UAP will reboot, after about 2 minutes the device is reachable again, possibly now with a different IP address.

The UAP device is now in the status – Pending Adoption (static white LED), the device can now adopt by the UniFi controller application.

Unifi UAP Pending Adoption Status

Now open an SSH terminal again and execute the command-lines, the command set-inform must be executed several times. After reset the login is ubnt/ubnt or root/ubnt. The UniFi-Controller is running on Server 192.168.2.17, but it can also by an UniFi Cloud-Key.

set-inform http://192.168.2.17:8080/inform
set-inform

After about 2 minutes, the device is ready for adoption, in the UniFi Controller application click Adopt. After another 2 minutes, the device is adopted and has been provisioned. The device status LED now lights up blue permanently.

Advanced UniFi UAP adoption troubleshooting

If the UniFi UAP device doesn’t appear for adoption and the steps above didn’t help, try the following steps:

If the device status LED not lights up, check whether the device is powered. Check the PoE and Ethernet cables. If the device is powered and the LED lights up, it may be managed by another UniFi network application.

If the device status LED is permanently blue, it means that the UAP device has either already been adopted from a UniFi network application and is no longer able to connect, or that the device is managed by another UniFi network application that prevents the device from being detected.

A reset can be triggered on the UniFi device next to the RJ-45 LAN port, use a pen or a curved paper clip to press and hold the reset button for at least 5 seconds, the device status LED starts flashing.

Add additional IP address on Windows

If the device has assigned the IP address 192.168.1.20 and not one from DHCP, it means that the device has been rejected by the UniFi Controller and the provisioning no longer works. In order to be able to reach the device via the SSH terminal, a second IP address must be assigned to the client computer. To do this, proceed as follows under Windows, by pressing the keys, Win+R for Run.

Enter ncpa.cpl and click OK

Enter ncpa.cpl and click OK

The Control Panel Network Connections is opened; right-click on Properties above the active network adapter.

Control Panel Ethernet Properties

Mark the line Internetprotocol Version 4 (TCP/IPv4) and click on Properties.

Add alternate IP-Address

Enter an IP address in the Alternate Configuration tap, i.e. 192.168.1.2 and the subnet mask 255.255.255.0. Confirm the entry by clicking OK to activate the alternate IP address.

Add second IP address on Linux

Under Linux, a second IP address can be temporarily assigned to the network interface as root.

$ ifconfig eth0:0 192.168.1.2 netmask 255.255.255.0 up

With modern Linux distributions like Debian 10 (buster) or CentOS 7 and newer, it is this command line.

$ ip address add 192.168.1.2/24 dev eth0

macOS use ifconfig to add second IP-Address to interface en0.

$ sudo ifconfig en0 inet 192.168.1.2 netmask 255.255.255.0

The device can now be checked with ping and connected to 192.168.1.20 via SSH terminal.

$ ssh ubnt@192.168.1.20

Linux has SSH built in and can be used directly from shell. After the SSH connection to the device has been established, the procedure described above is carried out.

If a UniFi UAP is not accepted after try several attempts Adoption. Assign an alternate IP address to the host on which the UniFi controller is running, i.e. 192.168.1.100. The UAP that does not get an IP from the DHCP can be reached by the UniFi controller in order to be able to initiate provisioning. Cause the UAP can be reached by the controller via the IP address 192.168.1.20, that after execute restore-default. After the successful provisioning, the UAP is back in the original subnet.

unifi UAP advanced adoption

It is also possible to use the ADVANCED ADOPT option with click to the + on UAP they appers status MANAGED BY OTHER.