How to Create Launcher to Open Caja as Root on Linux Mate desktop
Here in this post I show a way on how to create a launcher run as root on Mate desktop running on a virtual machine, I logged in to virtual desktop over vnc viewer, since newer Linux distos no longer include the ability of gksu and gksudo.
Before we create the launcher, some preparations have to be made, to do this with run the command below:
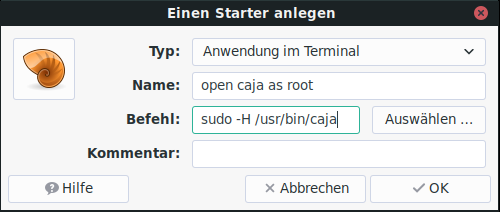
Now create a new launcher with right-click on your desktop.
Open the drop-down menu and choose application in terminal, then insert the command:
sudo -H /usr/bin/caja
into the command field, like see in the screenshot below.
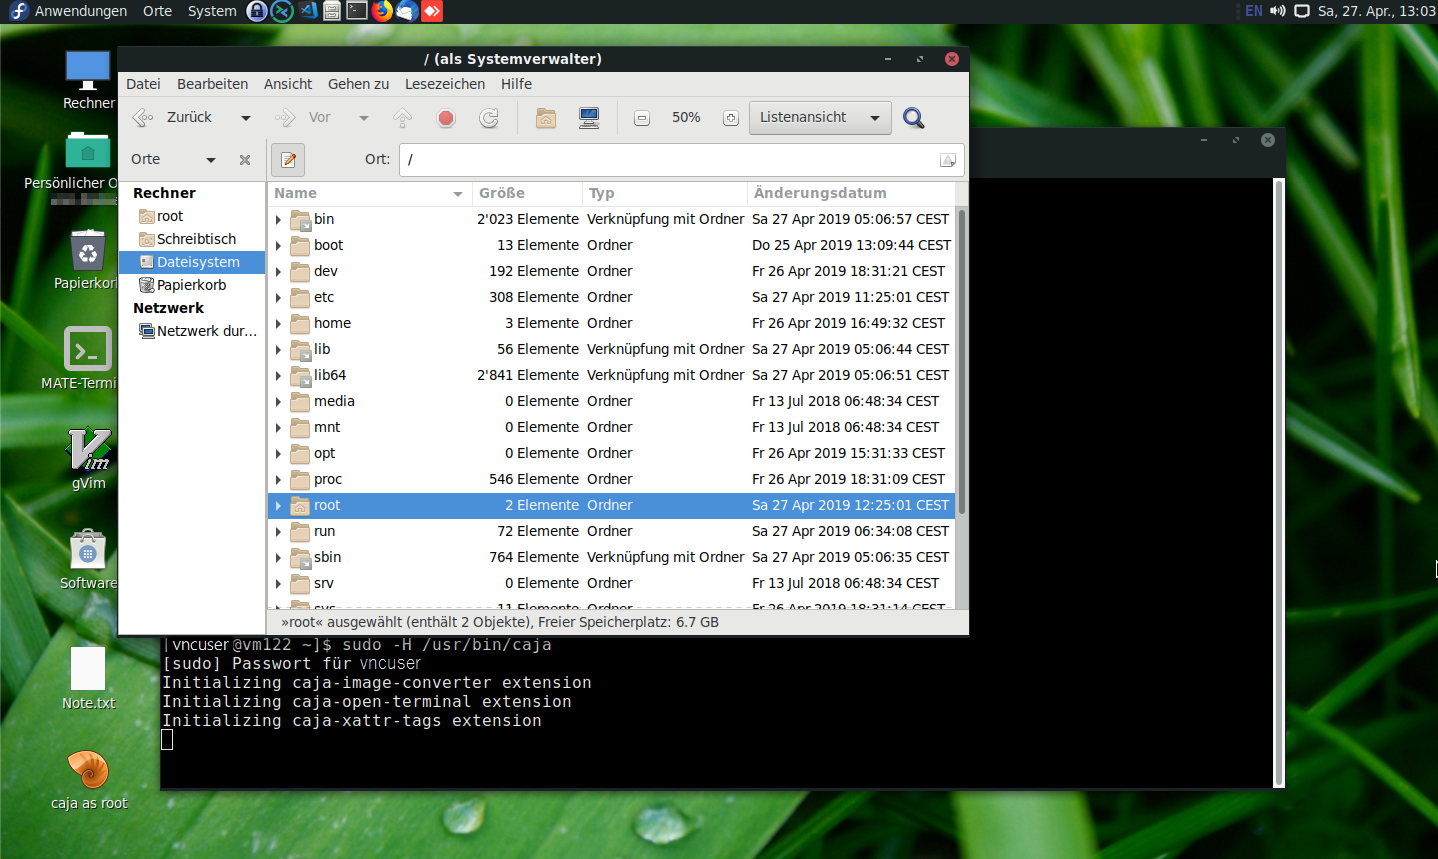
A double-click will open a terminal in here enter your password to gain root privileges able to run Caja as root.
Mate desktop with Matcha-sea theme on Fedora workstation 29
Be aware of what you are doing, your action may now result in irrevocable malfunction or destruction of the system.
The Caja file manage
Caja is the default file manager for the MATE Desktop Environment. It makes it easy to manage, manipulate, and customize files and directories. Caja can access local and remote filesystems such as SSH, FTP, and WebDav (HTTP/HTTPS).
Caja also provides the desktop background and the icons it uses for launching links and applications, as well as accessing files, directories, the trash, and removable media like CD/DVD/BD and USB drives.
Using Bash History Reverse Search to find and re-execute command
Bourne-again shell is a free Unix shell under the GPL. Bash remembers the commands you enter and saves them to a history file. It is the default shell for terminal environments of most Linux distributions, on macOS the default shell can be set to Bash, the Bourne-again shell is also available for Windows 10 and can be installed with the WSL features.
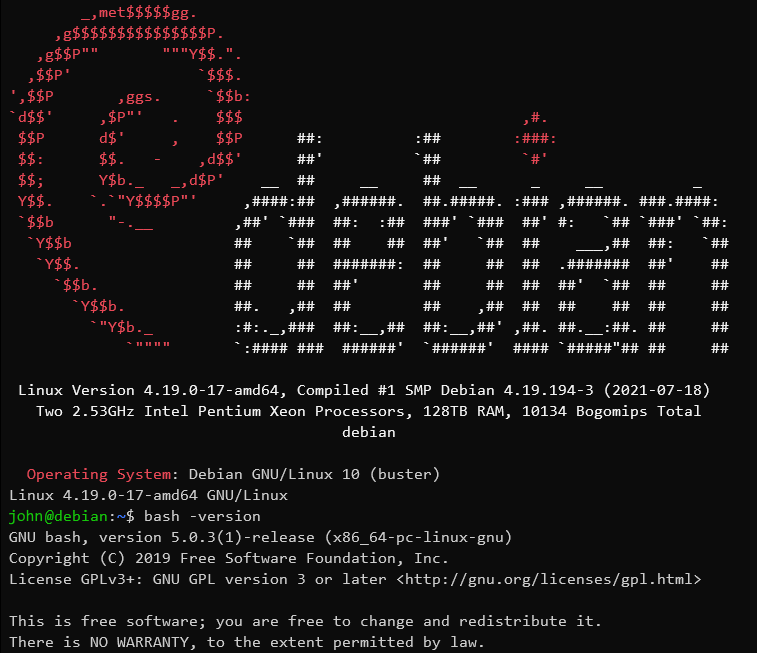
Bash the Bourne-again shell on Debian
Most will know it, with the arrow up key ↑ you can scroll through the bash history to run a previously executed command again.
Reverse Search Bash History for a Command
What many do not know, it can be searched for a certain command in the history, so with Ctrl+R the reverse search can be called, here you enter the characters you remember.
By repeatedly pressing Ctrl+R you scroll back step by step, to command lines that match to the search pattern in the history.
Ctrl+R: Search Bash History for a Command. Gets the last command that matches the characters you entered.
Ctrl+O: Run the found command, after Ctrl+R.
Ctrl+G: Exits history search mode without executing a command.
Bash History Common Scenario
A common scenario in which you find yourself is to enter part of a command and then find that you have run it before and could search the history for it.
The correct search method with what is already on the command line is to move the cursor to the beginning of the line with Ctrl+A to call the reverse history with Ctrl+R and to insert the current row into the search with Ctrl+Y and then search backwards again with Ctrl+R
Reviewing Previous Bash History
Each command is associated with a number for easy reference. The list of commands in the Bash history begins with an index number.
$ history
The command with the highest number is the last command executed.
495 vi /etc/bash.bashrc
496 cd /var/www/3w/dot/html/content
497 uname -promsvm
498 vi /etc/sysctl.conf
499 multitail -cS postfix /var/log/mail.log
500 multitail -cS apache /var/log/apache2/access.log
501 multitail -cS syslog /var/log/syslog
502 history
We can truncate the output by specifying a number after the command. For example, if we only want to see the last 5 commands entered, we can type the following.
$ history 5
Other possibilities are, for example, with forward to grep to filter the command history output.
$ history | grep hostname
365 hostname
369 hostnamectl status
484 hostnamectl set-hostname debian
486 cat /etc/hostname
516 history | grep hostname
Run Commands from Bash History
We can recall any of our previous command from history by its number preceded by an exclamation point (!). For instance, if the history looks like the above, we could run hostnamectl status quickly by typing !369.
This will immediately recall and execute the command associated with the history number 369.
We can also execute commands relative to our current position. We can do this by using the !-n syntax, where n is replaced by the number of commands ago we want to recall.
For instance, if we want to recall and execute a command that we typed before our most recent one, we could type !-5. So we will run again, our session might look like this.
$ !-5
hostname
debian
To re-execute the previous command, bash provides a shortcut that we can use. The shortcut is !! will re-execute the last recent command.
Delete Bash History
The command cleans up the history of the current user session.
$ history -c
Completely clear the saved bash history from the current user.
$ cat /dev/null > ~/.bash_history
The cat command clear the the content in file .bash_history of the currently logged on user.
Conclusion
This should now give a good idea of how the available follow-up operations can be used. Some of these will probably be more useful than others, but it’s good to know that bash has these skills in case you’re in a position where it would be helpful to dig them up.
Last but not least, the history command, the reverse search, and the simple history extensions should help speed up the workflow.
UNBLOG verwendet Cookies, um Dein Online-Erlebnis zu verbessern. Mit "ACCEPT" gibst Du Deine Zustimmung zur Nutzung dieser Website und unseren Datenschutzbestimmungen, oder wähle Cookie settings.
Diese Website verwendet Cookies, um Ihre Erfahrung zu verbessern, während Sie durch die Website navigieren. Von diesen werden die Cookies, die nach Bedarf kategorisiert werden, in Ihrem Browser gespeichert, da sie für das Funktionieren der grundlegenden Funktionen der Website wesentlich sind. Wir verwenden auch Cookies von Drittanbietern, mit denen wir analysieren und verstehen können, wie Sie diese Website nutzen. Diese Cookies werden nur mit Ihrer Zustimmung in Ihrem Browser gespeichert. Sie haben auch die Möglichkeit, diese Cookies zu deaktivieren. Das Deaktivieren einiger dieser Cookies kann sich jedoch auf Ihre Browser-Erfahrung auswirken.
Notwendige Cookies sind unbedingt erforderlich, damit die Website ordnungsgemäß funktioniert. Diese Kategorie enthält nur Cookies, die grundlegende Funktionen und Sicherheitsmerkmale der Website gewährleisten. Diese Cookies speichern keine persönlichen Informationen.
Alle Cookies, die für die Funktion der Website möglicherweise nicht besonders erforderlich sind und speziell zur Erfassung personenbezogener Daten des Benutzers über Analysen, Anzeigen und andere eingebettete Inhalte verwendet werden, werden als nicht erforderliche Cookies bezeichnet. Es ist obligatorisch, die Zustimmung des Benutzers einzuholen, bevor diese Cookies auf Ihrer Website ausgeführt werden.