
osTicket is a open-source helpdesk ticket system written in PHP and running like a CMS on LAMP stack we install here on debian 11. It comes with a simple and intuitive web UI used to manage, organize, track and archive all support ticket requests in company and organisations.
Tutorial: How to Install osTicket on Debian 11
In this tutorial, we will show you how to install osTicket on Debian 11
Requirements
- For install osTicket in this tutorial will be using a Debian 11.
- SSH root access or a user with sudo privileges is also required.
- PHP version 8.1
Step 1. Log in via SSH and perform system update
Log in to your Debian 11 Server through SSH as a root user:
$ ssh root@ip_address_or_hostnameFirst run the following command to update all installed packages to the latest available version.
$ sudo apt update && sudo apt -y upgradeStep 2: Install Apache Webserver
Before install osTicket the Apache webserver must be deployed, from now on you are logged in as root, or use sudo for elevated privileges:
$ apt -y install apache2Now start the Apache webserver and check it to auto-start on server boot, execute these commands:
$ systemctl start apache2
$ systemctl is-enabled apache2
If the Apache webserver is not enabled for auto-start at boot, do this.
$ systemctl enable apache2Step 3: Install osTicket PHP 8 and extensions
When this tutorial was written the latest release is osTicket 1.18 they requires PHP 8.1. PHP 8 packages are not available in the default Debian 11 package repositories.
So, to install PHP 8.1 first we have to enable SURY PHP PPA repository, which contains all the released versions of PHP to date.
Download the GPG key and add the required repository through the following commands:
$ apt -y install lsb-release apt-transport-https ca-certificates gnupg2
$ wget -qO - https://packages.sury.org/php/apt.gpg | apt-key add -
$ echo "deb https://packages.sury.org/php/ $(lsb_release -sc) main" | tee /etc/apt/sources.list.d/php.list
Once the SURY repository is added, you need to update the repository:
$ apt-get updateTo install PHP 8.1 and the required PHP extensions, run this command:
$ apt -y install php8.1 php8.1-cli php8.1-common php8.1-curl php8.1-mbstring php8.1-gd php8.1-mysql php8.1-xml php8.1-imap php8.1-intl php8.1-apcu php8.1-cgi php8.1-zipStep 4: Install MariaDB
MariaDB is available in the Debian 11 default OS repository. You can install it by running the following command:
$ apt -y install mariadb-serverOnce the installation is complete, perform the following command to secure your installation. This is optional, but strongly recommended:
$ mariadb_secure_installationThis script will set the MariaDB root password, disable remote root login and remove anonymous users. We suggest answering every question with the character ‘Y’ for yes.
Step 5: Create a Database for osTicket
Log in to MySQL to deploy the osTicket database:
$ mysql -u root -pCreate a MySQL database for osTicket by running the following command:
MariaDB [(none)]> CREATE DATABASE osticket;
MariaDB [(none)]> GRANT ALL PRIVILEGES ON osticket.* TO 'ostiuser'@'localhost' IDENTIFIED BY 'Passw0rd!';
MariaDB [(none)]> FLUSH PRIVILEGES;
MariaDB [(none)]> EXIT;
Note. replace Passw0rd! with an actual strong password.
Step 6: Install osTicket on Debian 11
Download the latest stable version from the official source by executing the following command on your server:
$ wget https://github.com/osTicket/osTicket/releases/download/v1.18/osTicket-v1.18.zipThen create a osticket directory by unzip it to/var/www/osticket
$ unzip osTicket-v1.18.zip -d /var/www/osticketCreate an osTicket configuration file, by copying the example config file:
$ cp /var/www/osticket/upload/include/ost-sampleconfig.php /var/www/osticket/upload/include/ost-config.phpThen run the following command to set the correct permissions:
$ chown -R www-data:www-data /var/www/osticket/
$ find /var/www/osticket/ -type f -print0 | xargs -0 chmod 0644
$ find /var/www/osticket/ -type d -print0 | xargs -0 chmod 0755
Step 7: Create new Apache configuration file
Create a new Apache configuration file for osTicket:
$ vi /etc/apache2/sites-available/osticket.confNote. if you are not familiar with vim, then simply choose your favorite editor, may you use nano or emacs!
A basic Apache configuration file looks similar to this:
<VirtualHost *:80>
     ServerAdmin admin@domain.com
     DocumentRoot "/var/www/osticket/upload"
     ServerName domain.com
     ServerAlias www.domain.com

     <Directory "/var/www/osticket/upload">
         Require all granted
         Options Indexes FollowSymlinks
         AllowOverride All
         Order allow,deny
         allow from all
     </Directory>

     ErrorLog ${APACHE_LOG_DIR}/osticket_error.log
     CustomLog ${APACHE_LOG_DIR}/osticket_access.log combined
</VirtualHost>
Note. after copy-paste this lines change the domain name next to ServerAdmin and ServerName (domain.com) along with ServerAlias in order to make it work with your unique registered domain name.
Save and close the file then activate the osTicket virtual host with the following command:
$ a2ensite osticket.conf
$ systemctl reload apache2
Now you able to open http://domain.com in your favorite web browser in order to complete the osTicket installation:
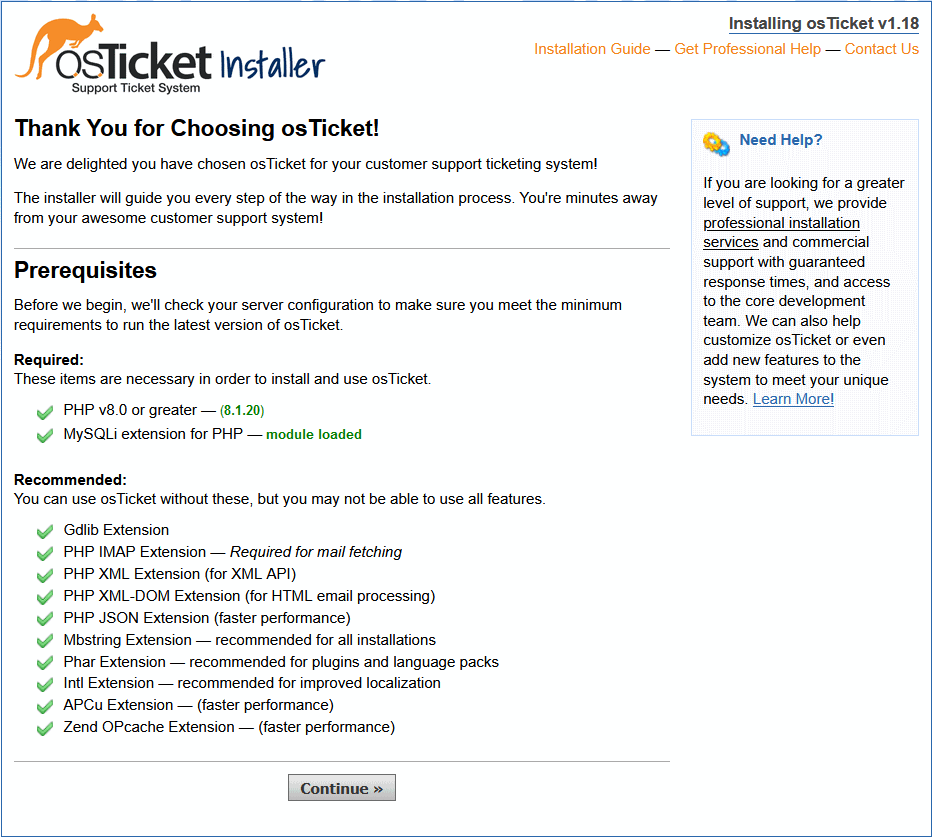
Confirm that all requirements are satisfied and click Continue.
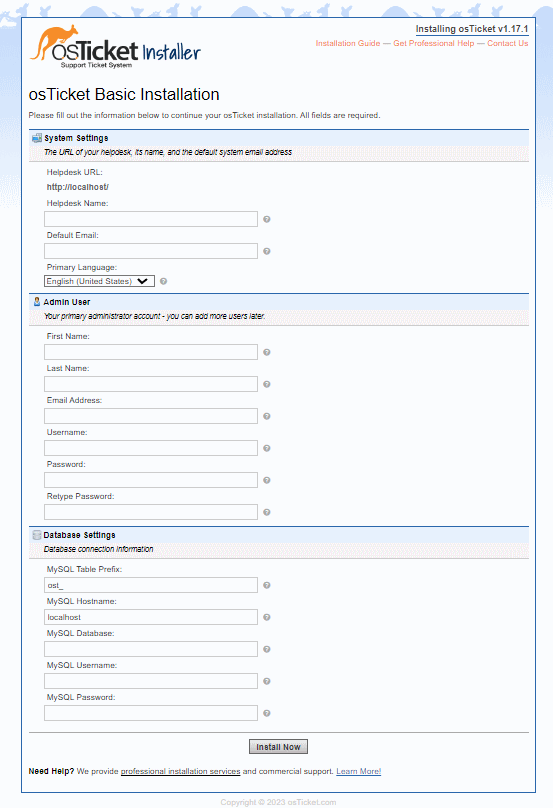
The next step is to add the base system configuration by entering the values you made earlier and click the “Install Now” button:
On installation has been completed successfully, you will get the osTicket installer Congratulations page:
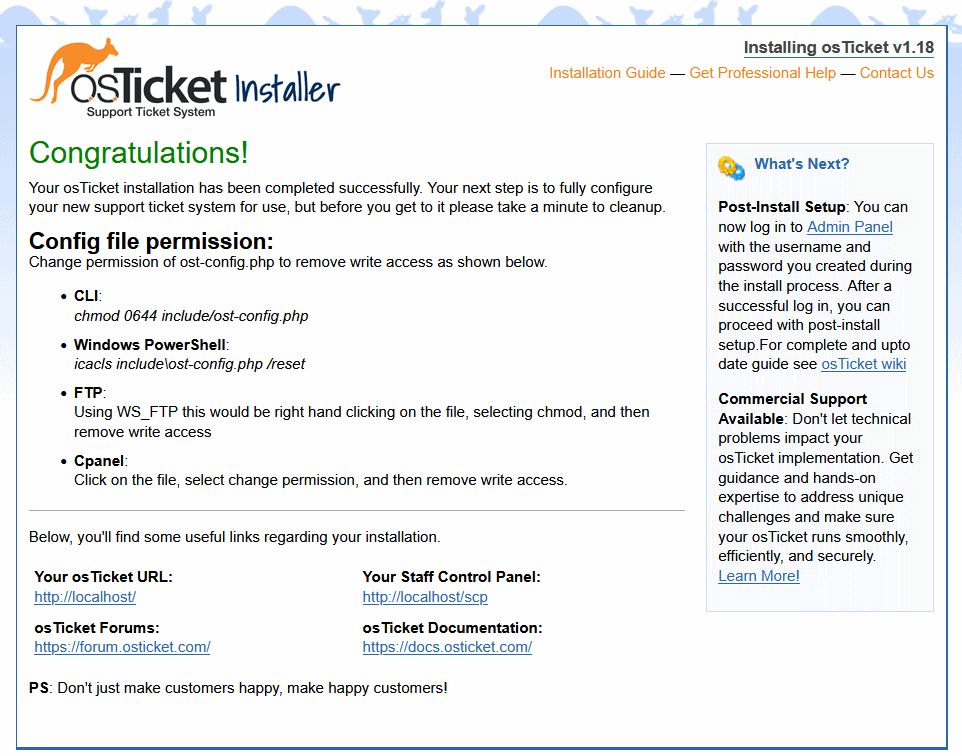
Finaly change the permission of ost-config.php to remove write access:
$ chmod 0644 /var/www/osticket/upload/include/ost-config.phpAlso, remove the setup directory:
$ rm -rf /var/www/osticket/upload/setup/Finish! osTicket has been successfully installed on your Debian 11 server.


