extend sudo password timeout

How to extend sudo password timeout

System administrators also authenticate as normal users and use sudo when administrative tasks are performed. The first time sudo run they asks for the password, after which sudo is active for a limited time.

The default password timeout is 15 minutes. Therefore, if sudo is run again within 15 minutes (900 seconds), the prompt to re-enter the password will not occur.

Extend sudoers timestamp timeout

The timestamp_timeout defines the number of minutes that elapse before sudo should ask for the password again. Edit the /etc/sudoers file to change the timestamp_timeout.

I recommend using command visudo to edit the /etc/sudoers file. Add the value timestamp_timeout on the line after “Defaults”, in the /etc/sudoers file.

$ sudo su

A grep shows the searched lines.

$ grep Defaults /etc/sudoers

here a sudoers at Linux Mint.

extend sudo Password Timeout

The default setting is “Defaults env_reset”.

$ sudo visudo 

Extend sudo password timeout

Edit sudoers so that the Defaults line looks like this:

Defaults    env_reset,timestamp_timeout=-0

timestamp_timeout=-1 (minus one) causes the sudo password to never expire.

  For Debian/Ubuntu distributions, the -0 option did not work. A higher value e.g. 60 is accepted.

timestamp_timeout=0 (zero) causes the sudo password to expire every 0 (zero) seconds. This means that each time sudo is called, the password is asked.

 Conclusion

This post shows how to administrators also authenticate as normal users and use sudo when administrative tasks are performed. The first time sudo run they asks for the password, after which sudo is active for a limited time. This article shows how the time for the active session can be extended.

How to Creating ESXi Scratch Partition

Creating ESXi Scratch Partition: Size of scratch partition <UUID> is too small. Recommended scratch partition size is 4096 MB

If this message is found in the Event Viewer of an ESXi host, a scratch partition should be created.

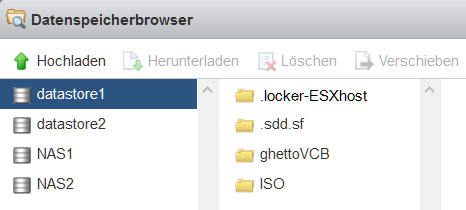
To creating ESXi Scratch Partition, open the vSphere Web Client to create a directory.Loose ESXhost. Go to Storage and open the Browse context menu above the desired datastore, or click Datastore Browser.

Creating ESXi Scratch Partition
Data Storage Browser – Create Scratch Directory

Then in the vSphere Web Client you navigate to:

Management > System > Advanced Settings

and enter the search term on the right side of the search box:
ScratchConfig.ConfiguredScratchLocation . Then click on Option Edit and add the path to the previously created directory.

Creating ESXi Scratch Partition. vSphere Management > System > Advanced Settings
vSphere – ScratchConfig.ConfiguredScratchLocation

By clicking on Create directory, for example, the Vereichnis .locker-ESXHost is created for the scratch partition.

Creating a scratch partition in the ESX shell

A scratch directory can also be created via the ESXi Shell Console, for example by opening an SSH terminal with KiTTY and creating a scratch directory via CLI.

mkdir /vmfs/volumes/5b2fb100-bbe22f82-fe22-ececc8968f68/.locker-ESXHost

  The path to the scratch directory must be specified with the UUID, here as an example /vmfs/volumes/datastore1 is the path /vmfs/volumes/5b2fb100-bbe22f82-fe22-ececc8968f68/.locker-ESXHost. The point at the beginning means that it is a hidden forgiveness, as is usual with unixoid systems.