Tag Archives: Synology DiskStation RackStation

Synology Inc. is a Taiwanese corporation that specializes in network-attached storage (NAS) appliances. Synology’s line of NAS is known as the DiskStation for desktop models, and RackStation for rack-mount models. Synology’s products are distributed worldwide and localized in several languages.

How to SSH Tunnel Reverse Port forwarding

How to build VPN Tunnel using SSH Port Forwarding

Linux has build in SSH from the start, Apple has also integrated Secure Shell into macOS, Microsoft provide OpenSSH on Windows 10 from 1803 and Server 2019 as an optional feature. There are also SSH Tunnels and SSH port forwarding known from tools like PuTTY and KiTTY. So why use SSH only as Terminal (TTY), as VPN Tunnel there are useful opportunities too, for example, VPN is not able because firewall is not capable, or additional software cannot be installed in corporate networks, because the required authorization is not given. An SSH Reverse Tunnel is always useful for devices they are not reachable behind the firewall.

How to use SSH as a VPN Tunnel with port forwarding use OpenSSH on Linux, macOS and Windows

SSH Tunnel to Remote Host B

Here as an example, a tunnel is built from host A to host B, host B is a web server from which the intranet page is to be opened http://192.168.111.10 on Host A. The only requirement is that there is a NAT mapping via port 22 to host B on the firewall (NAT router) and that the SSH service is present on each host.

SSH Tunnel Reverse port forwarding to Remote Host B
Illustration: ssh tunnel host A to host B

Run the command in the Linux terminal on Host A as follows:

$ ssh -NT -L 80:192.168.111.10:80 cherry@172.17.16.15 -p 45680

On Host A, the web page can now be opened http://localhost. The SSH tunnel enable port forwarding for TCP port 80 on Host B from 192.168.111.10 to the localhost 127.0.0.1 on Host A, the external port is 45680. Just we log on to Host B with user cherry.

The parameters:
-L = Local port
-N = do not run a remote command
-p = External SSH port (NAT port on firewall)
-T = do not open a terminal

On Host B the SSH daemon must be configured and activated, in the configuration file /etc/ssh/sshd_config the following settings are required, for many Linux distributions this is default.

# Force SSH Protocol 2
Protocol 2
 
#Turn on Privileged Separation for security
UsePrivilegeSeparation yes
 
#Deny root login
PermitRootLogin no
 
#Do not allow empty passwords
PermitEmptyPasswords no
 
# installations will only check .ssh/authorized_keys
AuthorizedKeysFile      .ssh/authorized_keys
 
# Forward my X Sessions
X11Forwarding yes
X11DisplayOffset 10
 
# I hate Motd displays
PrintMotd no
 
# It's alliivee
TCPKeepAlive yes
 
#AllowTcpForwarding yes

  The lines commented out with hash mean they are default values, e.g. #AllowTcpForwarding is by default yes.

Hint! OpenSSH also available on Synology NAS, FreeNAS, FreePBX Distro, OpenWrt, Raspberry Pi (Raspbian) and now on Windows Servers.

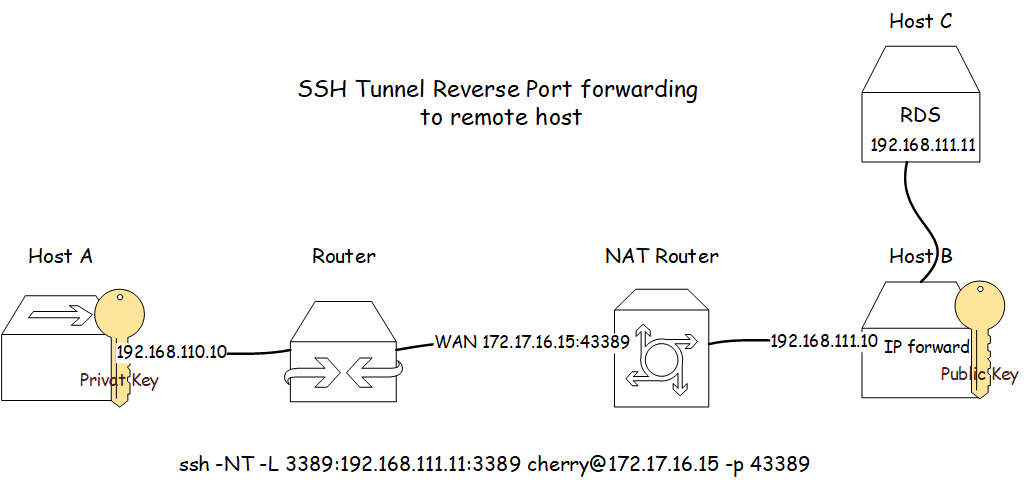
SSH Tunnel to Remote Host C

In this example, an SSH Tunnel is built from Host A to Host C, Host C is an RDS terminal server, Host B serves as a port forwarder.

example, SSH Tunnel Reverse port forwarding built from host A to host C
Illustration: ssh tunnel host A to host C

Run the command in the Linux terminal on Host A as follows:

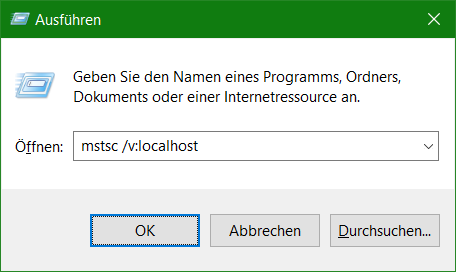
$ ssh -NT -L 3389:192.168.111.10:3389 cherry@172.17.16.15 -p 43389

The Remote Desktop session to Host C is built via localhost on Host A, by pressing the Win + R key opens Run, to confirm the input mstsc /v:localhost with OK.

Run mstsc

  This example uses the tcp port 3389 for RDP as both internal and external port. All unprivileged ports (-L) higher than 1024 can be used, if a port other than 3389 is used, then the port must be passed to RDP for execution, e.g. mstsc /v:localhost:44389

For Host B, the kernel must be enabled for IP forwarding, which is command for this in the shell as root:

$ net.ipv4.ip_forward = 1

Alternatively, echo in the Shell Console does the same thing:

$ echo 1 > /proc/sys/net/ipv4/ip_forward

Check the current IPv4 forward status as follows:

$ sysctl net.ipv4.ip_forward
net.ipv4.ip_forward = 1

The value 1 for activation, 0 applies deactivation. The change is not boot persistent, so that after the next start the IP forwarding is active again, edit using nano or sudo vi /etc/sysctl.conf

Controls IP packet forwarding
net.ipv4.ip_forward = 1

It is recommended to use an SSH key for authentication, a key pair can be created as follows:

$ ssh-keygen -f ~/.ssh/key_rsa -t rsa -b 4096

The public key ~/.ssh/key_rsa.pub is stored in the user’s home path, here in this example on Host B under the path in the file .ssh/authorized_keys.

  Authentication using SSH keys is not only more secure, there are other advantages, for example, the user is not asked to enter a password, also the SSH tunnel and other commands can be executed from a script.

SSH Tunnel on macOS

For Apple macOS, SSH is available after activation, open Terminal and run this command as follows:

$ sudo systemsetup -setremotelogin on

After that, the SSH Tunnel can be set up under macOS.

$ ssh -i ssh/key_rsa -NT -R 3389:192.168.111.11:3389 cherry@172.17.16.15 -p 43389

Remote Desktop for Mac Gateway on localhost is now registered and the RDP session can be opened, in this way terminal servers are protected and can only be reached via SSH.

macOS also offers the possibility for automation and uses launchd and the launch system services, the following script is created at: @/Library/LaunchDaemons/server.hostc.client.cherry.home.plist with the following content:

<plist version="1.0">
   <dict>
   <key>Label</key>
   <string>server.hostc.client.cherry.home</string>
   <key>ProgramArguments</key>
   <array>
	  <string>Ssh</string>
	  <string>-NTC</string>
	  <string>-o ServerAliveInterval=60</string>
	  <string>-o ExitOnForwardFailure=yes</string>
	  <string>-i</string>
	  <string>/Users/cherry/.ssh/key_rsa</string>
	  <string>-R 3389:192.168.111.11:3389</string>
	  <string>cherry@172.17.16.15</string>
          <string>-p 43389</string>
   </array>
   <key>Username</key>
   <string>Cherry</string>
   <key>RunatLoad</key>
   <true>
   <key>Keepalive</key>
   <true>
</true></true></dict>
</plist>

OpenSSH Server Installation from PowerShell

For Windows Server 2019, the OpenSSH server can also be deployed with elevated rights from the PowerShell opened as administrator.

PS C:\> Get-WindowsCapability -Online | ? name -like *OpenSSH.Server* | Add-WindowsCapability -Online
  Windows 10 OpenSSH client can be found in the settings, under Apps & Features – Optional Features – OpenSSH Client.

Docker Container with Synology DSM

How to use Docker with Synology

Synology DSM 6.0 or higher comes with the Docker Engine. You can find the Docker App in the package center by entering docker in the search field.

Docker is a lean virtualization application platform, thousands of containers created by developers from all over the world can be executed and are published on the well-known image repository, called Docker Hub. Container images can be find on Docker Hub will loaded and executed from Synology’s integrated Docker App.

synology_paket_center_docker

If the Docker App does not appear in the Package Center, the Synology device is most likely not supported.

Due to the hardware requirements, Docker is only offered for models with virtualization technology (VT-x). The models used in this guide are RS820RP+ / RS4018xs+ / DS218+ for these the Docker ability is given.

How to use Docker

When you open the main menu icon from DSM, you will find the icon for the Docker Engine, which can now be started.

Synology_DSM_Control_Panel

Docker opens in overview, the running containers are listed here, any applications including allocated memory and CPU resources, number of container has yet been started.

docker_overview
Synology DSM Docker overview

In addition, the Docker command line is explained below, this as a alternative hint for using Docker Console.

CLI Docker Command Running Container:

docker ps

In the Registration section you can search for new images (like on the official website). New repositories (in addition to the official ones) can also be added under Settings.

docker_registrering
Synology DSM Docker Registriering

CLI the original Docker Command is:

docker search ubuntu-sshd

After a suitable image has been found, in this case a small Ubuntu 18.04 Dockerized image contains SSH service, it is downloaded with a right click on the Synology NAS, ideally always choosing latest. All images are write-protected and can be used multiple times for other containers.

The download can take a few minutes, depending on the size and available download bandwidth. The download status is shown with an animated icon.

CLI Docker Command is:

docker pull rastasheep/ubuntu-sshd

The downloaded images that are available on the Synology NAS are located under Image. New containers can be started with the Docker wizard. Note Synlogy_Docker_Link link symbol opens the Docker Hub page for container with useful information.

docker_image
Synology DSM Docker Image

CLI Docker Command is:

docker images -a

Now go to Start will open the Assistent.

synology_docker_container
Abbildung: Synology DSM Docker Container Starten

Next to complete the wizard and start the container with klick Apply.

synology_container_erstellen
Synology DSM Docker create

CLI Docker Command is:

docker run -d -P --name ubuntu rastasheep/ubuntu-sshd

Running container can now be found in the Container section.

Synology_DSM_Docker_Container

CLI Docker full output as follows:

~# docker pull rastasheep/ubuntu-sshd
Using default tag: latest
latest: Pulling from rastasheep/ubuntu-sshd
a48c500ed24e: Pull complete
Digest: sha256:1a4010f95f6b3292f95fb26e442f85885d523f9a0bb82027b718df62fdd0d9e9
Status: Downloaded newer image for rastasheep/ubuntu-sshd:latest
~# docker run -d -P --name ubuntu rastasheep/ubuntu-sshd
2f96bba413755a843c2758f818dbec56f0e163a232e1cb7c7c971034c62a8c98

Back to Docker overview, we can now see the resources of started containers.

synology_docker_overview
Synology DSM Docker overview

CLI Docker Command is:

docker ps -a

Now we are trying to establish an SSH terminal to the container. To do this in the Container section, click on Details to see which port the SSH service is listening on.

Synology DSM Docker Conatainer
Synology DSM Docker Container

In the overview under port settings we find the value we are looking for under local port, in this case it is port 32789, the port address is assigned automatically.

CLI  Determine port address.

~# docker port ubuntu 22
0.0.0.0:32789

Now we open PuTTY or KiTTY and connect to IP of the Synology NAS with port 32789 to the container, for CLI Command as follows:

~# ssh -p 32789 root@10.127.52.77
The authenticity of host '[10.127.52.77]:32789 ([10.127.52.77]:32789)' can't be established.
ECDSA key fingerprint is SHA256:YtTfuoRRR4qStSVA5UuxnGamA/dvf+djbIT2Y48IYD0.
Are you sure you want to continue connecting (yes/no)? yes
Warning: Permanently added '[10.127.52.77]:32789' (ECDSA) to the list of known hosts.
root@10.127.52.77's password:
Last login: Thu Sep 19 15:00:25 2018 from 172.18.0.1
root@rastasheep-ubuntu-sshd1:~#

kitty_session
Abbildung: KiTTY Session

Logon as root with the password of root.

docker_terminal

The Docker Engine can also be used from the console, provided the SSH terminal that has been activated under DSM Control Panel – SSH Service.

Commands:
  attach      Attach local standard input, output, and error streams to a running container
  build       Build an image from a Dockerfile
  commit      Create a new image from a container's changes
  cp          Copy files/folders between a container and the local filesystem
  create      Create a new container
  diff        Inspect changes to files or directories on a container's filesystem
  events      Get real time events from the server
  exec        Run a command in a running container
  export      Export a container's filesystem as a tar archive
  history     Show the history of an image
  images      List images
  import      Import the contents from a tarball to create a filesystem image
  info        Display system-wide information
  inspect     Return low-level information on Docker objects
  kill        Kill one or more running containers
  load        Load an image from a tar archive or STDIN
  login       Log in to a Docker registry
  logout      Log out from a Docker registry
  logs        Fetch the logs of a container
  pause       Pause all processes within one or more containers
  port        List port mappings or a specific mapping for the container
  ps          List containers
  pull        Pull an image or a repository from a registry
  push        Push an image or a repository to a registry
  rename      Rename a container
  restart     Restart one or more containers
  rm          Remove one or more containers
  rmi         Remove one or more images
  run         Run a command in a new container
  save        Save one or more images to a tar archive (streamed to STDOUT by default)
  search      Search the Docker Hub for images
  start       Start one or more stopped containers
  stats       Display a live stream of container(s) resource usage statistics
  stop        Stop one or more running containers
  tag         Create a tag TARGET_IMAGE that refers to SOURCE_IMAGE
  top         Display the running processes of a container
  unpause     Unpause all processes within one or more containers
  update      Update configuration of one or more containers
  version     Show the Docker version information
  wait        Block until one or more containers stop, then print their exit codes

Run 'docker COMMAND --help' for more information on a command.

The Docker application shown in this article is intended to show as a simple example how Docker can be used on a Synology NAS, of course there are more useful container applications, such as Websever for developing web applications to complete development environments, there are already countless Docker images on Docker Hub https://hub.docker.com, and other Docker registrars. It makes you wonder whether the effort to install your development environment such as Xamp or LAMP is still useful. At this point it should be mentioned that all data stored in the container must be saved on a persistent volume, because all work is lost when the container is closed.

There are also other articles about using Docker here in this blog, the best thing to do is to simply enter docker in the search field above.