Tutorial: Let’s Encrypt Certbot auf CentOS 7 für Apache 2.4
Let’s Encrypt ist eine Zertifizierungsstelle, die kostenlose X.509-Zertifikate für Transport Layer Security (TLS) anbietet. In diesem Tutorial wird gezeigt, wie man Let´s Encrypt SSL anhand des ACME Vorgang mit certbot durchführt, und Let’s Encrypt auf einem CentOS 7 Host mit Apache 2.4 Webserver implementiert.
Vorausgesetzt wird hier, das der Apache-Webserver bereits installiert ist, die Domain als Apache VirtualHost konfiguriert ist, und die Domain im DNS auflösbar ist, mit einem A-Record in der Forward-Zone dieser Domain, oder für IPv6 ein Quad-A-Record für den Server eingetragen ist. Weiter muss für das ACME Challenge der Server über Port 80 erreichbar sein.
Zur installation auf dem CentOS host sind wir root.
$ su -
Password:
Last login: Tue Jan 15 06:25:52 CET 2019 on pts/0
Nach EPEL Repository hinzufügen wird Certbot für Apache installiert.
# yum -y install epel-release
# yum -y install mod_ssl python-certbot-apache
Nun den Apache-Webserver neu starten.
# systemctl restart httpdDie Firewall für die Service Port 80 und 443 öffnen.
# firewall-cmd --add-service=http
# firewall-cmd --add-service=https
# firewall-cmd --runtime-to-permanent
# firewall-cmd --reload
Jetzt durch den certbot das SSL-Zertifikat generieren lassen.
# certbot --apache -d mydomain.com -d www.mydomain.comDie erste Domäne sollte die Basis Domain sein. In diesem Beispiel heißt sie mydomain.com, diese durch den tatsächlichen Domain-Name ersetzen.
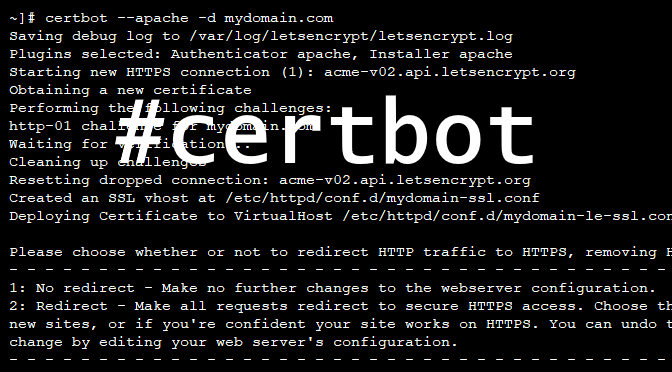
Die Ausgabe des certbot sieht in etwa wie folgt aus.
# certbot --apache -d mydomain.com -d www.mydomain.com
Saving debug log to /var/log/letsencrypt/letsencrypt.log
Plugins selected: Authenticator apache, Installer apache
Starting new HTTPS connection (1): acme-v02.api.letsencrypt.org
Obtaining a new certificate
Performing the following challenges:
http-01 challenge for mydomain.com
Waiting for verification...
Cleaning up challenges
Resetting dropped connection: acme-v02.api.letsencrypt.org
Created an SSL vhost at /etc/httpd/conf.d/mydomain-ssl.conf
Deploying Certificate to VirtualHost /etc/httpd/conf.d/mydomain-le-ssl.conf

Please choose whether or not to redirect HTTP traffic to HTTPS, removing HTTP access.
- - - - - - - - - - - - - - - - - - - - - - - - - - - - - - - - - - - - - - - -
1: No redirect - Make no further changes to the webserver configuration.
2: Redirect - Make all requests redirect to secure HTTPS access. Choose this for
new sites, or if you're confident your site works on HTTPS. You can undo this
change by editing your web server's configuration.
- - - - - - - - - - - - - - - - - - - - - - - - - - - - - - - - - - - - - - - -
Select the appropriate number [1-2] then [enter] (press 'c' to cancel): 2
Redirecting vhost in /etc/httpd/conf.d/mydomain.conf to ssl vhost in /etc/httpd/conf.d/mydomain-ssl.conf

- - - - - - - - - - - - - - - - - - - - - - - - - - - - - - - - - - - - - - - -
Congratulations! You have successfully enabled https://mydomain.com

You should test your configuration at:
https://www.ssllabs.com/ssltest/analyze.html?d=mydomain.com
- - - - - - - - - - - - - - - - - - - - - - - - - - - - - - - - - - - - - - - -

IMPORTANT NOTES:
 - Congratulations! Your certificate and chain have been saved at:
   /etc/letsencrypt/live/mydomain.com/fullchain.pem
   Your key file has been saved at:
   /etc/letsencrypt/live/mydomain.com/privkey.pem
   Your cert will expire on 2019-04-14. To obtain a new or tweaked
   version of this certificate in the future, simply run certbot again
   with the "certonly" option. To non-interactively renew *all* of
   your certificates, run "certbot renew"
 - If you like Certbot, please consider supporting our work by:

   Donating to ISRG / Let's Encrypt:   https://letsencrypt.org/donate
   Donating to EFF:                    https://eff.org/donate-le
Abschließend kann die URL getestet werden.
$ curl -k https://mydomain.comDie URL im Browser abrufen und bei SSL Labs verifizieren.
https://www.ssllabs.com/ssltest/analyze.html?d=mydomain.com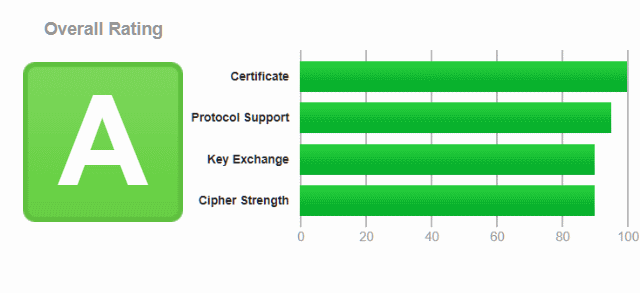
Das Let’s Encrypt Zertifikat ist 90 Tage gültig.