Archiv der Kategorie: Linux Howto

THINK UNBLOG GNU/Linux Tutorials Howto Workaround DevOps Code.

iptables mit DDNS Adressen

iptables chain mit DDNS Adressen

Die Linux Kernel Firewall iptables unterstützt keine FQDN und DDNS Namen in den Ketten, deshalb habe ich hierfür ein einfaches Script erstellt, dieses ein DDNS A Record auflöst und die IPv4 Adresse in die Kette als append chain einfügt.

#!/bin/sh
iptables="/etc/sysconfig/iptables"
sed -i '/#DDNSIP/d' $iptables
lookup="$(grep -i "#MyDDNS" $iptables)"
select=( $lookup )
ddns="${select[2]}"
echo $select $ddns
ip="$(host $ddns)"
if [ "$ip" == "${ip%% has address *}" ]; then
continue;
fi
ip="${ip##* has address }"
sed -i 's/^\('"$lookup"'\)$/\1\n-A RH-Firewall-1-INPUT -i eth0 -p udp -m udp -s '"$ip"' -m comment --comment #DDNSIP -j ACCEPT/' $iptables
service iptables restart

Dieses Shell Skript ist auf einem CentOS geschrieben, ist aber mit kleinen Änderungen auf anderen Linux distributionen einsetzbar, bei Zeile 3 wird der entsprechende Pfad zu iptables angepasst, z.B. für Debian /etc/defaut.

Das Commad host ist Teil der BIND-Dienstprogramme, sodass diese installiert sein müssen. Dazu führt man folgende yum Installation auf der Console aus, um die BIND-Dienstprogramme zu installieren:

sudo yum -y install bind-utils

Es wird eine Zeile mit dem DDNS-Hostnamen in die Konfigurationsdatei iptables eingetragen, der Tag #MyDDNS dient als Marke und muss in der Konfigurationsdatei iptables eingetragen werden:

#Allow from myhost.dyndns.org #MyDDNS
-A RH-Firewall-1-INPUT -i eth0 -p udp -m udp -s 123.456.789.101 -m comment --comment #DDNSIP -j ACCEPT

Die Kette wird mit Parameter -A (Append) automatisch bei der ersten ausführung angehängt. Nicht zu vergessen ist, das Script ausführbar machen:

chmod +x /usr/bin/allow_myhost.sh

Die Quellen IP-Adresse wird automatisch alle 15 Minuten aufgelöst. Die iptables-Kette erlaubt das UDP Protokoll, dieses beispielsweise einem IP-Telefon ermöglicht mit der PBX zu kommunizieren. Die Regel kann beliebig angepasst werden, wobei die Kommentar option –comment vorhanden sein muss.

Für die kontinuierliche Aktualisierung erstellt man ein Cron-Job:

*/15 * * * * root /usr/bin/allow_myhost.sh >/dev/null 2>&1

Dieser Beitrag ist auch auf gist donkey/allow_myhost.md

Amerkung

iptables ist ein Userspace-Programm zur Konfiguration der Tabellen (tables), die durch die Firewall im Linux-Kernel (bestehend aus einer Reihe von Netfilter-Modulen) bereitgestellt werden. Diese Tabellen enthalten Ketten (chains) und Regeln (rules). Verschiedene Programme werden gegenwärtig für unterschiedliche Protokolle verwendet; iptables beschränkt sich auf IPv4, für IPv6 gibt es ip6tables, für ARP ist es arptables, und mit ebtables gibt es eine Sonderkomponente für Ethernet-Frames.

Da iptables erweiterte Systemprivilegien benötigt, muss es als root ausgeführt werden. Auf den meisten Linux-Systemen ist iptables als /usr/sbin/iptables installiert. Dokumentation ist in den Manpages mittels man iptables einsehbar, sofern installiert.

Der Begriff iptables wird auch oft verwendet, um ausschließlich die Kernel-Komponenten zu beschreiben. x_tables ist der Name des Kernelmoduls, der den gemeinsamen Code aller vier Module (v4, v6, arp und eb) trägt, und das API für iptables-Erweiterungen bereitstellt. Folglich ist mit Xtables oft die gesamte Firewall-Infrastruktur gemeint.

Linux Splash Screen mit Linuxlogo

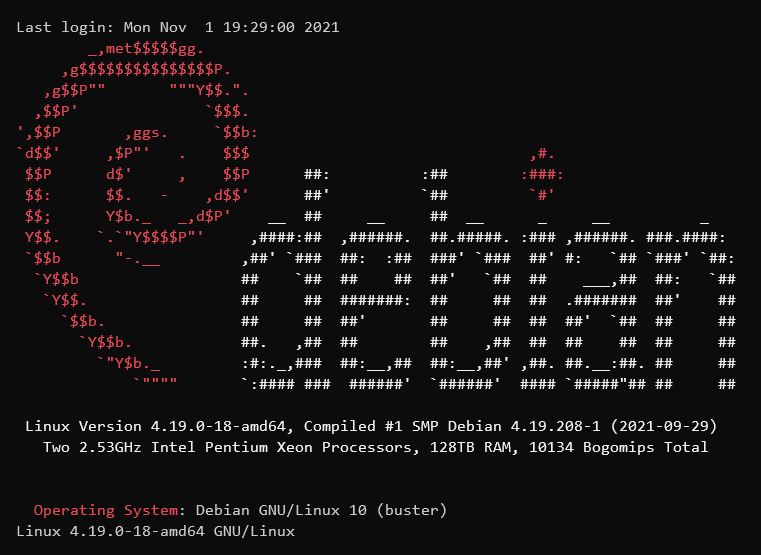
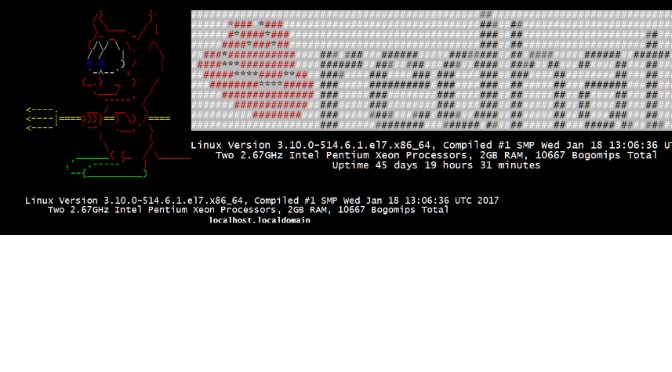
Linuxlogo ist ein Linux-Befehlszeilenprogramm, das ein farbiges ANSI-Bild des Distributionslogos als Splash Screen mit den wichtigsten Systeminformationen erzeugt.

Linuxlogo Splash Screen im Terminal erzeugen

Hierbei bietet sich die Datei issue.net oder motd auf sinnvolle weise an, ein Splash Screen des Host auszugeben, motd steht für message of the day. Diese Dateien, welche vom Login-Prozess genutzt werden, befinden sich unter dem Konfigurationsverzeichnis /etc und geben nach einem erfolgreichem Login – aber noch vor dem Start der jeweiligen Login-Shell eine Meldung aus.

linuxlogo ;hostnamectl status

Linuxlogo Installation

# redhat CentOS
$ sudo yum -y install linux_logo
# Debian Ubuntu
$ sudo apt-get -y install linuxlogo
# Fedora
$ sudo dnf -y install linux_logo

Die Autostart Konfiguration rc.local erzeugt beim Boot-Prozess die nötigen Einträge, für den Konsole Login mit der Datei issue und den Remote Login issue.net.

$ sudo vi /etc/rc.d/rc.local
# Debian & Ubuntu
$ sudo vi /etc/rc.local
if [ -f /usr/bin/linux_logo ]; then
     echo "" > /etc/issue
     /usr/bin/linux_logo -L debian_banner -u >> /etc/issue
     echo >> /etc/issue
fi
if [ -f /usr/bin/linux_logo ]; then
     echo "" > /etc/issue.net
     /usr/bin/linux_logo -L debian_banner -a -u >> /etc/issue.net
     echo >> /etc/issue.net
fi

Der Aufruf unter Debian und Ubuntu ist wie folgt:

$ /usr/bin/linuxlogo -L debian_banner_2 -u

rc.local muss ausführbar sein.

$ sudo chmod +x /etc/rc.d/rc.local

Damit der Splash Screen bei Remote Login im SSH-Terminal erscheint, muss man den Banner des SSH Daemon aktivieren.

$ sudo vi /etc/ssh/sshd_config

Die Zeile (ca. 108) das hash (#) entfernen und issue.net hinzufügen.

# no default banner path
Banner /etc/issue.net

Die Änderung wird wirksam mit neustart des SSH Daemon.

# CentOS 7
$ sudo systemctl restart sshd
# CentOS 6
$ sudo service sshd restart

Wo aus rechtlichen Gründen ein Hinweis vor unautorisiertem Zugriff zur Konsole warnen soll, kann die Datei /etc/motd folgende Ausgabe erzeugen:

$ sudo vi /etc/motd
##############################################################################
#             Unauthorized access to this system is prohibited !             #
#                                  ******                                    #
#    This system is actively monitored and all connections may be logged.    #
#         By accessing this system, you consent to this monitoring.          #
##############################################################################

Auch bietet sich an, den Splash Screen mit Linux Logo aus der ~/.bashrc auszugeben, hier ein Beispiel für die Systemweite bash Konfiguration der redhat Distribution.

$ sudo vi /etc/bashrc

Die Zeile am Ende der Datei ~/.bashrc einfügen.

if [ -f /usr/bin/linux_logo ]; then linux_logo -L redhat -u; fi

Erweitern lässt sich linuxlogo etwa mit folgender Zeile ~/.bashrc

if [ -f /usr/bin/linuxlogo ]; then linuxlogo ;hostnamectl status | grep "Operating System";fi
uname -sor

Linux Logo Parameter

Distributionen:

/usr/bin/linux_logo -L list

Available Built-in Logos:
        Num     Type    Ascii   Name            Description
        1       Banner  Yes     bsd_banner      FreeBSD Logo
        2       Classic Yes     irix            Irix Logo
        3       Classic Yes     bsd             FreeBSD Logo
        4       Banner  Yes     solaris         The Default Banner Logos
        5       Classic Yes     aix             AIX Logo
        6       Classic Yes     classic         The Default Classic Logo
        7       Banner  Yes     debian_banner   Debian Banner (white)
        8       Banner  Yes     mandrake_banner Mandrake(TM) Linux Banner
        9       Banner  Yes     pld             PLD Linux banner
        10      Banner  Yes     suse            SUSE Logo
        11      Banner  Yes     sourcemage_ban  Source Mage GNU/Linux banner
        12      Classic Yes     gnu_linux       Classic GNU/Linux
        13      Classic Yes     core            Core Linux Logo
        14      Classic Yes     debian          Debian Swirl Logos
        15      Banner  Yes     slackware       Slackware Logo
        16      Banner  Yes     mandriva        Mandriva(TM) Linux Banner
        17      Banner  Yes     redhat          RedHat Banner (white)
        18      Banner  Yes     ubuntu          Ubuntu Logo
        19      Classic Yes     debian_old      Debian Old Penguin Logos
        20      Banner  Yes     sme             SME Server Banner Logo
        21      Banner  Yes     sourcemage      Source Mage GNU/Linux large
        22      Banner  Yes     mandrake        Mandrakelinux(TM) Banner
        23      Banner  Yes     banner          The Default Banner Logo
        24      Classic Yes     classic-simp    Classic No Dots Or Letters
        25      Classic Yes     classic-nodots  The Classic Logo, No Periods
        26      Banner  Yes     banner-simp     Simplified Banner Logo

Do "linux_logo -L num" where num is from above to get the appropriate logo.
Remember to also use -a to get ascii version.

Linux Logo Help Screen

/usr/bin/linux_logo -h

Linux Logo Version 5.11 using libsysinfo 0.2.1
        by Vince Weaver <vince@deater.net>
   Newest Versions at:
      https://www.deater.net/weave/vmwprod/linux_logo
      https://metalab.unc.edu/pub/Linux/logos/penguins

Usage:   /usr/bin/linux_logo [-a] [-b] [-c] [-d] [-D file] [-e file] [-f] [-g]
                    [-h] [-i] [-k] [-l] [-n] [-o num] [-p] [-s] [-t str] [-u] [-v]
                    [-w Num] [-x] [-y] [-F format] [-L num | NAME | list | random_xy]
         [-a]     -- Display an ascii-only Logo
         [-b]     -- Display a Banner Logo!
         [-c]     -- Display a "Classic" type logo
         [-d]     -- disable "prettying" of output
         [-D file]-- use custom logo from "file"
         [-e file]-- Use "file" instead of /proc/cpuinfo [for debugging]
         [-f]     -- force the screen clear before drawing
         [-F format] Format output.  See README.
      B  [-g]     -- give system info only
         [-h]     -- this help screen
         [-i]     -- ignore ~/.linux_logo and /etc/linux_logo.conf
         [-k]     -- keep sysinfo flushed-left (non-centered)
      B  [-l]     -- display logo only
      C  [-o Num] -- offset output Num spaces to the right
         [-p]     -- preserve cursor location
         [-s]     -- skip Bogomips [speeds up on non-Linux platforms]
         [-t str] -- display user-supplied string
      *  [-u]     -- show uptime
         [-v]     -- version information
         [-w Num] -- set width of screen to Num [default 80]
      *  [-y]     -- show load average
         [-L num | NAME | list | random_xy] -- multiple Logo options.  See README

 B=Banner mode only, C=Classic Mode Only  *=Works Only in Linux
Bash